Still, I can live without knowing how to make perfect tofu, at least for now, because I do know how to make this.
Wilted greens, sriracha, fried egg.
olive oil
cabbage and chard/other greens
salt
sriracha sauce
egg (butter optional)
Shred the greens while you warm a little olive oil in a pan appropriate for egg frying. For me, this is a tiny 8-inch nonstick dude; I shredded a huge chunk of green cabbage and a few leaves of chard to fill it to bursting. A finer shred is better here. Add your greens to the pan, along with a pinch of salt. Stir it up and let it cook until the greens are reduced to about half their initial volume. You can also add a bit of water and slap the lid on for steamed greens.
Add sriracha to taste; if you add it nearer the beginning, it will get sweeter and some of the pepper oil will evaporate, but if you add it at the end, it will stay hot and pungent. You can also add some sesame seeds or slivered almonds, if you feel like it.
Make sure the sauce is well mixed in and the leaves are sufficiently wilted, then tip everything out into a bowl.
If the pan doesn't have enough residual oil to fry an egg, add a little bit of butter. Fry your egg, using the steam method. It's just like steaming greens: turn the heat to medium-high, add a little water, and slap the lid on. Leave it for a few minutes before you check the white for required levels of firmness. Since this method makes the heat suffuse the pan, you can get perfectly uniform, solid whites every single time. Knowing this method has totally transformed how I eat eggs. Not kidding.
Ok! When the egg is done, slide it immediately onto your greens. Break the yolk and mix the egg pieces with the greens. Wilted spicy cabbage coated with liquid yolk is one of the finest things.
Eat it all as hot and fast as possible. Do not wait. You remember this is an egg.
23 April 2010
21 April 2010
Breakfast in NYC
Oh, you thought it was going to be bagels? Well, that happens sometimes, but so does this:
Leftover Thai delivery. This one is my default basil/onion/tofu concoction, and after ten minutes in the toaster oven with rice and a little water, it's perfect. Occasional breakfast Thai is one of my favorite things about living in NYC, which is perhaps lame, but whatever. You know why breakfasts like this didn't happen in California? There was no available Thai delivery. How Silicon Valley gets away with that I don't know.
I really have to figure out how to cook tofu that is not just delicious initially but also on reheating. I mean, tofu is notoriously difficult to cook well, but I still manage to make palatable dinners. It's just that the leftovers are another story.
19 April 2010
Quinoa carrot carrot quinoa
I've had a container of quinoa sitting in the refrigerator for the past few days. In conjunction, I've eaten quinoa at last once a day for the past four days. Coincidence? Clearly not. Quinoa fried not-rice with mushroom and onion? Check. Quinoa in roasted pepper tacos? Check. Quinoa and baba ghanouj with a handful of baby carrots? Check.
Until now, I've usually used quinoa as a base for a big spoonful of curry or stir-fry. It hasn't been a component part of cooking, not least because I'm usually steaming it while making something else. With cooked quinoa on hand, ready to throw into whatever comes to mind, my array of recent food has become much more interesting. I think I'm going to have to make pancakes next. Pancakes with a handful of quinoa, yogurt, parsley, and a finely shredded carrot mixed into the batter.
Or I could make some more of this:
Black bean and carrot soup with quinoa
olive oil
red onion
carrots
cooked black beans/broth
additional veg broth/water
sage, thyme, salt, pepper
cooked quinoa
fresh parsley
hot sauce if you like it
This one is super easy. Warm a little olive oil in the bottom of a big soup pan. Chop up some red onion and soften it over medium heat. I used half a big red onion; other kinds of onion would be fine. Peel and chop a handful of carrots--I used four--and add them to the pan. Give the business a pinch of salt and a few shakes of thyme and sage, turn the heat up a little, and cook for another five minutes, shaking up the pan occasionally. You want the carrots to start to show a little browning and caramelization from the heat of the metal. At that point, add your beans. I probably used about a cup and a half of frozen beans and broth, plus a little water to bring up the liquid level. If you're using canned beans, drain the can and use some water or veg broth for the liquid instead. Anyway. Bring the business to a simmer, salt and pepper, and let cook for at least five or ten minutes, more if you feel like it.
When everything is completely tender, correct any seasonings and take the pan off the heat. You can either choose to eat is as-is or pulverize it with an immersion blender. Eat with quinoa and chopped parsley for earthy-crunchy deliciousness. I had mine with copious amounts of seventynine cent hot sauce, for ultimate awesome.
12 April 2010
The lonesome crowded dinner
On first glance, it doesn't seem like a dinner consisting primarily of steamed sweet potato and broccoli would be particularly spicy or filling. Wrong!
It is also cheap and easy. Not particularly fast, since a sweet potato never takes less than a half hour, but still.
Steamed sweet potato? Yes. You can definitely steam sweet potato. It doesn't get that oven-roasted caramelization, but that's ok.
Get a shallow pot of water boiling while you peel a sweet potato. Cut it into relatively large chunks. I cut mine in half down its length, then cut each half into inch-thick slices. Like that.
When the water is boiling, throw the potato chunks into a steamer basket/your preferred steaming implement. Make sure you leave some space exposed so the steam can get up to your potatoes easily! As long as you don't fill the steamer within a inch of its life, things should be ok.
Put the steamer basket over the pot, slap a lid on it, and let it steam until the potatoes are cooked through. This took about half an hour or forty minutes, but it'll take longer for bigger pieces of potato. Test them with a fork. If they are mashable: success!
Mash with butter/olive oil/whatever you like. I added a splash of maple syrup (real; not Aunt Jemima! GROSS!) and a big handful of sesame seeds. The seeds would've been even better if I tossed them in a frying pan first, but I was lazy. It was still awesome. Other things to put on sweet potatoes: a spoonful of tahini, or some toasted cashews. You could also crisp up some bacon and crumble it over the top if you feel like it and eat such a thing. Maybe some bacon and a big pinch of fresh parsley. Toasty crispy crunchy salty business is always a good idea with sweet potato.
Ok. Item number two!
That's a salad plate; I didn't eat an entire head of steamed broccoli. Not this time, anyway.
Cut broccoli into smallish florets. Peel some of the stem and chop it up too, if you like that sort of thing. I clearly do. Throw it in the recently vacated steamer basket, put it over the pot of water, and steam for about five minutes, or until said broccoli is done to your preferred texture. Item: you can totally take your cooked potatoes out of the steamer basket and let them sit a minute while you whip the broccoli immediately into the steamer; that water is totally hot and ready for such a thing. Use the heat you've harnessed! Then mash the potatoes while the broccoli is cooking.
When the broccoli is done, you can either eat it plain or put something delicious on top of it. I decided the best plan was sriracha sauce. Man, broccoli and sriracha are best friends. Otherwise, you can eat it plain, butter it, toss it in a spoonful or two of good vinaigrette, slap on some peanut sauce, or add whatever else you can think of.
Eat everything! You will feel surprisingly full and satisfied. Success!
08 April 2010
All tacos all the time
I seriously must have eaten tacos for half the week. Er, half of last week. TACOS.
Taco 1: Fried egg! I love the fried egg taco. This one had sauteed black beans/rice/onion/some sort of hot pepper and some exciting salsa verde. I also love the salsa verde, incidentally. If you make a fried egg and put it on one of two tacos, you can then catch any drippy yolk from taco one on the open face of taco two. Wait, that's sort of confusing with the whole "numbered tacos" conceit. Oh well.
Taco 2: Seared shrimp with similar black beans/rice, salsa verde, and squeezy lime. This would be more satisfactory were my shrimp higher quality as opposed to frozen. I need to get on that one of these days.
Taco three: These were actually more like quesadillas, since they were filled with refried beans, melted mozzarella (I know, but it's delicious and salty even though it's also inauthentic), and hot sauce out of the 79 cent bottle. Still: delicious.
Taco four: more refried beans, with cream cheese, wilted onion/red pepper, and big handfuls of greens. This was obviously a result of the newly reincarnated spring farmer's market. MORE SPINACH MORE MORE.
06 April 2010
Stroganoff: oh yeah
Probably my all time top food for when John is away and can't get nauseated by the fumes: mushroom stroganoff. All mushroom and dairy all the time: win.
This time I melted some semi-hot red pepper strips in with the mushrooms, and subbed plain yogurt for the sour cream. It's all good.
I also made seared tilapia, but that's more usual and doesn't push anyone toward the vomitorium.
Wait, do we have those in the US yet? Ah, yes: the party school.
Where was I going again?
Toward the food. Right.
It was delicious and I ate it all.
05 April 2010
Self-indulgent cooking for the win
Yes! So John was in CA again last week. While on many levels this is not at all a great situation (and, for the record, I am so glad video chat is now just standard and available), it does mean I get to cook whatever I want, complete with maniacal laughter.
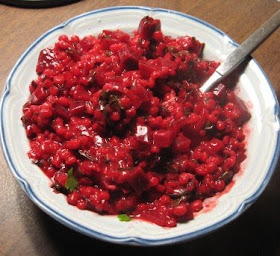
So. Beets. I had a couple in the vegetable drawer. I also had red chard, which is pretty much a given vegetable at our house on any occasion, and barley. Clearly this was an excellent opportunity to stain the cutting boards bright fuchsia. I made beet risotto.
As mentioned, I always only make risotto with barley anymore. Wow, that was a ridiculous grammatical arrangement! However, it is true. No more arborio rice. Barley works just as well, and is both cheaper and healthier. I suppose I should figure out the official term for "barley cooked in the style of risotto" sometime soon, since "barley risotto" is too much of a lingual mishmash. Babelfish says the Italian term for barley is "orzo," but using that to create the term "orzotto" would be confusing for English speakers who only know orzo as a pasta. The only other word I can find is the French "orgetto," which appears to be a created hybrid itself. I think I'm going to stay with the classic title, since risotto requires the same procedure no matter which grain you choose.
Beet risotto
olive oil/butter
onion
barley/arborio rice
white wine/dry vermouth
veg broth
beets
chard
salt, pepper
parmesan/other grating cheese if you want it
fresh parsley
Right! For risotto, you always want to make your broth first. So fill a smaller pot with a selection of vegetable trimmings and several cups of water. Since we're making beet risotto, you definitely want a beet-oriented broth; to achieve this, scrub and peel your beets, then add the peels and other trimmings to the broth pot. Bring the business to a boil, then cover and let simmer while you're orchestrating everything else.
For the main event, follow the same steps as with any risotto. That is to say, first get out a good deep pan and warm some olive oil in it. You can use butter instead, or mix oil and butter; whatever floats your boat. Or really, whatever you have in the house.
Peel and dice an onion, putting the trimmings into the broth pot. Add the diced onion to the oil/butter/whatever, stir it up, and let it cook on medium until softened. While the onion is cooking, you can dice your peeled beets or wash a bunch of chard. Multitasking for the win!
Next, add a cup of pearl barley and a cup of white wine to the risotto pan. Stir it up, turn the heat up a touch, and let it cook. Contrary to popular opinion, you do Not need to sit there and stir risotto absolutely constantly. Just give it a few stirs every couple minutes and you should be fine.
When the barley has absorbed most of the wine and the pan is beginning to get dry, scoop a cup or so of liquid out of the broth pan. I do this by lowering a measuring cup with the mouth against the side of the pan, so only the liquid gets in. It's not hard, and doesn't require straining the entire pot before you can use the broth. So! Dump the broth in the risotto pot and cook as before, stirring frequently. When the broth is absorbed, add another cupful and repeat. Add more water to your broth pan as needed--it should have plenty of time to come to a simmer from one broth addition to the next. For those of you who are clearly skeptical of such a mid-simmer addition: I do this all the time, and it works fine.
Between bouts of stirring, make sure your beets are all diced. I used one gigantic softball-sized beet, which gave me enough beet content for several people. Also, trim your chard and cut the leaves off the stems. Chop the stems finely and the leaves coarsely. Definitely keep them in separate piles!
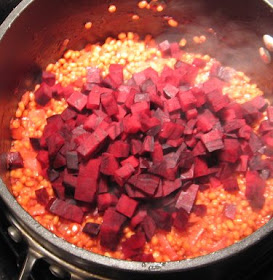
After maybe the third broth addition, your barley should be about halfway cooked. You can tell by looking at the grains: there should be a translucent ring around a solid core. When you get to this point, add both another cup of broth and your diced beets to the risotto. Stir it up and keep cooking as before. After another round of broth, add the chard stems. Notice how violently pink the entire business has become by this point. PINK!!
The barley should start to look thoroughly cooked pretty soon now. Taste a grain or two if you aren't sure. Just keep on with the broth additions until it's done. The whole cooking procedure should take about a half hour altogether.
Ok! Take the pan off the heat and stir in the chopped greens. They should wilt into the barley pretty quickly. Add a good lot of cracked black pepper and a tiny pinch of salt. If you want cheese, grate a pile and stir it into the risotto as well. If you aren't using cheese, you can use more salt, since cheese is generally salty. Definitely add lots of pepper, though; beets are sweet, and chard tastes like super iron spectacular, so it's nice to have some spice to balance them out.
Now put it in a bowl, sprinkle a good pinch of fresh parsley leaves and maybe a little more cheese over the top, and eat it.
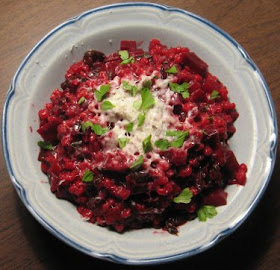
Note the extremely high color contrast. Don't wear white clothing while you're eating beet risotto. I'm just saying.
Evidently the glorious healthy deliciousness of risotto was not enough for me, however! After I finished eating, I went straight back into the kitchen and made a bundt cake.
I know! But I wanted cake, and I had sufficient ingredients, so I baked a cake and I ate it. Well, not the entire cake, but still. I certainly ate a reasonable amount of it.
This one was an unveganized version of jae steele's lemon poppyseed cake, from her cookbook Get it Ripe. I tend to make lots of unveganized versions of the baked goods in vegan cookbooks for some reason. In this case, I had actual plain yogurt but no soymilk, so I just subbed the yogurt directly for the milk. I also left out the poppyseeds, since none of those were hiding in the cupboard, and used whole wheat flour instead of spelt. The resulting batter was thick and unpourable, but very easily scoopable. I had zero issues getting it arranged in the pan.
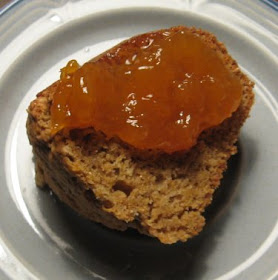
The end result was definitely fine and lemony and delicious and damp. I had mine with my heritage cake topping: apricot jam. Lemon cake and apricot jam definitely win.
In the morning, I made some of my massive amount of leftover risotto into risotto cakes for breakfast. Warm a nonstick pan with a tiny bit of olive oil, fry spoonfuls of risotto on both sides, then maybe melt a thin slice of cheese over the top: done.
Clearly, it was a pretty rewarding night of cooking.