I've been eating amazing amounts of oatmeal lately. I think I had this one very early in the morning before running at top speed to catch the bus for my doctor's appointment.
I don't really do the fancy oatmeal that's been going around for the past few years. These are rolled oats cooked on the stovetop, with water to cover, a pinch of salt, and maybe a little butter. For those of you who may only be familiar with instant oatmeal, the stovetop version takes about five minutes. All you do is boil. That's it. Then your oatmeal is cooked and you can eat it.
While these oats were cooking, I broke up a handful of pecans and quickly toasted them in a little frying pan. Then I chopped up some dried apricots. Voila!
Have with black tea, as long as you're not also running swiftly out the door. Then the tea will be too hot and you'll end up leaving it on the counter, especially if you own no travel mugs. That's ok; oats work pretty well by themselves.
31 January 2011
25 January 2011
Not tacos: the vegan burrito bowl
For some reason, flour tortillas have totally vanished from all the local grocery stores this week, and I just did not want the very easily available corn tortillas. Boo! No tacos! No burritos! No quesadillas!
Instead, I cooked a cup of brown rice and a pan of refried beans, and then piled them in a bowl with half a chopped avocado, a handful of parsley (as there is currently no cilantro in the house either), and a dousing of hot sauce. Reasonable taco substitute achieved!
22 January 2011
Chicken corn chowder of great excellence
So I finally got enough distance from the meat overload of several months ago to cook with our freezer chicken and its broth. Our refrigerator is actually pretty bare right now, since I cleaned it out and neglected to go shopping afterward. The freezer raid was therefore at least a marginal necessity.
Things we had:
- chicken
- corn
- potatoes (not in freezer)
It was clearly time for some serious chowder.
This is a standard soup, and so it is very easy and fairly fast. And what's cheaper than using the broth you coaxed from the carcass of a roasted chicken and froze months ago?
Chicken corn awesome chowder (or I guess soup as I didn't actually use milk or cream. FINE.)
olive oil/butter
onion
a hot pepper
potatoes
broth (veg Or chicken; what do you have?)
cooked chicken
corn
paprika, mustard powder (or dijon mustard), salt, pepper
garnish: cilantro/parsley, labneh/sour cream/other dairy/etc.
Do what you'd normally do for soup: chop up an onion and hot pepper of your choosing, and soften them in olive oil, butter, or a combination. I believe the pepper I used was of the long red cayenne persuasion, but most hot peppers should work fine. If you have access to some poblanos, by all means roast them, flake off their skins, chop them up, and add them; roasted poblano and chicken LOVE each other.
If you want to add things like garlic, carrots, or celery, go right ahead. It's all good. Let them soften while you scrub and dice some good boiling potatoes.
When things are soft and fragrant, add the potatoes, plus a good few shakes of paprika and a little mustard powder. Herbs in the marjoram/oregano family might be good here too. Toss everything together and cook for a few minutes more, stirring intermittently; this will give the potatoes a chance to absorb some of the excellent onion-pepper oil and to develop a bit of crust.
After about five minutes, add in several cups of broth, a couple handfuls of chopped cooked chicken, and another couple handfuls of frozen corn. I used chicken broth, since I had a big chunk of it in the freezer, but veg broth is also good here; see the big broth FAQ to produce some. I wouldn't use any stronger meat broths, such as beef or lamb, as those would totally overwhelm the finished soup. Other vegetable broths (mushroom, potato, corncob?) should be fine.
Anyway. Salt the soup, bring it to a boil, lower the heat, and simmer, covered, for at least ten or fifteen more minutes. Then take off the lid and check the soup texture; if it's too watery, boil off some liquid; if it's too thick, add some water or some extra broth.
When the soup is your preferred texture, add pepper, taste for seasoning, and serve.
I had my first bowl of this with a lot of chopped cilantro and some sriracha sauce, and it was excellent.
Later, I decided that I wanted a bowl that went along with a more stringent version of the "chowder" title, and contained dairy. I added a bit of milk, but the finished product was just not creamy enough for me. Hmm. Ok, what's in the fridge? Half a block of cream cheese. Great! So I chunked off a slice of cheese, dumped it in the pot of soup, and heated it just enough to melt.
The resulting chowder was so rich that it really needed all the chopped parsley in the house. I think I was full for the entire duration of the day. Oh man. It was awesome.
21 January 2011
Don't go to the bagel shop.
20 January 2011
Busy busy busy
You guys, I'm so exhausted. I'm just going to have to give you some pictures, ok?
The CA winter farmer's market is dramatically different than the NY version. I can seriously still buy peppers. I can buy them YEAR-ROUND. Wow. I can buy lots of clementines and various other citrus fruit, too, but winter is actually citrus season, so that at least makes sense. Also note the half gallon of apple cider. It's hard to find, as we are ostensibly not in a big apple-growing state, but it's there.
TACOS!! Can you believe that the filling used to be potato leek soup? Yes. One night I made a big batch of said soup, then discovered that neither John or I wanted to eat it. So I put the whole pot into the fridge overnight. The next day I stuck a big spoonful of cold thickened soup into a frying pan, boiled off the remaining liquid, added an egg, parsley, and some sriracha sauce, scrambled it all together, and put the finished business into tortillas, which I then ate. And that's why you should never throw away any decent food if you can help it. (The rest of the soup is now hiding in the freezer for future lazy dinner.)
Can't stand the thought of looking at the stove for even one more minute? Try GRAPEFRUIT. Easy! Fast! Also available at the winter farmer's market, at least if you live in a citrus-growing area! TRY IT TODAY!
13 January 2011
SQUAAAASH
As always, the messiest food tastes the best. Eat it!
Winter squash pasta bake
kabocha/other winter squash
olive oil
onion
garlic
a hot pepper
sage, thyme, marjoram
salt, pepper
ricotta, cream (if you want them)
greens
chunky pasta (mezzi rigatoni in this instance)
First, get a kabocha squash or another winter squash of your choosing. Chop it in half. Scoop out and discard the seeds (or obsess about whether to keep them for spring sowing even though you only have a couple of inadequate window boxes on the balcony), and brush the cut surfaces with olive oil. Put the squash halves cut side down in a baking pan of some type with a little water, and roast at 350F for about an hour.
Now you have this:
Let the squash cool enough to handle while you're making the additional sauce base and the pasta.
Sauce: Chop up an onion and some garlic cloves and soften them in olive oil with minced hot pepper, sage, thyme, and marjoram. Some paprika might be a good addition. When everything is soft and lovely, just turn off the heat.
Pasta: put on water to boil. When it's boiling, cook the pasta. Voila!
Is your squash cool enough to handle? Ok. Scoop it out of the skin and add it to your pan of onion and garlic. Since I was using kabocha squash, which has a very thin skin, I had a pretty hard time doing this. Mostly the squash ripped under its own weight. That's ok, though; kabocha skin is edible (although other winter squash skins are not), so if you want, you can mash it right in. Hooray!
If you want to end up with cheese-infested squash pasta, add several spoonfuls of ricotta. You can also add some cream if you like. Salt and pepper everything; mix it all up. You should be left with a pan of beautiful orange goo, like so:
At this point, the business is really rich, even though it has so much vegetable content. To solve this, add a whole bunch of greens. I used red chard; kale, spinach, arugula, or whatever else floats your boat should work fine. Just wash your greens, chop them up, and mix them in. The more tender greens will wilt right in; the sturdier ones will need several more minutes of cooking. Easy.
Of course, if you really want an ultra-rich baked pasta, you can leave the greens out. The end result can get a little overwhelming, though.
Is your pasta done? Great. Drain it and mix it with the squash melange.
At this point, you could either eat the business as is or bake it for a crispy crust. I decided to bake mine, so I spread it in a casserole dish and put it in the oven at 375F. A top coating of bread crumbs or grated parmesan would not go amiss here.
Bake until golden brown (well, golden orange, I guess) and beginning to crisp on top.
You can eat it now! Hooray!
12 January 2011
Exhausted bagel longings
I don't know about you, but this is just about exactly what I'd like to be eating right now: toasty bagels with cream cheese or hummus and coffee with actual cream. In actuality, I went to the dentist this afternoon, so I had to cut my delivery pizza dinner into small pieces and eat it with a fork due to inability to bite with the left side of my mouth. Soon it will be time for sleeping. Hooray!
05 January 2011
Braised in red wine
I had halfway been planning on making "braised in red wine" the theme for christmas dinner. Instead, we ate hundreds of snacks--bagels, hummus, breadsticks, pickles, olives, and raw veg--all day. The cooking wine just had to wait.
Incidentally, you know the new compact box wines that have been coming out over the past few years? They are the best possible candidates for cooking wines, and especially red cooking wines. They're cheap, light, and fresh for weeks on end. All hail the vacuum pack! Red wine braise for all!
Cabbage braised in red wine
onion
garlic
cabbage
red onion
carrot
celery
relatively tart apple
red wine
water
bay leaf
salt, pepper, thyme
First, put on a small pot of water to boil. Shred as much cabbage as you want to eat. For the two of us, this meant half a cabbage. You can use any kind of cabbage you want here; I used the standard green, though it turned a lovely purple in the wine.
When the water boils, dump in your cabbage. Blanch for a minute or two, then drain.
While all this is going on, heat up a large saute pan. Dice half a red onion, a few cloves of garlic, a carrot, and a stalk or two of celery, and soften them in olive oil. While you're waiting for them to cook, core and finely julienne/grate half an apple. Eat the other half.
When the initial mirepoix has softened, add the cabbage, apple, a bay leaf, and roughly equal amounts of red wine and water. I used about a cup and a half of each. Salt and thyme it up as well. Bring the business to a boil, lower to a simmer, and let cook on medium-low for about twenty to thirty minutes.
When the wine and water have reduced to a delicious syrup, and the vegetables are thoroughly cooked, season with lots of pepper. Maybe add a little more salt as well. Voila!
Great; vegetables. What else?
I had made a big pot of beans in broth (i.e. water) in prep for white bean/carrot soup, but instead we ended up gradually using the carrots for all kinds of other business. Instead, I decided to pan-fry the beans in spicy olive oil, for a sort of minimalist riff on Heidi's panfried corona beans/the crusty white beans and chard from her cookbook, Super Natural Cooking. This was definitely a great idea.
You can totally make the beans and the cabbage at the same time. No problem.
Crusty spicy nice white beans
cooked white beans
garlic
hot peppers
olive oil
salt, pepper
fresh parsley
Heat another saute pan; dice up a big nice handful of garlic cloves and hot peppers. Soften the vegetables in a little more olive oil than usual. (The beans will soak up a good bit of oil and spice, so you can use a little more of everything than usual, really.) When things are looking wilted but not brown, add a single layer of well-drained white beans. If you can leave a little space in the pan, you should; this will let the beans cook more easily.
Add some salt and pepper, toss well to coat, and let everything sit and cook. Try not to move the beans for at least three or four minutes, okay? You want them to develop a nice golden-brown crispy texture. When this is well on its way, use a spatula to flip over big swaths of bean business. When both sides of your beans are golden brown, taste them. Are they good? Great. Correct the seasoning, throw in a handful of parsley, and you're done.
Put it on your plate and eat it with a fork. Hooray!
Post-holiday baking roundup
I'm definitely sure you guys want to see these now, on January 5th, during the "I never want to see another sugar-oriented food ever again" phase, right? Of course, we seem to have surpassed that phase and gone straight for more cookies, so let's just run with it.
We produced a pretty substantial amount of baked business, considering there were only two of us to feed. This also meant a "substantial amount" could consist of one batch of cookies and one cake. Both came from The Great Scandinavian Baking Book, which I highly recommend.
First I busted out the flour and made these refrigerator cookies.
Swedish farmer cookies
2 cups flour
1 1/2 tsp baking powder
1/4 cup sugar
1 cup slivered almonds
1 tbsp molasses
2/3 cup softened butter
1 egg
2 tbsp water
These are super, super easy. Just throw all the ingredients in a mixing bowl and mix them well. If you discover that you have forgotten to buy pre-slivered almonds at the Persian market, you can sliver whole almonds by hand. It's ok! It doesn't take that long, and you get nice pieces of contrast skin as well. Just try for the thinnest pieces possible, since they'lll make for a nicer texture later.
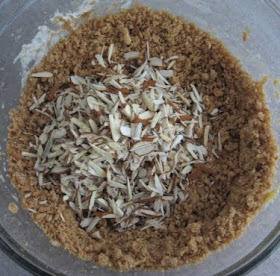
You will note that the dough is pretty crumbly. This is ok, though; it isn't actually dry, and holds together well.
Form your dough into three long cylinders about an inch and a half in diameter. I mostly just used my hands instead of trying to roll them out. Wrap the pieces in plastic wrap or foil and put them in the refrigerator for at least an hour. You can also put one or two of them in the freezer for later slice and bake action. Do it!
When you're ready to bake, preheat your oven to 400F. Slice your dough about 1/4 inch thick to form lots and lots of cookies. See that baking sheet down there? That's only a third of the dough!
Put the cookies on a parchment-covered baking sheet with little to no regard for spacing; these do not spread. Bake for eight to ten minutes, or until the cookie edges are slightly golden. Then pull them out of the oven, let them cool, and eat them.
These dudes are satisfyingly short, not very sweet, and a lovely shade of golden brown on the bottom. I ate several with copious smears of apricot jam. Tea is another obvious choice.
Ok. So those were our christmas cookies. How about an actual ridiculous cake? This seemed like the ideal time for such a thing, if ever such a time were to occur. To guard against the typical eat-one-piece-of-cake-and-let-the-rest-sit situation, I chose a coffee-oriented cinnamon roll ring called, for some reason, a Boston cake.

Boston cake
Dough:
2 1/4 tsp/1 packet yeast
1/4 cup warm water
1/4 cup milk
2 eggs
1/3 cup sugar
1/2 tsp salt
1/4 cup soft butter
2-2 1/2 cups flour
Filling:
1/4 cup soft butter
1/2 cup sugar
1 tbsp cinnamon
This is a yeast-risen dough (as you can see, considering the yeast in the ingredients), so plan ahead for rising time. I planned ahead so thoroughly that it was more or less my undoing: I made the full roll of cake dough and filling, left it in the refrigerator overnight, and then brought it to room temperature for a rise the next morning. In our cold, winter-oriented house (well, cold for a heated CA apartment--our heat is currently set at 65F), the warmup and the rise took FOREVER. I therefore recommend that you allow plenty of time if you try such a thing.
For the dough, put the yeast and water in a mixing bowl with a sprinkle of sugar. When the yeast bubbles and froths, mix in all the other dough ingredients but the flour. Then beat in the flour to create a good, solid dough. I did this in three or four batches. Cover the bowl and let the dough rise in a warm place until doubled.
When the dough is all risen and nice, put it on a floured board and use your hands to gently stretch it into an even rectangle. For filling, spread the butter over the dough. Mix the cinnamon and sugar and spread them over the butter layer. Then roll the whole business up into a long dough log. (This was the point at which I stuck my dough in the refrigerator.)

Cut your dough log into eight cinnamon rolls. Put the rolls into a buttered bundt pan or other reasonable ring-shaped cake pan, cover the pan, and let the whole business rise again.
When everything is nice and puffy, bake at 375F for 25 to 30 minutes. Cool, unmold, and eat.
I would err on the side of 25 minutes for appropriately sticky cinnamon business. I would especially do this now, as I slightly overcooked the cake I actually baked...which, of course, led directly back to the eat-one-piece-of-cake-and-let-the-rest-sit situation. Boo! If only we were the kind of people who have two pounds of powdered sugar sitting around, ready for glaze-making at a moment's notice.
01 January 2011
HAPPY NEW YEAR: blood orange mimosas
May I suggest some of these?
Blood orange mimosas
a blood orange
champagne
Roll the blood orange around on the table for a minute; this will make it easier to juice. Then cut it in half and juice it. Pour half the juice (or whatever your desired proportion) into each of two glasses; top with champagne. Drink.
Blood orange mimosas
a blood orange
champagne
Roll the blood orange around on the table for a minute; this will make it easier to juice. Then cut it in half and juice it. Pour half the juice (or whatever your desired proportion) into each of two glasses; top with champagne. Drink.