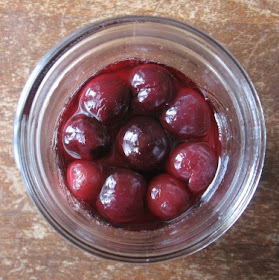
Check it out! Lemon balm schnapps!
This guy has been quietly aging in the back of the cupboard since I strained out the lemon balm leaves about a week and a half ago. The scent is similar to plain vodka at first--rubbing alcohol heaven--but has an interesting floral back note that I'm hoping will become more dominant over time. It's clearly going to require at least a few more weeks to fully develop.
After about two weeks of infusion, I strained the spearmint leaves out of my second herbal schnapps. This one had turned bright green in the first week, but later matured to a darker olive oil color. The scent is super pronounced, and in time became a little heavy; I'd almost compare it to spearmint oil at this point. Next time I might err on the side of a slightly shorter infusion, for a greener finished product.
Actually, both of these schnappses look a lot like olive oil in color (though obviously not in viscosity/etc). The lemon balm schnapps looks like a light, standard-use olive oil, while the spearmint schnapps looks like super ridiculous extra virgin goodness.
Of course, we can't drink them yet. Each taste so far has been pretty harsh; aging is the only answer. Now is clearly an excellent time to practice the gentle art of patience.
30 June 2011
28 June 2011
Who's on first? Yogurt is!
Look what I got at the farmer's market: a pint of sheep's milk yogurt from Garden Variety Cheese. Apparently, this stuff is only out for a very limited time each year, so if you live in the SFBay, now is your chance. It is super thick and tangy and awesome in every way. Yay!
I went straight home and started cooking. First, I marinated a butterfish filet (also from the farmer's market) in a mix of yogurt, lemon zest, garam masala, turmeric, jalapeño, mint, and ginger. Nigel Slater uses this on chicken, but it clearly works well for fish. Next time I think I need to try it on some lamb, because yogurt + lamb = SO good.
Anyway. I left the fish in the marinade for about 45 minutes, and then seared it over high heat for about three minutes per side. Look at the flake! Awesome.
What else was at the farmer's market? Cherries. Lots of cherries. For a good chunk of the week it was too hot to cook--or even to want to eat much. So what could I eat for breakfast? Clearly, pitted cherries with yogurt were the answer. This stuff is so superior to commercial fruit-on-the-bottom, it's not even funny.
Later, wanting actual lunch even though the outside continued scorching, I quickly boiled some penne and sautéed garlic, zucchini, mushrooms, and finely shredded peppers in olive oil. Maybe there was some basil in there too. I don't remember.
In my bowl: raw arugula, pasta and veg, a big spoonful or two of yogurt, parsley, and lots of black pepper. The yogurt melted just a little in the ambient heat, so it coated everything else easily: awesome. I have to say that nothing tames overly pungent arugula like dairy.
Mmm, yogurt! What else could a woman possibly need? (video)
24 June 2011
23 June 2011
Making schnapps
So you know how we suddenly live in a house with a massive assortment of delicious things growing in its yard? Well, I went and got a bottle of vodka, and started making some of those delicious things into alcoholic delicious things.
I made all of these schnappses from the recipes at danish-schnapps-recipes.com. If you have never seen this site, go browse through all the things you can make! All you need is patience, vodka, and some sort of fruit, herb, or other plant.
First up: plum schnapps. Right now, ripe cherry plums are falling off our tree into our new backyard pretty constantly. It was way too hot to make jam (although I could certainly freeze a nice selection of fruit...), but not too hot to pierce twelve or fifteen plums all over with a pin, put them into jars, and cover them with vodka. Then I just put the jars into the cupboard and shut the door to let the contents age in the dark. That's all there is to it. Schnapps accomplished!
Plum schnapps reportedly has a 3-6 month aging period before you can strain it and drink it. I find this unfortunate simply because I have no idea how my first batch will turn out, and so I'm hesitant to make more right now. But if I wait, all the fresh plums will be gone! I may end up just making another batch anyway.
In the meantime, I also had a bunch of herbs running wild in the front yard. I made lemon balm schnapps and mint schnapps. The recipe is for peppermint, and our mint is spearmint, but I'm betting I still get a good result. Same deal: cover the herbs in vodka, let steep for a set amount of time, and strain.
Herbal schnappses seem to take a much shorter infusion time than fruit schnappses, so I'l be able to report back on these much sooner than the plum. I actually strained the lemon balm one already, since the recipe specified 48 hours; however, it could clearly use some aging time in the back of the cupboard before we do a final taste test. I'm probably going to let the spearmint steep for another week or so before I strain it (and yes, I am totally going to keep it in the Grey Poupon jar; why do you ask?).
In conclusion, schnapps is both easy and awesome. You guys should make some too, and then we can all have a schnapps tasting party on the internet. YES.
22 June 2011
Ravioli with caramelized mushroom and red onion
It's kind of difficult to even look at some of the last pictures from the old apartment, but then I suppose that's what happens when you suddenly put yourself in a different living environment: your brain is so caught up with adjusting to the new situation that it forcibly shoves the prior one out of your head.
Did I really eat this? Yes. Was it delicious? Yes. Ok then.
So. I had acquired an exciting new type of frozen ravioli, stuffed with farmer's cheese and dill. Clearly, any ravioli containing dill will not work with a traditional marinara sauce. They didn't want alfredo; they didn't want pesto. Instead, after scrounging through the bits and pieces left in our old kitchen, I decided to treat them like pierogies.
While my pasta water was coming to a boil, I slowly melted a bunch of thinly sliced red onion in a mixture of olive oil and butter. I'm pretty sure I just used red onion by itself, but a mix with chopped shallots would definitely be good.
When the onion was largely softened and definitely fragrant, I added a couple big handfuls of sliced mushrooms. After some salt and pepper, I left the business to caramelize over medium-low heat, stirring occasionally.
Hooray! A big mess of mushrooms and onions!
I think I may have deglazed the pan with dry vermouth just at the end of cooking, but I can't remember. If you want to try it, go nuts.
When my ravioli were done, I drained them, served them, covered them with plenty of caramelized veg, and garnished everything with fresh chopped parsley.
I imagine that if you really wanted to treat these ravioli like pierogies, you could add a spoonful of sour cream, and maybe swap the parsley out for fresh chopped dill, but they already featured quite enough dairy for me.
Yay ravioli! I ate them all.
19 June 2011
10 June 2011
Quick note for your edification
You guys, we're moving on Monday! Woo! Yeah!
We're only moving about six blocks, but it's still exciting. For one thing, it means we get to move all our food, including frozen food, which is a great experience after so many cross-country endeavours. It also means we get a brand new yard, containing not only a few garden-ready beds and a premade compost pile, but also a lemon tree, an orange tree, a plum tree, and a pineapple guava tree. AWESOME!!!
Ok! I have to go clean and/or organize all the things, but I will be back...in THE FUTURE!
(Yes, this is a very cutesy entry; I don't care. I'm excited! Excitement for all!)
08 June 2011
Oatmeal with berries
I had oatmeal with all the fruit in the refrigerator. Hooray!
Why don't more people love and revere oatmeal? Do they have bad childhood associations? Are they sick of the artificial flavors in the little instant packets? Or is washing all the gack off the pan the problem?
To make oatmeal
Put roughly equal amounts rolled oats and water in a saucepan with a pinch of salt. Make sure the water covers the oats. Heat to a boil; cook for about five minutes, or until oatmeal reaches your desired texture. Put into bowl, add whatever you like on your oatmeal, and eat.
One thing I learned from this breakfast: I don't like warm apricots. Warm strawberries? Yes. Warm apricot jam? Yes, sure. Warm apricots? No. Why? I have no idea.
07 June 2011
Homemade maraschino cherries yeahh
So. This weekend Veronica and I made maraschino cherries.
While researching recipes online, I noticed the vast majority of resources were concerned not only with making cherries, but showing just how awful the canned version is. Well, that's no surprise, is it? The unnatural red color, verging on fluorescence, the sticky, unpleasant aftertaste (and just taste) of corn syrup, the fact that even an opened jar won't go bad in over a year--none of these are signs of great purity or authenticity. Any homemade cherries would clearly be far superior.
Veronica also had a bottle of Luxardo maraschino liqueur sitting unused at her house. What better use for it than homemade cherries?
We decided to use this maraschino cherry recipe from The Cupcake Project. Are these actually authentic maraschino cherries? Honestly, I don't know--I couldn't find the original Imbibe Magazine recipe (though their brandied cherries recipe looks oddly similar!)--but they're obviously better than their mass-marketed counterpart. They're easy to make, and call for the big, sweet cherries that are actually available in our farmer's market. (In my experience, tart cherries just don't exist in California--sad but true.) They also don't require canning, which was perfect for our small test batch.
Maraschino cherries
1 pound sweet cherries
1/2 cup sugar
1/2 cup water
2 tsp lemon juice (from a lemon, not a jar)
1 cinnamon stick
1 tsp vanilla extract
pinch of nutmeg
1 cup maraschino liqueur
We used about 3/4 pound of cherries, since that's all we had after pooling our supplies. Veronica pitted all of them with a knife; a cherry pitter would certainly have been faster and neater, but who can justify actually buying yet another piece of one-use kitchen equipment? I suppose it depends on the quantity of jam, preserves, pie, and liquor-infused cherries you want to make every summer.
Ok. Make a syrup with all your ingredients but the cherries and maraschino. Bring everything to a boil; note the excellent aromas rising from your pan. Add your cherries, reduce the heat, and simmer for about 5-7 minutes. In the course of cooking, the cherries will leach some of their juice into the syrup, turning it dark red. Pretty!
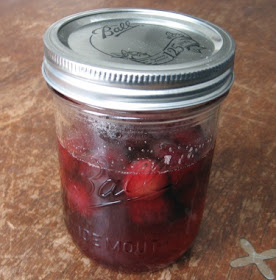
When cooked, turn off the heat. Add the maraschino liqueur to the cherries; stir. Ladle the cherries and syrup (er, liquor?) into jars. Let them cool; lid them; store them in the refrigerator.
When immediately done, the cherries will smell strongly of maraschino liqueur and not much else. It's pretty pungent. Clearly, the best course of action is to let them age and cure a bit before eating. Er, garnishing. Drinking. Maybe in a week or so they'll be ready for us to embark on a manhattan- and old-fashioned-based taste test.