REALLY.
I like cabbage. I think cabbage is one of the most maligned of all vegetables. It's cheap, healthy, easy to cook, and delicious as long as you don't boil it to high hell. You want vitamin C? Get that cabbage in your mouth.
Right! Several nights ago we were having frozen vareniki with caramelized onions for dinner. Clearly this was not sufficient! No! So I grabbed my copy of Vegetarian Cooking for Everyone, looked through the index, and found Steamed Cabbage with Butter and Poppy Seeds.
I chopped up some green cabbage, steamed it over the vareniki pan, buttered it, and tossed it with a couple handfuls of the poppy seeds I've had sitting in my spice cabinet for the past year.
Guess what? It was delicious.
Quickly steamed cabbage turns out to be mild, with a texture similar to steamed bok choy. We usually make our cabbage into intense Asian preparations with sriracha sauce, peanut sauce, or sambal oelek; eating it practically bare was, in contrast, soporific and calming. It was the perfect intro for a night of doing nothing, nothing, and more nothing.
Of course, in the morning I dropped the leftovers into a plain pancake batter, fried them up, and ate them with pungent labneh and sambal. It's all good.
30 November 2011
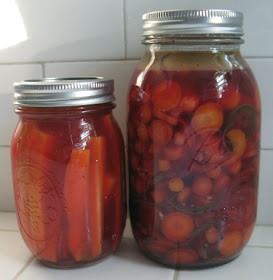
Carrot pickles!
After my experiments this fall, my only real question is why I didn't try pickling sooner.
After the success of my refrigerator dills, I decided to branch out. Clearly, one of the key items on the thanksgiving (or maybe pre-thanksgiving) table is always the dish of pickles and olives. So I not only made another batch of dills, but also decided to try out these carrot pickles.
Let's just say that the garden next year will definitely contain more pickle components. Hey, it's winter (or "winter"--but it's foggy today in the south bay, and though that is normal for SF, it is highly abnormal in the valley, and definitely sends a clear message that it's going to be 50F for a while). Winter is the traditional time to get out the graph paper and the seed catalogs to plot out exactly what you want to grow next year. In short, jalapeños and carrots are on the list, and I wouldn't put it past me to plant a cascade of beets for good measure.
After acquiring a bunch of farmer's market purple carrots, half a red onion, and a jalapeño, I went to work.
The pickle-making process is super simple. I scrubbed the carrots, peeled the onion, and sliced them and the jalapeño into pieces. I made the brine by boiling a cup of water and two cups of vinegar with a quarter cup of canola oil, and seasoned the business with cumin, oregano, salt, and pepper. When the salt was dissolved, I added the chopped veg and cooked everything together for a little over five minutes. Then I decanted everything into a clean quart jar that I'd preheated with hot tap water.
Since I'd made my pickles with the lid on the pan, eliminating most of the evaporation, I ended up with a lot of extra brine. Okay then! I grabbed another couple carrots, scrubbed them, cut them into sticks, put them in another preheated jar, and poured on the additional brine. This way we had both cooked and raw (or only brine-warmed) carrot pickles to try.
At this point I lidded my jars, let them cool, and stuck them in the fridge. By thanksgiving, three days later, they'd matured into the most perfect instance of spicy pickle I could possibly imagine. Even though we also had a massive tableful of additional dinner, we ate about 1/3 of the quart jar in one go.
A couple things to think about:
- Yes, that is a layer of oil at the top of the jar. I think this is fine; just shake the jar to distribute the oil before opening.
- My brine turned bright pink. This is pretty clearly because I used purple carrots. Yay pink pickles!
- Since these pickles are made with onion and jalapeño, they get hotter over time. Be careful!
- Since these pickles are made with onion and jalapeño, you don't just get pickled carrot--you also get pickled onion and jalapeño.
In fact, after we roasted our post-thanksgiving chicken (what? you don't roast a post-thanksgiving chicken??), and I was looking for something delicious to put on my resulting sandwiches, guess what I found? That's right: my lovely jars of pickles. I didn't use the pickled carrots on the sandwich, though. Instead, I fished out a few of the jalapeño rings and red onions.
On an english muffin with dijon mustard and freshly roasted chicken, they were perhaps the best choice ever.
Orphans' thanksgiving 2011
It was an excellent night.
We made:
- Veganomicon cassoulet with olive oil biscuits
- Lentils vinaigrette
- A big green salad with backyard sungold tomatoes
- Mashed potatoes and mushroom gravy
- Roasted mixed root vegetables in vinaigrette
- Garlic dills and spicy carrot pickles
- Maple-roasted cashews
Chrissy and Ben made:
- Tofurky
- Roasted pecan, olive, and grape salad
- Pumpkin pie
There was also plenty of wine.
Notes:
- I made the vinaigrette dressing (for both salad and roasty veg), the croutons, and the lentils the night before. This worked admirably. The vinaigrette recipe makes over a pint, so you should expect to see it around over the next few months.
- I did not like the cassoulet! It was just kind of stodgy and tasteless. We had added seared marinated tempeh to it, but I kept the spices mild to match the cassoulet recipe. Yeah, no. It would have been a much better idea to just do our customary super-spicy marinade, with maybe some liquid smoke added, and then to sear it separately and strew bits liberally over the top of each serving bacon-style.
- The biscuits, which I made with rice milk, were good. We ate the leftovers for breakfast in the morning.
- For the potato seasoning, we poached a bunch of minced shallot and garlic in olive oil and mashed them in. With some rice milk, salt, and pepper, this made the best mashed potatoes ever. Who says you need butter for mashed potatoes? You do not.
- Similarly, the mushroom gravy was really, really good. It was so much better than last year's version, which did not contain either 1. enough mushrooms or 2. nutritional yeast. This year's version contained plenty of cremini mushrooms and the required nutritional yeast, and it was fabulous on both potatoes and tofurky.
- I really like tofurky! I don't think I'd ever had it before. It was particularly excellent mixed up in a big bite with potatoes and gravy, as all thanksgiving main courses should be.
- So I made garlic croutons, then forgot to put them on the salad! SO SAD.
Garlic croutons
good stale bread
olive oil
garlic
Smash and peel a couple of cloves of garlic and steep them in maybe 1/4 cup of olive oil for twenty minutes. In the meantime, get out the loaf of stale bread that's been hiding on top of the refrigerator. Cut it into reasonable crouton pieces. Toss the croutons with the oil, turning well to coat. You can pick the garlic cloves out or leave them in; I left mine in. Then spread the croutons on a baking sheet and bake at 350F until golden brown, paying attention to make sure they don't burn. This took about ten minutes for me, but it'll depend on your bread quality and piece size. Salt the croutons right after you take them out of the oven. Voila! Now you can put them in a container, put it in the cupboard, and forget all about it until after dinner is over.
- The roasted veg were a bit overdone, but still good. This year we had radishes, fingerling potatoes, onion, garlic, carrots, brussels sprouts, and golden beets. Was that it? I think that was it. We just tossed them with vinaigrette, salt, and pepper, added some fresh rosemary and thyme, and roasted at 350F until great.
- Lentils vinaigrette are totally going to become staples in our house. OH MAN. I just ate the last of them today for lunch, and they were still perfectly textured and flavored. Granted, I did use the slightly more expensive (and sturdier, and better textured) Puy lentils instead of standard green, but they are well worth it. If I had to pack a lunch to work, I would definitely be spending a good number of Sundays making big batches of lentils vinaigrette to eat all week. I can just see them sitting in a corner of an excellent bento.
- Then there was pie. Pie pie pie pie pie pie pie. I think there is one piece left for me to eat tonight. Pie.
- Guess what I made out of the leftover mushroom gravy and roasted veg?
THANKSGIVING OMELET!
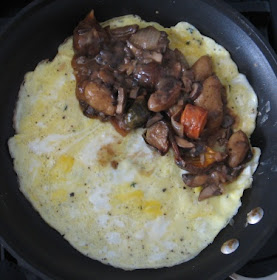
I warmed the gravy and root veg in a little saucepan, then made the omelet itself in a regular nonstick. I used two eggs and followed the classic Julia Child omelet method (that is video, for those of you). When the eggs were 90% cooked, I poured in the gravy and veg, folded the omelet over, let it cook for another 30 seconds or so, and flipped it out of the pan.
With a handful of chopped parsley and forgotten garlic croutons strewn over the top, this omelet became perhaps the best leftover thanksgiving concoction ever.
22 November 2011
Thanksgiving run-up
Sunday I brought home double our usual amount of vegetables from the farmer's market. Yesterday we made the actual grocery store run. I also made carrot pickles, which I will discuss once I get the pictures actually on a computing device of some kind. Of course, I have to make a vast spread of holiday food first.
In the meantime, I'm taking a cue from Jes and compiling this list of last-minute American thanksgiving dinner ideas. The majority of these are vegetarian, for those of you. Anyway. Go forth!
Pre-dinner snacks
- Marinated olives, toasted nuts, and vegetable crudités, none of which you need me to tell you about.
- Refrigerator pickles.
- Salami rolls.
- A few little bowls of hand-popped popcorn.
- Hummus and pita or carrots is never a bad idea.
- Red wine is always a nice thing to drink over an afternoon of cooking.
Soups & stews
- Black bean sweet potato soup, a classic at our house.
- Tuscan white bean soup.
- Brandied tomato rice soup: much more than the sum of its parts.
- Split pea soup is always great for blustery evenings.
- French onion soup.
- Carrot and white bean soup.
Salads
- Grain salads: quinoa, rice, barley, or even wheat berry are all good, and can be made the night before. They can also all take cooked chickpeas to boost the overall protein content.
- Green salads with fruit: spinach salad with walnuts and dried cranberries or fall salad with pear, pecans and dried blueberries.
- Shredded salads: Red cabbage and apple salad or carrot salad.
- Salads of root vegetables: beet and goat cheese salad, raw beet, pear, and cashew salad, or the slightly unseasonal (but maybe welcome in SoCal) potato and green bean salad.
Other vegetables
- Roasted mixed vegetables vinaigrette, which you can make with nearly any winter veg, and which is great with fresh rosemary.
- Mashed sweet potatoes with garlic and ginger.
- Sautéed apples and onions, for that sweet-savory element.
- Sautéed kale (or other greens) with garlic. Tres facil et tres vogue. No, seriously, kale is up there in recent food trends.
- Baked winter squash, which you can then mash with butter & spices of your choosing.
- Cabbage braised in red wine, which is classic for a reason.
- Brussels sprouts with bacon, which are way down at the bottom.
Baked items: savory or neutral
- Olive oil baking powder biscuits.
- Cornbread. I usually use the Veganomicon recipe (though I sometimes unveganize it), but go with your favorite.
- Stuffing with shallots. It's sort of baked, right?
Baked items: sweet
- Cranberry bread: get those cranberries into your body without eating cranberry sauce (which I for one find disgusting even if homemade and beautiful)!
- Chocolate chunk banana bread. Breakfast!
- Apple pie, which is allll the way down at the bottom.
- Fruit crumble or crisp, which you will of course want to make with apples, pears, plums, or other winter fruit.
- Speaking of plums, you can always make another plum cake.
- And though I've never made it myself, our traditional family thanksgiving dessert is pumpkin chiffon pie.
Fill in that menu! You can do it!
17 November 2011
Israeli couscous is the best
Wait, how did we get into the actual run-up to thanksgiving? I still have to talk about fairly summery things! The leaves are still predominantly green! My tomatoes are still alive! And, well, this is living in California: being unprepared for every seasonal event because the weather outside doesn't match the calendar in your head.
So let's talk about Israeli couscous. I have had a bulk bag of it in my freezer for six months, but have somehow never eaten any until now. This, it turns out, was a mistake. I want more!
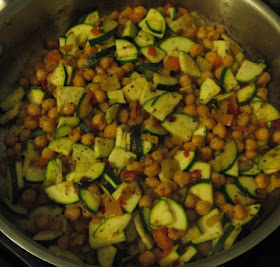
Israeli couscous & chickpea salad
olive oil/butter
onion
Israeli couscous
more onion
garlic
hot chili pepper
cooked chickpeas
zucchini
sweet or mild pepper
dry vermouth
oregano, salt, black pepper
lemon juice & zest
optional grating cheese, or feta if that floats your boat
Ok. First, you're going to need two pans: one to cook your couscous and the other to stew all your vegetables together into a wash of deliciousness.
I had to look up how to cook Israeli couscous, since I'd never done it before. The main issue was the proportion of water to pasta (because Israeli couscous is actually pasta; did you know?). I found the solution in this Chowhound thread; evidently, one should measure a specific amount of Israeli couscous, barely cover with water, and then add the same amount of water as couscous. Great! However, I didn't just cook the couscous alone. Instead, I flavored it with onion cooked in olive oil.
Start by warming some olive oil in the bottom of your intended couscous saucepan and sautéing half a chopped yellow onion in it. When the onion is translucent, add a cup of dry couscous, cover it with water, and add another cup of water. Put the lid on, bring it to a boil, turn the heat down to the lowest setting, and let the pan sit while you cook everything else. It should take about ten minutes to produce perfect Israeli couscous.
In the meantime, make your vast vegetable mass. So. Warm some more olive oil in a wide sauté pan, add chopped onion, minced garlic, and minced hot pepper, and let everything soften together for a few minutes.
Next, drain a can of cooked chickpeas and added them to the pan along with some oregano, salt, and pepper. I think I may have added a splash of water at this point too. Obviously, chickpeas you soak and boil yourself will be better, but I used canned and they worked just fine.
Give the chickpeas five minutes or so to heat through while you dice a pepper (preferably red bell, though you can use an Anaheim or banana if you want) and chop a zucchini into thin quarter-moons. Add the vegetables to the pan and cook on medium-high, stirring occasionally. When your vegetables are three or four minutes from done, deglaze the pan with dry vermouth. Give everything another few minutes over the heat to burn off the alcohol. Then correct the seasonings and turn off the heat.
By this point your couscous should be done. Pour the couscous into the vegetable pan, add the juice and finely chopped zest of a quarter of a lemon, and mix everything together. Taste for seasonings one last time; besides the obvious salt and pepper, you might need to add a little more olive oil or lemon juice. Some fresh parsley couldn't hurt, either.
Now scoop some couscous into a bowl, grate some cheese over the top if you like, and eat.
I had this for dinner and then immediately the next morning for breakfast, and I'm happy to report that it was just as good cold as it was hot. That's how I like my food: great at any speed.
11 November 2011
PLUM CAKE
There were excellent pluots at the farmer's market, so I made a plum yogurt cake. Yay cake!
I've made this type of fruit-ridden cake several times before. The key seems to be pushing the fruit well down into the batter before baking. That way, large quantities of plums and juice are trapped inside the crust, making the finished cake damp and tender.
This current variation required not only yogurt but an additional egg. Even though I switched out the regular flour for whole wheat, the result was still strikingly more rich and fluffy than my cake of last December. I think the flavor is roughly equivalent, however.
Anyway, the point is: CAKE. I have cake and I will eat it. Probably I will even split a few slices in half and spread a spoonful of labneh on each. I will almost certainly also have tea.
09 November 2011
Oven-dried sungolds
I've been meaning to make these dried sungolds in olive oil for a very long time. This year, with the onslaught of tomatoes bursting out of our backyard, I gave them a try.
First, I went out to the garden and picked all the ripe tomatoes I could find. (I also picked up one big green purple cherokee that I accidentally knocked off its vine. It has since turned mostly red in the sun on the kitchen windowsill.) Yes, the tomatoes are still alive. Yes, they are still slowly ripening, even though it has finally gotten at least a little chilly. No, it was not difficult at all to find this many.
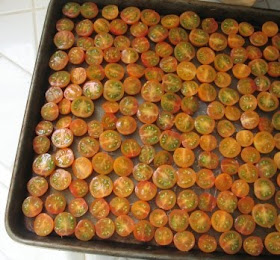
It only took me about ten minutes to wash the sungolds, cut them in half, and arrange them cut side up on a cookie sheet. I had just enough to cover the entire sheet.
Then I turned the oven to 200F, deposited the cookie sheet inside, stuck a wooden spoon in the door to allow for air circulation, and went about my business for several hours.
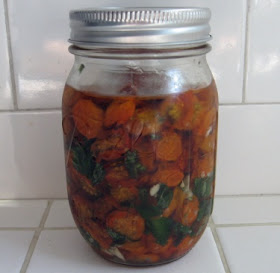
When the tomatoes were shriveled but still chewy, I took them out of the oven and packed them into a jar with chopped basil and minced garlic. If you don't happen to have any fresh herbs, or you want plain oven-dried tomato goodness, I'm sure you could just put them in the jar alone. I covered the entire shebang with olive oil, let it cool on the counter, and stuck it in the fridge. Voila!
Since I'm keeping my jar in the fridge, the olive oil gradually turned cloudy and coagulated. This is fine. I plan to just leave my jar out on the counter for an hour or so to warm up before using the tomatoes in any sort of uncooked context.
I have not yet actually eaten any of these! Maybe I should bust them out for lunch today, in a sandwich with some cream cheese and spinach. Or maybe I should make some pasta and throw a big spoonful in at the last minute. Or I could drain off the oil, chop the tomatoes, and knead them into pizza dough...HMMM.
08 November 2011
Apple cheddar bread
It is actually fall in California! Hooray!
To celebrate, I rediscovered baking.
Since the farmer's market sort-outs bin has been overflowing with hail-scarred apples, I decided to make Everybody Likes Sandwiches's apple cheddar bread. I subbed whole wheat flour for the all-purpose, but otherwise followed the recipe exactly as written.
I think it's important to measure your apples precisely for this recipe. I didn't measure mine, and almost certainly used about a third of a cup more than recommended. This made the inside of the loaf so damp that it had a hard time cooking through. So that's something to avoid. I think next time I'd also try baking individual bready dudes in a muffin tin, for optimal heat penetration and portability.
Still, after some extra time in the oven, the bread turned out to be especially great for breakfast. Sticking slices in the toaster oven made them perfect: slightly damp and steamy in the middle, yet crispy and delicious on all sides.
03 November 2011
Shrimp & lemon zest soup
Hey look, another beautiful 9 pm picture!
I made this soup on a night when nothing sounded good and making the effort to cook a big dinner seemed impossible. So I checked the freezer, found the emergency shrimp, and concocted a plan.
Shrimp & lemon zest soup
veg/fish/shrimp broth
garlic
green beans
frozen shrimp (defrosted, deveined, & peeled except for the tail)
salt, pepper, red pepper flake
a lemon
fresh parsley, chervil, or tarragon to garnish
First, make yourself a pot of broth. I made our standard vegetable broth, which I cooked for about 15 minutes total. If you want to make fish or shrimp stock, you'll want to simmer it for about a half hour instead.
In a separate pot, warm up some olive oil and sauté several cloves of chopped garlic. Cut a big handful of green beans per person into inch-long pieces and add them to the pot. Season with salt, pepper, and red pepper flake, and let everything cook together while you defrost and shell shrimp. After about five minutes, strain your broth and add it to the main veg pot. Bring everything to a boil, then add six or eight shrimp per person. Boil until the shrimp are totally cooked through; this should take maybe two or three minutes total.
While your shrimp are cooking, peel a couple strips of lemon zest off your lemon and slice them into fine strips. When the shrimp are done, correct seasonings, turn off the heat, squeeze a big wedge of lemon per person into the pot, and add the lemon zest. Stir it all up and serve with chopped parsley, cracked black pepper, and any other fresh herbs that sound good to you.
This was way, WAY more than the sum of its parts, and it’s all due to the the lemon zest. While the parsley garnish was good, chopped tarragon or chervil would be even better. I’d also consider making a dedicated tomato and shrimp shell broth with a tiny pinch of saffron. YEAH!
01 November 2011
More liqueur experimentation: the 44
More vodka infusions! More!
This time I thought I'd try out a French liqueur, the 44. Essentially, you stuff an orange with 44 coffee beans, put it in a jar with 44 sugar cubes, and fill the entire thing with vodka. After aging for 44 days, you remove the orange and strain out any particulates. Then you drink it in good health and good conscience.
Here's what 44 coffee beans look like:
I used Blue Bottle's Three Africans, a bag of which has been in my freezer for an inordinately long time. We really need to get a decent coffee grinder one of these days. Does anyone want to recommend a good grinder producing a uniform coarse grind that works well in a French press?
Anyway. I grabbed a knitting needle (a size 5 aluminum double-point, for those of you) and stabbed a whole bunch of holes all over my orange.
The orange in question came from one of our copious neighborhood trees. It wasn't very big (so it fit through the regular mouth of my quart jar) but it was super fragrant and juicy. In fact, I ended up holding the orange over the mouth of the jar to catch the juice and orange oil while I stuffed the coffee beans in the holes.
The knitting needle made holes small enough to totally envelop all the coffee beans. When I was finished stuffing the orange, they were only visible as slightly dark spots underneath the peel.
Since we don't generally have sugar cubes lying around, my next step was to check the internet to find out how much sugar each cube contains. Apparently the answer is one teaspoon. 44 teaspoons equals .92 cups. Since we don't like overly sweet liqueurs, I halved that amount and used a touch under half a cup of brown sugar.
Then I filled the jar with vodka, shook it all up (lid on, of course), and deposited it in the cupboard to age for the requisite 44 days. My finished liqueur should be ready to drink on December 9th.
Now all I have to do is wait patiently. Boo!