Showing posts with label salads. Show all posts

08 September 2015

Spicy tuna salad with chard stem pickle, cabbage, and cilantro

Spicy tuna salad with chard stem pickle, cabbage, and cilantro

A few days ago, I made a batch of Marisa's chard stem pickles. Now -- as usual when trying out a new kind of pickle -- the question is how to use them.

I started off with this experiment in tuna salad. After all, dill pickles or gherkins are a pretty standard ingredient in classic tuna salad. So why not give it a try with a different variation? I like to eliminate the usual mayo and go for a more oil-and-vinegar-oriented salad, which meant that these tangy, slightly sweet pickles were a perfect match.

To complement the rice wine vinegar in the pickle brine, I added hot mustard and cilantro. Together with the tuna and vegetables, this made a nicely spicy, herbal, and complex tuna salad.

Now I want to do another tuna salad experiment with my refrigerator pickled beets. Of course, in that case, everything will be BRIGHT FUCHSIA. But that's okay. Who doesn't like bright pink food?

On that note, because they're just too gorgeous, this is what the chard stems looked like just before I brined them up. So intense.

Spicy tuna salad with chard stem pickle, cabbage, and cilantro

Spicy tuna salad with chard stem pickle, cabbage, and cilantro
Makes enough for 3 open-faced sandwiches or 2 substantial closed sandwiches.

1 cup shredded cabbage
1 medium carrot
1-2 scallions
2-3 tbsp chard stem pickles
1/4 cup chopped cilantro
1-2 tsps hot Chinese mustard
1 tbsp grapeseed oil or other oil of choice
1 5-oz can tuna
salt, pepper

Shred your cabbage and deposit it into a mixing bowl. Sprinkle with a few shakes of salt and mix with your hands, squeezing gently, to soften the cabbage a little.

Prep and finely chop your carrot, scallions, pickles, and cilantro. Add them to your bowl, along with the mustard, the oil, the drained contents of your can of tuna, and salt and pepper to taste. You may also wish to add in a little of the pickle brine for some extra vinegar kick.

Mix everything together well, taste and correct seasonings, and you're done. Super easy.

Spicy tuna salad with chard stem pickle, cabbage, and cilantro

I had my spicy tuna salad in a couple of open-faced sandwiches on toasted sourdough, with a small green salad on the side. It was fantastic. Needless to say, this is definitely going on the list of things to make when the fridge is full of pickles (i.e. always).

Do you have a fridge full of homemade pickles? How are you eating them this month?

29 August 2015

Bagel panzanella

Bagel panzanella

I've been wanting to make bagel panzanella for several months. Now that the best summer tomatoes are here, it is time. Oh man, is it time.

You almost certainly know my love of bagels. Bagels are wonderful. Bagels are delicious. Bagels are the best breakfast on a holiday morning. You can put anything on a bagel. And while I usually discuss my love of bagels through a series of various cream cheese schmears, I thought it was time to mix it up in a more bready way, so I could shoehorn even more bagels into my diet. What recipe combines a delicious bread product and many tasty vegetables? Panzanella. And so bagel panzanella was born.

Probably the most important component of panzanella is the bread. It's supposed to be dry, so it can soak up all the vegetable juices and vinaigrette readily, yet not turn into a pile of soggy mush. So preparing the bread is critical. It also needs to be done a good 12 hours in advance, unless your bagel is already quite stale. You can get away with toasting your bread pieces gently in a low oven, but the texture is going to be a little different.

I chose an everything bagel, for optimal all-bagel flavor content. Cherry tomatoes came out of the garden; cucumber, red onion, and basil came from the CSA box. Actually, the basil could have come out of the garden too, since there's plenty of it out there. But it didn't.

To make this even more substantial (and bagely), you could serve big scoops of it over some tangy salad greens -- arugula would be my pick -- and scatter some chunks of cream cheese or goat cheese rolled in sesame and poppy seeds over the top to serve. For that matter, if you wanted to take the whole thing in a sweeter direction, you could go for a blueberry bagel, an assortment of halved berries, and fresh mint, give it a squeeze of lemon juice, and serve it all over a bed of spinach, with optional goat cheese. Panzanella!

Bagel panzanella

Bagel panzanella
serves 2

1 savory bagel to make 2-3 cups cubed bread
2 cups chopped tomato (14 cherry tomatoes in my case)
1 1/2 cups chopped cucumber
3/4 cup thinly sliced red onion
1/2 bunch or up to 1 cup chiffonaded fresh basil
1/4 cup or more red wine vinaigrette

Cut your bagel into bite-sized pieces. I'd recommend going a bit on the small side, to create optimal bites with cucumber and tomato later.

Put your bagel pieces on a rack and let them dry out overnight. If your bagel is already a day old (mine was fresh from the bagel shop), I'd guess you only need 4-6 hours.

The next day, it's time to make your salad. Chop up your tomato and cucumber into bite-sized pieces; thinly sliver your red onion; chiffonade your basil. Combine your bagel pieces, tomato, cucumber, red onion, basil, and vinaigrette. Mix everything together well. Let sit on the counter (no tomatoes in the fridge) for at least a half hour, and up to four hours.

Taste, correct seasoning, and serve with the delights of your choice.

Red wine vinaigrette

1 clove garlic, crushed and minced
2 tbsp red wine vinegar
1/2 tsp dijon mustard
1/4-1/2 tsp salt
12 good grinds of pepper
1/2 cup olive oil

Put all the ingredients into a small jar. Lid the jar and shake well to emulsify. Voila! Red wine vinaigrette.

You'll have some vinaigrette left over, so put the jar into the fridge and use it on any salads you may be eating in the next week or so. Let the dressing come to room temperature before using.

Bagel panzanella

It's so dramatic-looking with the black cherry tomatoes.

We had our bagel panzanella with slices of Spanish tortilla, but it would be pretty happy alongside a whole lot of different main dishes. Eat it for breakfast, with some scrambled eggs. Eat it for lunch, with a cup of Tuscan white bean soup. Eat it for dinner, with a burger of your choice, or maybe a seared steak if that's how you roll.

How are you eating your bagels lately?

27 July 2015

Summer garden tuna salad

Summer garden tuna salad

The CSA box demands that we eat as many vegetables as humanly possible all summer long. This is simultaneously great and a problem.

Salads are the obvious solution, but an all-veg salad is usually not a sufficient lunch. Unless you want to make another entire dish, some sort of protein is necessary. I chose eggs -- we still have abundant CSA eggs -- and tuna, and decided to wake up the flavors with sriracha sauce, garlic, and fresh basil, scallion, and parsley. For some extra textural interest, I used a mix of cooked and raw vegetables. Altogether, this worked out super well.

If you aren't a tuna person, you can always leave it out and up the hard-boiled eggs to two, or sub in the cooked and drained beans of your choice. I'd probably go for white beans first, but any kind you like that maintains reasonable structural integrity should be fine. If you want to use other fish, maybe try fork-mashed sardines or a smoked fish of your choice. And of course, you can make this completely vegan by switching out both tuna and egg for beans. It's all good.

Some lime or lemon zest wouldn't be unwelcome, either.

Summer garden tuna salad

Summer garden tuna salad
makes 2 meal-sized servings

1 egg
1 cup broccoli florets in bite-size pieces
1 cup green beans in bite-size pieces
3/4 cup shredded/julienned cucumber
3/4 cup shredded/julienned zucchini (I used gold bar squash)
1 clove garlic, minced and pulverized thoroughly
1-2 scallions or a large handful of their greens, finely chopped
large handful basil leaves, finely chopped
large handful parsley, finely chopped
1 5-oz can tuna, drained
1+ tbsp olive oil
several good squirts sriracha or other hot pepper sauce to taste
salt, pepper
any other veg you think sounds good in this circumstance
salad greens to serve

Put your raw egg in a small pot of water and set it on to boil. Cook for 9 minutes at a simmer. Scoop the egg out of the water and put it in an ice bath.

While your water is still hot, add your broccoli and green beans. Bring the pot back to a boil and cook for 3 minutes, or until the vegetables are done to your liking. Drain, shock briefly in cold water, and drain again.

While you're waiting for the egg and cooked veg to cool enough to use, cut up your cucumber, zucchini, garlic, scallions, basil, and parsley. Add them to a mixing bowl along with your tuna, olive oil, sriracha, salt, and pepper.

When the egg is cool, peel and dice it. Add your egg, broccoli, and beans to the bowl. Mix thoroughly. Taste and adjust seasonings.

Serve on a bed of salad greens of your choice, with an extra drizzle of olive oil and a little more salt and pepper.

A spoonful or two of leftover salad, combined with mozzarella cheese and another dash of sriracha, makes a good quick quesadilla filling. The cucumber makes it a little drippy, but it's still delicious.

How are you eating your fresh summer vegetables?

29 May 2015

Chickpea, heart of palm, & roasted red pepper salad

Chickpea, heart of palm, & roasted red pepper salad

One thing you do when you're going out of town -- especially if an abundant CSA box is on the way -- is to eat down as much of the food in your kitchen as you can.

Salad was definitely on the list, because we had romaine already, and we're going to get an influx of even more greens before we leave. So I went through the cabinets and pulled out everything I thought would make a great full-meal salad. That meant chickpeas, hearts of palm, and jarred roasted red pepper. Together, they make an excellent, highly flavored, and multitextural salad. Over plenty of crispy greens, this mix made a very satisfying lunch.

This salad is very reminiscent of one of my favorite restaurant salads ever: the heart of palm salad at Osteria in Palo Alto, CA. I'm super excited to have made something similar at home. And if any of you want good Italian food -- especially salads -- in Palo Alto, this is where you should go, hands down. Even their basic green salad is astoundingly good.

This recipe will make three meal-sized servings or 4-6 smaller servings. It's therefore pretty great to make on Sunday and bring to work for several days during the week, as long as you keep the salad greens separate from the marinated veg mixture.

Chickpea, heart of palm, & roasted red pepper salad

Chickpea, heart of palm, & roasted red pepper salad

1 15-oz can or 2 cups cooked chickpeas
1 14-15-oz can hearts of palm
3-4 roasted red bell peppers
several big handfuls of chopped parsley
1 tbsp champagne vinegar
1 clove crushed garlic
4+ tbsp olive oil
salt and pepper
up to 1 head romaine or other salad greens

If you need to roast your peppers, do that first. You can either roast them directly over the gas flame or halve them and stick them under the broiler. In either case, you want to blacken and blister the peppers on all sides. Then put them in a bag or sealable container for about ten minutes; this will trap the steam inside and loosen the skins. Then you can just brush the skin away with your fingers. Voila! Roasted red peppers!

Drain and rinse your chickpeas and deposit them in a large mixing bowl. Drain and rinse your hearts of palm, cut them into bite-sized pieces, and add them to the bowl. My hearts of palm were supposedly salad-cut, but they were still pretty large, so I cut them down a bit more. Chop your roasted and skinned peppers into similar bite-sized pieces and add them to the bowl. Add a couple big handfuls of chopped parsley, and the base of your salad is ready.

To make the dressing, mix together a tablespoon of champagne vinegar and a clove of crushed garlic, along with some salt and pepper. Whisk in about 4 tablespoons of good olive oil. Taste and adjust the seasonings to your liking. Then pour your dressing over your salad and stir well to coat and mix. You can sub about 5 tbsp of the vinaigrette of your choice if you prefer.

It's a good idea to let this salad rest in the refrigerator for at least an hour before serving, so the flavors have a chance to mix together nicely. I absolutely did not do this, however.

When you're ready to serve, wash, dry, and chop your salad greens into appropriate pieces. Spread a few handfuls of leaves over each plate. Top with a generous amount of your chickpea mixture. Sprinkle a little more pepper on top and go to town.

What are some of your favorite salads?


09 April 2015

Spring salad pita with sugar snap peas, avocado, and mushrooms

Spring salad pita with sugar snap peas, avocado, and mushrooms

I have been putting raw sugar snap peas into pretty much everything I make lately. So good! So springy! So sweet and crunchy!

If it's still too early for peas where you are, I think some grated raw beet or carrot would be a good substitute. Those are pretty sweet and crunchy too.

This pita is just about the easiest lunch ever. Just chop up a salad's worth of vegetables, stuff them inside some warm pita bread, and go to town. It's such a good way to get plenty of fresh spring vegetables, snap peas or not.

Spring salad pita with sugar snap peas, avocado, and mushrooms

For 2 sandwiches:

2 loaves pita bread
3-4 large romaine lettuce leaves
1 medium avocado
~15 sugar snap peas
2 scallions
4-5 button mushrooms
~2 tbsp fresh parsley
salt & pepper to taste
olive oil or vinaigrette to dress
~4 tbsp hummus

Gently warm your pita in a 250F toaster oven (or just an ordinary oven) while you make the salad.

Wash your lettuce leaves and chop them into bite-sized pieces. Halve and dice your avocado. Finely slice your sugar snap peas, scallions, and mushrooms. Mince your parsley. Add all of these to a mixing bowl, season with salt and pepper, drizzle with olive oil or vinaigrette, and toss gently to combine.

When your pita breads are toasty warm and beginning to crisp up a bit on the outside, remove them from the toaster oven and cut them in half. Spread the inside of each half with hummus. Fill with your salad mixture, and you are ready to eat.

What sandwiches are you eating this spring?

20 February 2015

Roasted beet and fennel salad with orange and dill

Roasted beet and fennel salad with orange and dill

I've been meaning to make this salad for weeks, but life kept getting in the way. Well, both life and my own innate laziness, not to mention my desire to eat other things, such as big dishes of curry, that would not go very well with such a thing. But now I have made it and eaten it and it was delicious.

This is such a great salad for the middle of winter: full of bright and tangy flavors, but also the warmth and comfort of roasted vegetables. Adding some chickpeas or white beans would make it a full lunch with very little effort. And any leftover beets and fennel can just chill in the refrigerator for future salad endeavors. It's definitely a win all around.

It has been far too long since I've put citrus pieces in a salad. These orange segments were possibly the best contrast ever to the earthiness of beet and the gentle bite of roasted fennel. I know what I'll be doing with the next few oranges that fall off our tree.

Roasted beet and fennel salad with orange and dill

This is also an excellent way to get random beets out of your crisper! Mine were these exciting torpedo-shaped monsters. I still have another bunch of beets hanging around. Maybe those will become salad mark II.

Roasted beet and fennel salad with orange and dill

1 large or 2-3 small beets per serving
1/2 large head fennel per serving
olive oil, salt, pepper
up to 1 orange per serving
1 handful chopped dill per serving (or sub fennel fronds)
Orange and shallot dressing

Start by preheating the oven to 350F to roast your vegetables. For the beets: trim off any beet greens, scrub well, and put in a casserole dish with 1/2 cup water. Cover tightly with foil. For the fennel: core, remove stems and fronds, and cut into bite-sized chunks. Toss with a glug of olive oil and a few shakes apiece of salt and pepper. Put them in a different baking dish, so they can caramelize a bit and not turn magenta while cooking.

Put your beets and fennel into the oven and roast for approximately one hour, or until they are tender to the point of a knife. Let your beets cool enough to touch before rubbing off the skins with your hands. Be careful, because there will be beet juice everywhere! Cut the peeled beets into bite-sized pieces.

Supreme your oranges. Start by cutting off the skins, removing the white pith as you go. Then, using a small paring knife, cut directly next to the membrane on one side of a segment, and then the other. This should let you remove the segment, completely free of membranes. Repeat until you've removed all the orange flesh. Save the core of the orange and any juice on the cutting board to make the dressing.

To assemble your salad, arrange your fennel, beets, and orange segments on a plate. Scatter a handful or two of chopped dill over the vegetables and fruit. Dress with orange and shallot dressing, add some extra pepper if you desire, and serve.

Roasted beet and fennel salad with orange and dill

Orange and shallot dressing
Adapted from The Joy of Cooking

1 clove garlic
2 large pinches salt
1 large or 2 small shallots
1/8 cup orange juice (squeezed from the carcass of the orange)
2 tbsp lemon juice
several good grinds of pepper
1/2 cup olive or vegetable oil

Mince your garlic, sprinkle it with salt, and crush it to a puree by scraping it with the flat of your knife. Finely mince your shallot.

Put all your ingredients into a jar with a tight-fitting lid. Close the jar and shake vigorously until the oil is well emulsified. Taste and correct seasonings before serving. Refrigerate extra dressing for future salads. Makes approximately 3/4 cup.

What salads are you eating this winter?

03 November 2014

Spicy tuna pasta salad with green beans, tomato, and romaine

Spicy tuna pasta salad with green beans, tomato, and romaine

A few weeks ago I found cans of tuna for practically the lowest price ever -- 66 cents each -- and grabbed a stack for future nearly-instant lunch endeavours. You know, like this one. Mixed with pasta and an assortment of garden veg, it was delicious, yet incredibly cheap. Definitely a win all around.

For veg, I looked at what was left of the garden. I know I'm not the only one who still has a windowsill full of slowly ripening green (and orangish, and actually red in some cases) tomatoes. This sounded like an excellent way to eat one. With a handful of the last beans -- a mix of plain green bush beans and scarlet runners -- I had a good mix of vegetables to spike my salad.

And why not serve the whole shebang on a bed of salad greens? Who doesn't like a little salad on salad action? You have to love the texture contrast of chewy tuna and pasta with super crispy, crunchy romaine. Even a soft butter lettuce would be great here, though. It just depends on what you have in the crisper.

In fact, practically any element of this salad can be switched out for something else. Butter lettuce is not the only option -- so are hard-boiled eggs, roasted beets, grated carrots, handfuls of sprouts, tiny broccoli florets, chickpeas, white beans, rice or quinoa, and as many or as few herbs as you happen to have on hand. Use what you have and make what you love.

Spicy tuna pasta salad with green beans, tomato, and romaine

Spicy tuna pasta salad with green beans, tomato, and romaine

chunky pasta of your choice
1 can tuna
1 clove garlic
the tail end of a bunch of cilantro or parsley
handful of green beans (cooked or raw; mine were raw)
1 small to medium tomato
olive oil, touch of vinegar, dijon or brown mustard
salt & pepper
sriracha sauce if you like it hot
romaine lettuce or your choice of greens, washed & dried

Start by putting on a pot of salted water and cooking your pasta. While it's cooking, prep the rest of your salad ingredients.

Drain your tuna and deposit it into a mixing bowl. Mince your garlic and herbs finely, slice your green beans into pieces (bite-sized if cooked, and very thin if raw), and dice your tomato; add all of these to the bowl. If you want to add any other vegetables, beans, eggs, herbs, etc., cut them up and add them too.

Dress your salad with a few glugs of olive oil. Season with vinegar, mustard, salt, pepper, and sriracha sauce to taste. When your pasta is done, drain it and add it to the bowl. Mix, taste, and correct the seasonings.

To serve, scatter a few handfuls of chopped romaine over your plate. Top with as much tuna pasta salad as you like. Garnish with some extra cilantro or a grind of pepper. Voila!

Everyone loves salad with even more salad on top.

What easy lunches and dinners are you making this fall?

13 September 2014

Emergency tuna pasta salad

Emergency tuna pasta salad

Sometimes -- like when you get home with approximately 35 minutes to make and eat lunch before the plumber is supposed to show up to fix your kitchen faucet -- emergency food has to happen. This tuna pasta salad is an excellent example.

This salad is 100% flexible, depending on what vegetables you happen to have kicking around your crisper or ready to eat in your garden. Use as much or as little as you like of practically every ingredient. Then nom it like a boss.

If you are in the no-meat camp, you obviously won't be using tuna here. I would probably go for some roughly mashed chickpeas or a couple diced hard-boiled eggs, but you should clearly feel free to experiment with whatever sounds good to you. And if you are in the no-pasta camp, rice or another grain of your choice would be an excellent substitute.

One standard can of tuna plus half a pound of pasta and as much veg as you like will make approximately two servings.

Emergency tuna pasta salad

Emergency tuna pasta salad

chunky pasta of your choice
a can of tuna
cucumber
red pepper
green onion
fresh parsley
mesclun mix or other salad greens
olive oil
salt, pepper
dijon mustard

Put a pot of salted water on to boil. Cook your pasta while you're prepping the rest of your ingredients.

Drain your can of tuna and deposit it into a bowl.

Chop up your cucumber, red pepper, green onion, parsley, and salad greens. Add them to the bowl.

Season with olive oil, salt, pepper, and dijon mustard.

Check to see if your pasta is ready. When it's done, drain it and add it to the tuna and veg. Mix well. Taste and adjust the seasonings.

Wow! It's done!

Now sit down and have some instant dinner. Or lunch. Or breakfast, if tuna salad for breakfast floats your boat.

What are your emergency back-up lunches?

08 September 2014

It's still summer: tomato, cucumber, and chive salad

It's still summer: tomato, cucumber, and chive salad

Okay. I hear you on the incoming pumpkin. It is September, after all. But that doesn't mean tomato season is over!

I for one am still eating quite a few plates of food that look very much like this. Fresh tomato! Fresh cucumber! Fresh chives!

They're all so good, and they're all still easily available. So let's cram our faces with the best of the late summer produce while we still can, shall we?

It's still summer: tomato, cucumber, and chive salad

Tomato, cucumber, and chive salad

The best beefsteak tomato you have (Caspian Pink in my case)
A lovely crisp cucumber
A handful of fresh chives
salt, pepper, olive oil
optional lemon juice or vinegar

This could not be easier or more delicious.

Wash your tomato and cut it into half-inch-thick slices. If your tomato is particularly huge, you may want to halve it first. Slice your cucumber into thin half-moons or quarter-moons. Cut your chives into a pile of tiny bits.

Arrange a fan of tomato slices on each salad plate. Season with salt and pepper to taste. Drizzle on a few drops of olive oil.

Top each plate of tomato with a handful of cucumber. Season as before with salt, pepper, and olive oil. Garnish with a generous sprinkling of chives. If you like, finish the plate with a small squeeze of lemon juice or a few drops of vinegar.

Voila! Your salad is complete.

It's still summer: tomato, cucumber, and chive salad

You can serve as much of this salad per person as you please. I made mine a reasonable side salad size, but if you have the appetite for a full dinner plate of huge tomato slices, I say go for it.

My brain wants this salad next to a plate of eggs, either deviled, poached and served on some nice seedy toast, or just scrambled. It would also be excellent with any number of other things, however! Sandwiches of all kinds would be a perfect plan. So would a big whack of a proteiny salad - chickpea, tuna, or what have you. So would a nicely seared piece of fish. Practically anything would be a good idea. Get what you like and eat it!

How are you relishing the final fruits of summer?

14 August 2014

Emergency dinner: mashed potatoes with homemade ranch & salad with green beans & eggs

Emergency dinner: mashed potatoes with homemade ranch & salad with green beans & eggs

Sometimes you just need emergency dinner.

First, put a pot of salted water on to boil. Scrub your potatoes under running water, cut into quarters, and simmer until tender.

Put your eggs into the potato pot to cook along with them. Scoop them out after about eight minutes and put them in a bowl of ice water to cool. When you're ready, whack them all over with the back of a spoon, peel them, and cut them into quarters.

Wash and trim your green beans. Put them in a steamer that fits over your potato pot. Put the steamer over the pot and steam until done to your liking. Shock briefly in cold water.

While your potatoes finish cooking, make a batch of The Chubby Vegetarian's yogurt ranch dressing. Put it in the fridge until you're ready to serve.

When the potatoes are done, drain them well and mash them with butter, salt, and pepper. Mash in some ranch dressing if you don't have any yogurt-haters in the house.

Get out a dinner plate. On one side, throw down a handful of the clean salad leaves of your choice. Top with green beans and eggs; season with salt and pepper. Drizzle on some olive oil if you so choose. On the other side of the plate, deposit a huge scoop of mashed potatoes. Top the potatoes with as much ranch dressing as you like.

Now eat it. Eat it all.

And for those of you watching at home, here's what it looks like when you hard-boil a double-yolked egg.

Emergency dinner: mashed potatoes with homemade ranch & salad with green beans & eggs

I've been saving this picture for months! And now, finally, there is a reason to post it. Eggs are the best, you guys.

What do you eat for emergency midsummer dinner?

11 August 2014

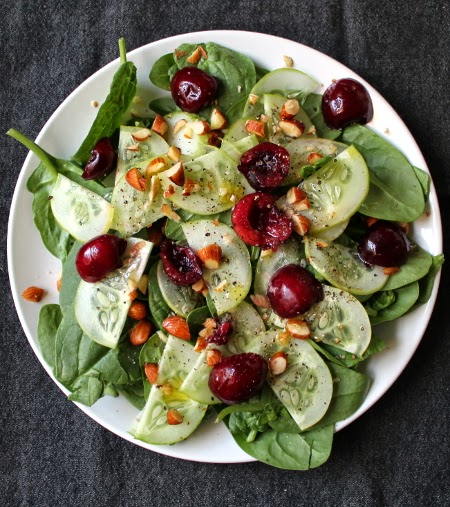
Spinach salad with lemon cucumber, toasted almonds, and summer cherries

Spinach salad with lemon cucumber, toasted almonds, and summer cherries

Well, we are still essentially buried under a massive amount of fresh CSA veg at all times.

This means salads. Lots of salads. Salads at dinner, yes; salads at lunch, yes. Salads at breakfast? Also yes.

Breakfast salads are one of my favorite things. This stems from our year and a half living in Brooklyn, during which we tried our best to eat at every restaurant possible, and consequently ended up eating a lot of brunch. I mean, we would have ended up eating lots of brunch anyway, but Brooklyn is one of those towns in which brunch is practically an institution. So we ate lots of brunch at lots of different places, and the main thing those places had in common was salad. Every time we ate brunch anywhere even the smallest step up from the classic diner, we discovered that our orders came with a handful of mesclun and shredded carrot, tossed with vinaigrette and deposited next to the egg of our choice.

And now I don't really want to eat breakfast without some sort of serious vegetable content.

So. Salad for breakfast?

We received both a bag of baby spinach and a few lemon cucumbers in the last CSA box. Clearly, those were the basis for an excellent salad.

Lemon cucumber is not a variety I use much, mostly because it's not the best choice for pickling. But when I'm not making pickles, I find its mild flavor and subtle crunch to be delicious in salads and sandwiches.

The cherries came into play after we found bags of them on sale for $2 per pound. You can't say no to that. And once you have cherries, you have to have a handful of crunchy, rich almonds as well.

Boom. Salad.

Spinach salad with lemon cucumber, toasted almonds, and summer cherries

Spinach salad with lemon cucumber, toasted almonds, and summer cherries

baby spinach
lemon cucumber
toasted almonds
sweet cherries
olive oil
salt, pepper
lemon juice

Arrange a few handfuls of spinach on each salad plate. Scatter a few drops of olive oil over them.

Trim your lemon cucumber, halve it, and slice it into thin slices. Arrange half a cucumber's worth of slices over each salad.

Roughly chop a handful of almonds and scatter them over each salad.

Pit your cherries, either using a cherry pitter or the paperclip method. Cut them in half. Strew a generous handful of cherry halves over each salad.

Dress your salads with a drizzle of olive oil, a squeeze of lemon juice, and some salt and pepper. Done.

While these salads are excellent alongside a plate of traditional breakfast eggs and toast, they would also clearly be fine additions to the lunch or dinner table. Eat them with a huge sandwich, a seared piece of halibut and a side of green beans, a bowlful of rice and curry. It's all good.

What is your favorite summertime salad?

07 August 2014

Red cabbage curtido de repollo

Red cabbage curtido de repollo

If you want to make the pinkest pickle imaginable, I have just the recipe for you!

I've been making gigantic batches of curtido de repollo -- essentially, spicy pickled cabbage slaw -- ever since I first tasted it at our local Salvadorean restaurant. There, you stuff platefuls of pupusas with as much curtido as you so desire. The contrast between soft, chewy masa, creamy beans, and crunchy, tangy curtido is pretty spectacular.

At home, I've never yet attempted a batch of pupusas. Note to self: this really needs to happen as soon as possible. However, the curtido has been flowing freely. We eat it in tacos, in burritos, on top of big bowls of chili, and occasionally all by itself. SO good.

Normally, I use standard green cabbage and yellow onion to make curtido. This time, I had a lot of red cabbage and red onion from our CSA. Pink curtido it is!

Red cabbage curtido de repollo

1 small or 1/2 large red cabbage
a carrot
half a small red onion
1 1/2 cups white vinegar
1 cup water
2 serrano peppers, or whatever works for your spice tolerance
1 tbsp salt

Start by coring and shredding your cabbage and dicing your carrot and red onion. Put them in a large non-metal mixing bowl (mine is 4 quarts) and toss to mix.

Put your vinegar, water, peppers (chopped roughly), and salt in a blender. Liquefy. Be sure to keep your hand and maybe a towel over the top of the blender, so you can combat any liquid leaks. The result will be a light green brine with a layer of foam on top.

Red cabbage curtido de repollo

Pour your completed brine over your bowl of vegetables. Stir, getting all the vegetables wet.

The brine will not come up to the top of the bowl; this is fine. As the cabbage pickles, it will wilt and exude liquid, so the amount of brine will increase to cover all the veg within a few hours.

It will also turn pink from the red onion and cabbage. Hooray! Pink pickles!

Red cabbage curtido de repollo

Cover the bowl, put it in the refrigerator, and let it sit for at least three to four hours. Mix every so often, so the surface cabbage gets submerged in the brine. When the liquid level comes up to the top of the vegetables, you can stop mixing.

Congratulations! You are the proud owner of a big batch of curtido -- about 8 to 10 cups, depending on the size of your cabbage. It will keep well in the refrigerator for a good two weeks, getting gradually more and more pickley as it ages.

Eat your curtido with pupusas or arepas, on tacos, in burritos, on top of servings of chili, or alongside big bowls of tortilla soup. So crispy and tangy and delicious!

What's your favorite bright pink food?

07 July 2014

Strawberry, nectarine, basil, and fennel frond salad

Strawberry, nectarine, basil, and fennel frond salad

I don't know about you, but salad is just about the only thing I'm really craving right now. It's cool, refreshing, and delicious. It's an excellent way to eat as much delicate summer fruit as possible -- and vegetables as well. And it's certainly the season for a bounty of fresh produce!

Lately, our CSA box has been showering us with assorted greens, heads of fennel, baskets of strawberries, and even a still-rooted basil plant that's been resting happily in a jar of water for a good week. I supplemented this mix with a single white nectarine, and ten minutes later sat down to a huge plate of delicious fruit, herbs, and vegetables. So good.

I used a mix of butter lettuce and baby spinach for the base of this salad. Spinach and strawberry, together forever, right? The butter lettuce upped the crunch factor for a good contrast with the soft fruit and herbs. If you want an even greater contrast, you could also add in some bitter crunchy greens like endive or radicchio. Or toss on some toasted almonds, if that floats your boat. It's all good.

For dressing, I went super simple with olive oil and lemon. This salad could definitely stand up to a syrupy balsamic vinegar instead of the lemon -- I just tend not to ever have such a thing in the house. Yes, a foodblogger without balsamic vinegar! But no matter what my kitchen stock may be, berries and stone fruit with balsamic are still completely classic.

Strawberry, nectarine, basil, and fennel frond salad

Strawberry, nectarine, basil, and fennel frond salad

lettuce of your choice
2-3 strawberries per serving
1/2 nectarine per serving
3 fennel fronds per serving
4-5 basil leaves per serving
olive oil
lemon wedge
salt, pepper

Chop up your lettuce, wash, and spin dry. Arrange a few handfuls on as many salad plates as you want servings. Drizzle with a few drops of olive oil.

Wash your strawberries, halve or quarter them according to size, and scatter them across your plates of lettuce.

Wash your nectarine, twist the halves off the pit, and slice into thin slices. If your pit clings, slice individual slices off the nectarine, using the remaining flesh as a pivot for your knife, and gradually rotate until you have enough. Add your nectarine to your salads.

Roughly chop your fennel fronds and slice your basil leaves into thin strips. Distribute them over your salads.

Drizzle some olive oil over each plate of salad. Season with salt and pepper. Serve each salad with a lemon wedge for individual acid adjustment, or just squeeze and serve if you prefer.

Strawberry, nectarine, basil, and fennel frond salad

This salad is great by itself, or with a few crackers and cheese on the side as a simple lunch, but it would also work very well with all kinds of other dishes. Vivid carrot soup, garlicky white bean salad, or a piece of simple poached fish -- it's all good. Or shred some leftover chicken and add it in for a full meal in salad form. Hooray, salad!

Are you eating any of your summer fruit in salad form?

24 June 2014

Baby artichoke and roasted red pepper salad with chickpeas and mesclun

Baby artichoke and roasted red pepper salad with chickpeas and mesclun

We interrupt plum week (uh, two weeks?) to bring you this important bulletin.

SALAD IS AWESOME.

Maud at Food Feud was talking about advance prep for a week's worth of salads. Yes! LET'S DO IT.

On the menu:
- baby artichokes
- roasted red pepper
- and then a delightful salad! YAY.

I needed to use all the baby artichokes from the CSA box before they went off. This is always a challenge, since artichokes are not noticeably tender or easy to cut when raw. So I broke out our steel, sharpened my knives, and got to work.

cooked baby artichokes

How to cook baby artichokes

baby artichokes
1-2 lemons
water
1 1/2 tbsp salt
1/4 cup apple cider vinegar or lemon juice
1 1/2 tbsp olive oil
1 garlic clove for each 2 baby artichokes

Start by trimming your baby artichokes. This is the hardest part of the whole process. Essentially, you want to chop off the top third of the artichoke, trim the bottom of the stem and peel it thickly, and then cut around and around the edges of your artichoke until all the dark green and purple is removed. You should be left with a little yellow-green nugget of excellence.

Have a big bowl of water ready with the juice of one or two lemons squeezed into it (and the empty peels dropped in too). As you trim each artichoke, drop it into the acidulated water. This will keep your artichokes from oxidizing and turning black.

When all your artichokes are trimmed, bring a pot of water to a boil. Add salt, lemon juice or apple cider vinegar, olive oil, and crushed garlic cloves. Then toss in your artichokes, right side up. Simmer, covered, for about 12 to 15 minutes, or until tender to the point of a knife. Full-size artichokes can go up to 35 minutes.

When your artichokes are done, pull them out of the water and drain them upside down for a few minutes. Then you can halve or quarter them, or leave them whole if they are particularly small. Note that you do not have to remove chokes from baby artichokes, as they are not yet formed. If you're doing this with full-size artichokes, you'll need to get in there with a spoon and scoop out any sharp thistley bits.

Store your artichokes with the lemon husks in a closed container in the fridge. Now you can pull out a handful whenever you want salad!

roasted red pepper strips in olive oil

How to roast bell peppers over the gas flame

bell peppers of your choice
tongs
paper bag or sealable container large enough to hold your peppers

This is easy but requires some attention and care.

If your peppers have stems, cut them off. This is just to keep any dangling bits from catching on fire. The base of the stem can stay on, so the pepper as a whole is intact.

Turn on your gas burner to medium-high. Using your tongs, set the pepper right on the grate over the flame.

The flames will gradually char and roast the pepper. Turn your pepper as it cooks, so all the flesh is evenly blistered and blackened. The creases in the pepper may not want to char; this is okay.

When the majority of your pepper skin is charred, take your pepper off the heat. Put it into a paper bag or other unmeltable container and seal. Leave it there for at least five minutes. Inside the bag, the steam from the hot pepper will loosen the skin.

Repeat this for all the peppers you want to roast.

Remove your roasted peppers from the bag and remove the skins by rubbing them under a stream of cool water. Most of the skin will flake off easily. It's fine to leave any stuck bits of uncharred skin on the flesh.

Tear each pepper in half and remove the stem and seeds. Separate into sections and chop up into any shapes you like.

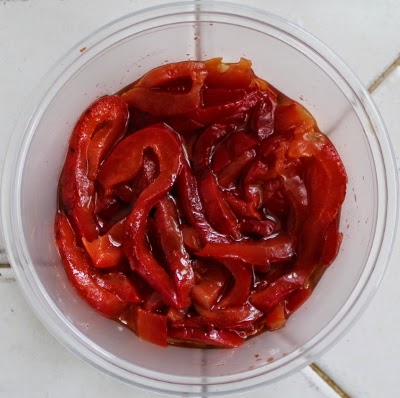
Voila! Roasted red pepper! I cut mine into strips and stored them in a little olive oil in the refrigerator.

Now that you have a selection of delightful vegetables ready to go at a moment's notice, you can make a salad like this in no time flat.

Baby artichoke and roasted red pepper salad with chickpeas and mesclun

Baby artichoke and roasted red pepper salad with chickpeas and mesclun

mesclun mix
cooked baby artichokes
roasted red pepper
cooked chickpeas (canned or previously cooked & cooled)
olive oil
lemon juice or vinegar
salt, pepper

Arrange your mesclun mix on a plate. Scatter with big handfuls of artichokes, red pepper, and well-drained chickpeas.

Make a simple dressing by drizzling some olive oil over your plate, squeezing a lemon wedge over the top, and seasoning with salt and pepper. Or just use the vinaigrette of your choice.

Eat with vigor! Hooray!

And since you have the rest of the baby artichokes and red pepper strips in the refrigerator, you can have salads like this all week. Or use them for other things! Blend the baby artichokes with some white beans and garlic to make the world's best dip and/or sandwich spread. Toss the roasted pepper into a rice pilaf. Put big handfuls of both artichokes and peppers into a hearty pasta sauce. HAVE IT ALL.

What delights do you like to have on hand for an emergency salad session?

17 June 2014

Salad of plums, almonds, and arugula

Salad of plums, almonds, and arugula

The plums are ripe.

They're constantly falling off the tree into the backyard. Squirrels take single bites and leave the rest of the fruit hanging from their stems. Birds peck.

It's ok, though; we've rescued plenty. So now, it's plum week!

I kicked it off with a very simple but VERY delicious salad: a bed of tender baby arugula with chopped plums and roasted almonds, topped off with a minimal drizzle of olive oil and squeeze of lemon. Perfect.

The discerning viewer will notice that the salad in the picture is actually made with little gem lettuce. This is because we tore through the original arugula-based salads way too quickly to take any pictures, but I am not going out to buy more baby arugula when we have a CSA shipment of lettuce to get through once a week. The little gem version was good, but the arugula was better. Take note.

This can be easily adapted for any number of servings. Make as much as you like!

Salad of plums, almonds, and arugula

Salad of plums, almonds, and arugula

baby arugula
fresh plums
roasted almonds
olive oil
salt, pepper
lemon wedges

Wash and spin dry your arugula. Arrange big handfuls on each salad plate.

Wash your plums. Slice them off their pits and into fourths or eighths. Scatter handfuls of plum across each plate of arugula. Pour any accumulated juice over each salad.

Roughly chop your almonds and add them to your salads. If you have raw almonds instead of roasted, toast them in a frying pan for about 5 minute, or until fragrant and starting to turn golden, before you chop.

Drizzle a thin stream of olive oil over each salad. Season with a little salt and pepper. Serve with a lemon wedge, or just squeeze a spray of juice over each salad.

The finished salad is so simple and so good. The sweet plums, the spicy arugula, and the crunchy almonds are a perfect combination of contrasting textures and flavors.

Plum almond arugula salad

What could you eat with this salad? Practically anything. A plate of pasta with creamy sauce, a bowl of hearty, wine-laced soup, a perfectly seared piece of meat or fish, or a huge sandwich stuffed sky-high with every filling under the sun: any or all of these would be great.

What new and creative dishes are you cooking with your summer stone fruit?

28 May 2014

The simplest, best summer salad

The simplest, best summer salad: butter lettuce, cucumber julienne, and fresh dill

Yes, we still have dill in the house, but don't worry -- a few more salads like this and it'll all be eaten.

My taste in salad (or just food in general) is gradually getting simpler and simpler. Salads with a huge mixture of different vegetables are still delicious, and they still happen, especially when I need an entire lunch immediately. But ordinary lettuce salads with one or two other vegetables are popping up more and more often. I don't even make dressing most of the time; a drizzle of olive oil, a little salt and pepper, and a wedge of lemon work just fine.

For this one, I julienned a double handful of English cucumber slices and added a whole lot of dill. It was perfect.

If you've never eaten cucumber in a thin julienne like this, you should definitely give it a try. It's a far cry from the huge, tasteless chunks of waxy, watery cucumber in the standard house salad. The julienne cut transforms cucumber into something soft and juicy and amazing.

Other green leafy herbs would work well in lieu of dill. Parsley is the obvious choice, but chives or tarragon are also a good idea. Pick one you like and run with it.

The simplest, best summer salad: butter lettuce, cucumber julienne, and fresh dill

The simplest, best summer salad: butter lettuce, cucumber julienne, and fresh dill

butter lettuce or another salad green
English or Persian cucumber
fresh dill or another herb of your choice
olive oil
salt & pepper
lemon wedge

Wash your lettuce well and spin it dry. Chop or tear into bite-sized pieces. Arrange it on a plate.

Cut your cucumber into thin slices, stack the slices up, and cut across to make a fine julienne. Scatter your cucumber over the lettuce.

Top with a handful of fresh snipped dill. Drizzle with olive oil and season with salt and pepper. Serve with a wedge of lemon on the side, and squeeze it over your plate before you eat.

I had mine with a big sandwich and was well satisfied. Fruit for dessert, if you want it.

What kind of salads are you eating lately?

07 May 2014

Couscous salad with chickpeas, golden beets, and zucchini

couscous salad with chickpeas, golden beets, and zucchini

Who wants a quick and delicious lunch salad? You know you want one.

Raw beet has fast become my favorite way to cram as much crunchy, sweet vegetables as possible into a salad. To keep everything in my kitchen from turning fuchsia, I use golden beets. Red or chioggia beets also work well, but their juice will stain. At the very least, red beets will produce a bright pink salad. Be aware!

Of course, beets alone are not a particularly sufficient lunch. To give this salad some real heft, I opened a can of chickpeas. These little guys are the saviors of lunch salads everywhere. And why not bulk it up with the easiest non-grain ever, instant couscous? Perfect.

Not only is this salad tasty, easy, and cheap, it's very easily packable for work lunches or potlucks. The couscous absorbs the dressing, so there's very little risk of an olive oil spill. If I still worked in an office, I absolutely would have packed up a bunch of servings so I could grab one every day as I ran out the door.

I accidentally made enough salad to feed myself for a full week. Oops. On the other hand, now I have lunch just waiting in the fridge constantly. I call that a win.

Makes 6-8 servings.

couscous salad with chickpeas, golden beets, and zucchini

Couscous salad with chickpeas, golden beets, and zucchini

Salad:
1 cup instant couscous
salt, pepper, olive oil
1 cup boiling water
1 medium-large golden beet
1 small zucchini
4 mushrooms
fresh parsley & chives
2 cups cooked chickpeas

Dressing:
lemon juice
dijon mustard
salt, pepper
olive oil

Make your couscous by putting it in a heat-safe bowl, seasoning it with a bit of salt, pepper, and olive oil, and pouring the water over it. Cover with a clean tea towel and let it sit while you prep the rest of your ingredients. It will be done in about five minutes.

The vegetables are super easy: just cut them up into the shapes of your choice. I scrubbed and grated a golden beet and finely chopped a zucchini and a handful of mushrooms. You can add all kinds of other vegetables if you like. Chop up a decent whack of flat-leaf parsley and a handful of chives while you're at it.

When your couscous is finished, fluff it with a fork. Add your vegetables, herbs, and chickpeas and stir together.

Make your dressing by combining the juice of half a lemon, a spoonful of dijon mustard, and a generous grinding of salt and pepper. Whip with a fork to emulsify as you drizzle in about 1/3 to 1/2 cup of olive oil. Taste and adjust seasonings.

Pour your dressing over the salad and mix thoroughly.

couscous salad with chickpeas, golden beets, and zucchini

Check out that beautiful golden glow. I actually might have to rename this "golden glow salad," don't you think? So pretty. So tasty.

Which salads are keeping you happy as the weather heats up?

20 April 2014

Broccolini vinaigrette with chopped egg and red onion

Broccolini vinaigrette with chopped egg and red onion

Everyone has been on the asparagus bandwagon lately. I have too. The roasted asparagus is just jumping onto our plates. But you know what? So are all the other spring vegetables.

How about broccolini?

No one is singing the praises of broccolini this spring. Why not? It's tender, delicious, sweet, and available in nice bunches for your eating pleasure. Go get some!

Broccolini and broccoli rabé are not quite the same thing. Broccolini is sweeter and has bigger, floppier blossoms; broccoli rabé is more bitter, with tighter, more broccoli-like blossoms. They're close enough to each other that they're frequently mislabeled, and they're definitely interchangeable in recipes, but the two flavors will be a little different. If you prefer a more tender green, broccolini is the way to go; if bitter greens are your thing, broccoli rabé. Either one should make a delicious salad.

You can, of course, make this with asparagus too, but why not go for something completely different?

Broccolini vinaigrette with chopped egg and red onion

Broccolini vinaigrette with chopped egg and red onion

broccolini
red onion
hard-boiled egg
olive oil
lemon wedge
salt & pepper

If you need to hard-boil an egg, do it in advance. I boil mine for eight to nine minutes, depending on size, and ice them immediately when done. You can use whatever method you like best.

Start by trimming the ends of as much broccolini as you want to eat. I used half a small bunch for one lunch-sized serving; a whole bunch could serve two for lunch or three to four as a side.

Steam your broccolini over boiling water. After three minutes, pull out all the thinner stems. Continue to steam the thicker stems for about two more minutes before pulling them as well. (If you're using broccoli rabé, you may need to add a few minutes to the steaming time.) Let them sit for a minute to let the clinging water evaporate, but don't shock them in cold water unless you want a cold salad.

While your broccolini is steaming and resting, finely mince a slice or two of red onion. You can also use shallot if you like. Peel your hard-boiled egg and finely mince it as well. You'll want about half an egg per serving; I left the second half of mine whole and just ate it alongside my broccolini with some salt and extra red onion.

Dress your broccolini in a light drizzle of olive oil, turning to coat all sides. Arrange the pieces on a plate. Squeeze a lemon wedge over all, scatter with a tablespoon of red onion and one of egg, and season with salt and pepper.

It's so good.

What new spring vegetables are you most excited to eat?

11 April 2014

Roasted beet salad with butter lettuce and sliced eggs


Salads are the best. Salads that fulfill the lunch quota for the day are even better.

This time I went for a contrast in temperature and texture as well as flavor. Beets and eggs still warm from cooking over cool, crunchy lettuce, covered with a tangy, herby vinaigrette? Perfect. I ate a plateful for lunch, had a sliced apple for dessert, and was thus well prepared for an afternoon's work. Yay!

For an added bonus, you can absolutely make 90% of this salad in advance. Roasted beets, hard-boiled eggs, and vinaigrette all keep quite well for a good week, so you can have a prep party and get all of them ready on a long, lazy weekend afternoon. A few days later, when you discover that you need to eat lunch immediately, you can assemble it on the spot and go.

I kept this salad super simple, with only three main ingredients, but you can absolutely up the fance factor if you so desire. A handful of toasted almonds or walnuts, some beautifully garlicky croutons, or a scattering of crumbled feta or goat cheese would all be excellent over hearty, earthy-sweet beets. Extra crunch and tang? Yes, please.


Roasted beet salad with butter lettuce and sliced eggs

2-3 small beets or 1 large
2 eggs
butter lettuce
salt & pepper
vinaigrette of your choice

To roast your beets: Preheat the oven to 400F while you scrub your beets under running water. Trim the stems, saving the leaves for the braised, stir-fried, or ensoupenated application of your choice.

Wrap the beets in foil, put them in a small casserole dish, and roast for about 45 to 60 minutes, or until tender to the point of a knife.

When your beets are done, give them a few minutes to cool, and then slip off the skins with your fingers. Slice into whatever size pieces you prefer.

To hard-boil your eggs: put your eggs in a small pot with a lid and cover them with water. Bring to a boil, reduce to a simmer, and cook, covered, for eight minutes for large eggs and nine for extra-large.

Immediately remove the pan from the heat, drain off the hot water, and cover your hot eggs with cold water and ice. When cool enough to handle, peel under running water. Slice.

To assemble your salad: Wash and spin dry your lettuce. Tear or chop it into bite-sized pieces.

Arrange your lettuce on a plate. Top with your beets and eggs. Sprinkle with salt and pepper and drizzle with vinaigrette. I did a simple oil-vinegar-dijon combination with some added parsley, but I think this herb vinaigrette would be good too. Even a squeeze of lemon would be good.


Beautiful and delicious.

What salads are you eating this spring?

10 March 2014

Spinach salad with grapefruit and avocado

Spinach salad with grapefruit and avocado

Happy daylight savings time! The whole springing forward thing makes me feel like it's actually irreversibly spring. Of course, this is not all that big a leap here in CA, but still. The sun is shining and the scent of new growth is in the air: it's definitely the right time for green, green salads.

This spinach salad couldn't be easier. All you really need is access to fresh, bright greens, seasonal citrus, and a just-ripe avocado. Put them all together and you have a perfect salad for the earliest days of spring.

If you've never supremed a piece of citrus fruit before, you might want to check out this video from Saveur. Just slice off the top and bottom end of your grapefruit, cut off the rest of the peel in strips, and, holding the fruit in one hand, gently slice down the edge of the membrane on each side of a segment. Work your way around your grapefruit until you've removed all the segments, and then squeeze the remaining juice out of the husk. You'll be left with a pile of beautiful, glistening grapefruit pieces and a few tablespoons of juice for your salad dressing.

However, you will also get citrus juice all over your hands, so make sure you don't have any paper cuts before you try this at home. I'm just saying.

This recipe makes 2 large salads or 4 small ones.

Spinach salad with grapefruit and avocado

Spinach salad with grapefruit and avocado

1 bunch fresh spinach
1 large red grapefruit
1 avocado
grapefruit vinaigrette
pepper to garnish

Destem, wash, and dry your spinach leaves. Tear or chop them into bite-sized pieces and arrange them on your plates.

Supreme your grapefruit, reserving the juice for your dressing. Cut your avocado in half and slice each half into long strips. Divide your grapefruit supremes and avocado slices between your plates.

Dress each salad with a few spoonfuls of vinaigrette and top with a final dusting of pepper.

Simple grapefruit vinaigrette

1.5 tbsp grapefruit juice
3 tbsp olive oil
salt and pepper to taste

Put all ingredients in a lidded jar and shake vigorously to emulsify.

Spinach salad with grapefruit and avocado

Hooray! Salad!

I think this salad would be perfect alongside a hearty sandwich or a bowl of hot and comforting soup, depending on just how close spring is at your house. I ate mine with some leftover falafel and rice, because that's how I roll, but if you wanted to make your salad a full meal in itself, some sliced hard-boiled eggs or seared shrimp would work very well.

How are you eating your new spring greens? How about your end-of-season citrus? Or maybe both at once?