31 July 2012

Adventures in sauerkrauting

homemade sauerkraut

Why is fermenting food so intimidating?

I've been meaning to ferment something or other for a good three years at least. I love all kinds of fermented foods, from miso to sourdough to kimchi to tempeh, so it's not as though I had no reason to make them myself. But somehow the only fermented or cultured food I'd ever tried to make was yogurt, and that only once, due to lack-of-candy-thermometer fail.

Clearly the lack of an everyday fermentation tradition is the problem. So. Let's fix that by making a start, shall we?

Two weeks ago, I decided to take on a fermentation challenge and make a batch of sauerkraut. I followed the classic sauerkraut recipe from Sandor Ellix Katz's Wild Fermentation.

These instructions sound very easy. You do need appropriate equipment and a place to put everything during the fermentation process--but the process is clearly doable. It goes like this.

1. Shred cabbage.
2. Mix with salt.
3. Pack into crock.
4. Weight down/ensure things are covered with brine.
5. Let sit around for two weeks or until delicious.

That doesn't sound so hard, right? So I acquired a crock and a cabbage and got to work.

green cabbage

I cored and shredded a green cabbage. This particular one was pretty small. I don't have a scale, but I'd estimate it weighed about two pounds.

Shredding a cabbage by hand is not that big a deal, in case you were wondering. It's not a sufficient reason to get a food processor. (Cashew cheese and its ilk might be, however.)

shredded green cabbage for sauerkraut

I mixed the cabbage with salt and packed it into a large glass jar. Since the rim of the jar was a bit narrower than the body, I couldn't fit a plate inside to weigh down the cabbage. So instead I found an empty ziploc bag, washed it, filled it with water, and weighed the whole shebang down with a smaller jar of water. I hear that if you use this weighting method you're supposed to use salt water in your plastic bag, just in case it bursts. I didn't, but then my bag didn't burst, so that turned out okay.

After about 12 hours my cabbage and salt had produced enough brine to cover itself, so I didn't need to add any additional salt water.

sauerkraut crock with shredded cabbage

Then I just left the entire deal on my kitchen counter, out of the sun and covered with a dishcloth, for two weeks. I checked on it every few days, and shifted my weights a bit to let the bubbling gases escape. The gas from the bubbles smelled sort of milky or whey-like. However! The fermenting sauerkraut didn't smell of anything at all at any other time. We'd been worried that fermenting would really stink up the house, but it totally did not do so in any way whatever. Qualms overcome!

After two weeks, the bubbles had largely subsided, and it was time to try out the finished product. The result was a tangy mass of slightly crunchy sauerkraut, with a young but distinctly correct kraut flavor. It's a far cry from the slimy, translucent, and overpowering mass-produced sauerkraut you get at the grocery store. I'm going to let it keep fermenting for another week or so to get a stronger finished flavor before putting it in the fridge. And then! I will eat it over chili, and with seared sausage, and maybe I'll make up a batch of sauerkraut and mushroom pierogies to stick in the freezer for future dinner application.

Hooray for sauerkraut!

Have you guys ever made fermented food? How did it go?

30 July 2012

Raw zucchini rolls with cashew cheese and heirloom tomato

Raw zucchini rolls with cashew cheese and heirloom tomato

Everyone still needs to find new and interesting ways to eat their summer zucchini stash, correct? Well, have I got a deal for you!

How about some raw zucchini rolls filled with cashew cheese and garnished with that queen of summer lovelies, the heirloom tomato?

I found these rolls to be surprisingly filling--and unsurprisingly delicious. Even John, cordial disliker of zucchini, thought they were good. Raw zucchini obviously tastes a bit different from cooked--which makes this an even more refreshing change from the endless squash sautes and pasta sauces and bread and cakes that normally dominate the summer zucchini discussion.

The process is simple. First, make yourself a batch of cashew cheese. Next, cut up your zucchini and tomato. Finally, assemble your rolls.

I've been experimenting with various additions to cashew cheese. I based this variation off Gena's "pizza cheese", switching out the basil for scallion and sweet bell pepper. Result: delightful.

Raw cashew cheese

Cashew cheese

1 cup cashews, soaked 1 hr and drained
pinch salt
1/2 tsp white miso
small handful sun-dried tomatoes
large handful chopped scallion greens
small handful chopped sweet pepper of your choice
1/8 cup water

Essentially, you just want to grind everything together into a medium-thick paste. Start by grinding the cashews alone. Then add everything else and continue to grind until everything is pureed together. You can also add a bit more water to thin down your cheese if necessary.

I make my cashew cheese in the blender, because we don't have a food processor. You should use a food processor if you have one, because the blender--being better suited to more liquid pursuits--will make you want to hurl it across the room. (I actually got the tip of the spatula stuck under the blender blade and had to use a second spatula to scrape out the finished cheese before completely disassembling the pitcher in order to get the damn thing out. AWESOME.) I'm just saying.

This recipe will be enough to fill two or three medium zucchinis' worth of rolls. I had plenty left over for later snacking and garnishing.

Raw zucchini rolls with cashew cheese

When you're done making your cashew cheese, it's time to make the rolls themselves.

Raw zucchini rolls with cashew cheese and heirloom tomato

cashew cheese, made as above or by your method of choice
whole raw zucchini
heirloom tomato

To make the zucchini strips, just take a vegetable peeler to a topped & tailed zucchini. Cut a bunch of long thin strips all the way down the length of the zucchini. You'll probably have to discard (or, you know, just eat) the first few strips because they'll be very narrow & irregular. When you start getting to the seed chamber, rotate the zucchini 1/3 of the way around and start cutting more strips. Cut as many strips as you want rolls and save the middle for some other purpose.

The tomato is easy; just core and dice it. (You can also leave out the tomato if you want to eat the finished rolls as finger food--for instance, if you're making a big tray for a party. Tomato is delicious, but it does get messy.)

To make the rolls, deposit a small spoonful of cashew cheese on one end of a zucchini strip. Then just roll it up. I find it easiest to wrap the long tail around the cashew cheese section to form the roll, but do whatever works for you. Repeat until you have a lovely plateful of rolls.

Raw zucchini rolls with cashew cheese and heirloom tomato

Scatter the tomato over the rolls, sprinkle with pepper, and eat.

Hooray! A cool, refreshing, easy to make, filling, and totally delicious plate of food. You win summer!

27 July 2012

Couscous with chicken sausage and summer vegetables

Chicken sausage, corn, green beans, grape tomatoes, and couscous

Instant lunch: GO!

Couscous with chicken sausage and summer vegetables

Find yourself a half cup of instant couscous, a precooked chicken sausage, a couple cloves of garlic, an ear of corn, a handful of green beans, and another handful of grape or cherry tomatoes.

Make the couscous by covering it in boiling water fresh from the teapot. The water level should be a finger's width above the couscous. Cover with a cloth and let steam while you cook everything else.

Chicken sausage with corn and green beans

Cut your sausage into reasonable chunks and brown them in a saute pan over medium-high heat, adding a little olive oil if necessary. Add a little crushed & minced garlic after both sides of most pieces have browned.

Husk your corn and cut it off the cob; trim and chop your green beans. Add corn, beans, and a pinch of salt to the pan. Cook, stirring occasionally, until done to your liking. Deglaze the pan with dry vermouth or a little water if needed. Halve your tomatoes and add them to the pan for the last two minutes of cooking. Add a couple grinds of pepper at the very end.

Chicken sausage, corn, green beans, and grape tomatoes

When everything is done, take the cloth off your couscous, season with salt, pepper, and a little olive oil, and fluff it with a fork.

Dump your couscous into your sausage and veg and mix well, coating the couscous with the pan juices. Correct the seasonings and eat with vigor.

Chicken sausage, corn, green beans, grape tomatoes, and couscous

DELIGHTFUL.

Have a great weekend!


25 July 2012

Garlic dill pickles!

homemade garlic dill pickles

There was an entire box of cucumbers in the sort-out bins at the farmer's market this weekend. What better opportunity for pickle-making?

Ok, if I grew my own cucumbers and was suddenly drowning in all the harvest, that would be a better opportunity, yes, but I didn't do that this year. Although I suppose I could start some vines and go ahead--we still have a good two months of serious heat to go. Hey, why not? I did it last year at about this time.

Anyway. Pickles!

farmer's market cucumbers

Obviously these are not pickling cucumbers. Oh well; let's see what kind of results I get.

I used the garlic dill pickle recipe from Food in Jars.

These were very easy. I soaked my cucumbers in water for several hours, dried them, and cut them into fat chunks. I stuffed the pieces into four sterilized regular-mouth pint jars with dill seed, red pepper flakes, peppercorns, and a couple cloves of garlic each. I made a half recipe of brine by boiling vinegar, water, and pickling salt, and poured it over the cucumbers, filling to 1/2 inch headspace. I wiped the rims, lidded and ringed the jars with sterilized equipage, stuck them in a rack, and processed them in the boiling water canner for 10 minutes. Then I let them cool overnight on a cooling rack on the kitchen counter.

I'm having kind of a hard time not just popping open a jar and eating a few of these, but you're supposed to let canned pickles age for at least a couple weeks, so. I will be good!

homemade garlic dill pickles

It became obvious a few days later, when I was sitting around thinking about how I should make a batch of dilly beans, that I should have made both recipes at once and concentrated the canning heat and vinegar brine into one two-hour session. Oh well--now I have a better plan for next time.

Hooray! Pickles!

23 July 2012

More schnapps: cherry, green walnut, strawberry

homemade cherry schnapps, cherry infused vodka

Sour cherries are hard to find in California, but sweet bings and rainiers have been all over the farmer's market. So I went ahead and grabbed several pounds to bring home for more schnapps-making.

What? Summer isn't just the perfect time for canning--it's the perfect time for immersing fresh, beautiful fruit in alcohol as well. I already made plum schnapps; why not go for several more?

The basic procedure for making schnapps--also known as infused vodka--is as follows. Get your hands on enough top-quality ripe fruit (or herbs, spices, nuts, etc.) to fill 2/3 of your chosen jar. Wash it, cut it up if necessary, put it in the jar, and cover it with vodka. Lid the jar and store it in a dark place, shaking every few days. Steeping time varies. Herbs only need maybe 48 hours of steeping, since they're so potent; fruit can be steeped for anywhere from a week to about six months, depending on your taste. When you're done steeping, filter out your fruit and any sediment. Then put your schnapps back in the cupboard to age to your taste.

For cherry schnapps, I just washed and destemmed a pint or two of dark sweet cherries, pricked them all with a pin, and covered them in vodka. After about a month, I plan to strain out the fruit and filter the resulting schnapps. Voila!

So that's one batch. What's next?

homemade green walnut schnapps, green walnut infused vodka

Well, when I was first researching schnapps infusions a couple years ago, I was especially intrigued by walnut schnapps. According to danish-schnapps-recipes.com, this particular schnapps is supposed to be aged at least a year and up to five years before drinking, and to change four colors and release some surface particles of walnut oil over the course of the process. The finished result is supposed to be comparable to cognac. Needless to say, I WANT SOME.

So when I discovered a couple black walnut trees in my neighborhood, I knew I had to experiment.

To make walnut schnapps, acquire and quarter 5 or 6 green, unripe walnuts. Put then in a jar and cover with vodka; put the jar in a dark place. Steep 5 months. Shake occasionally & stir with the lid off once a month to let some oxygen in. The color of the schnapps will change from light green to a dramatic & very dark forest green as it oxidizes. (Mine has just started to do this, and let me tell you, it is seriously weird-looking.) After 5 months, strain & put back in the cupboard to age for a minimum of 7 more months. I can't wait.

homemade strawberry schnapps, strawberry infused vodka

Of course, if you want a quicker finished product, there are also strawberries.

Strawberries are one of the most rampant fruits here in CA--you can find them at the farmer's market practically all summer. So last week, when I snagged a half flat for $6 five minutes before the close of market, I knew exactly what to do. I cut up a full pint of the most perfect berries, put them in a quart jar, and covered them with vodka. Then I cut up another half pint, put them in a pint jar, and covered them with tequila. (And then I made a strawberry yogurt cake, and we ate a whole lot of strawberries plain, and we still need to use up about a pint.)

I first heard about strawberry tequila from my friend Veronica, and although I was a little skeptical of a tequila infusion, the aroma of the steeping liquid won me over almost immediately. I only made a pint, because we don't generally have a gigantic handle of tequila in the house, but I'm already regretting it. On the other hand, we do have a cabinetful of different schnappses and infusions marinating already, so I think we'll survive.

Now I just need to have the patience to let everything sit around and get as delicious as possible.

19 July 2012

Frugally Delicious and Mussels and Fennel in Ale

Mussels and Fennel in Ale

A few weeks ago I got a lovely email from Joey at 80 Breakfasts, informing me that I'd won a very exciting blog contest--and lo, my package has now arrived, all the way from the Philippines! What is it what is it what is it what is it what is it?

It's the Frugally Delicious cookbook!

frugally delicious cookbook

This little book focuses on ideas for cooking and eating well on a budget: a skill even the thriftiest of us could use help with from time to time. 55 amazing foodbloggers contributed their dishes to make this project a reality.

Overall, the aesthetic is clean, with minimal line drawings illustrating each chapter heading, and a great variety of recipes hiding behind the charming facade. The compact format makes the book easy to use; just page through, tuck a corner under a cutting board, and get cooking.

I obviously had to make something right away--but what? I decided on the third recipe in the book: The Year in Food's Mussels and Fennel in Ale.

Mussels and Fennel in Ale

Steamed mussels generally look really impressive but take almost no effort or monetary layout, and this version was no exception. The combination of Belgian white (Leffe Blond for us) with fennel and onion created a highly fragrant broth studded with tender shellfish.

The proper way to eat mussels in broth is of course to slurp out the shellfish and then use the shell to scoop up as much broth and veg as possible. Soak up more of the broth with your choice of crusty bread; we had sourdough, which was a perfect match.

These mussels were super easy, fast, and intensely flavorful: an ideal appetizer or quick dinner for those of you who like both shellfish and anise.

Hooray! Thanks again for the cookbook, Joey--I'll definitely be trying out more recipes in the future!

18 July 2012

Fresh from the farmer's market

farmer's market fruit and vegetable haul

Corn and mushrooms and tomatoes and berries and arugula and peppers and carrots and zucchini and eggplant and lettuce and nectarines and plums! YEAH.

Clearly there is no better way to use some of the summer's peak produce than to whack them all together on a plate.

Here we have a delightful dish of herbed couscous and pan-fried spicy white beans with arugula salad and chopped raw heirloom tomato over the top. Fantastic!

white beans, herbed couscous, arugula, and tomato

Herbed couscous is easy. Cover instant dry couscous with boiling water from the teapot. You want maybe an inch of water above the couscous layer. Cover with a tea towel (or pan lid, or whatever) and let steam for about five minutes. In the meantime, chop up a selection of whatever herbs you like and have on hand. I used parsley and basil. When the couscous has absorbed all the water, fluff with a fork. Mix in your chopped herbs, a drizzle of olive oil, and salt and pepper to taste. Voila!

I make something approximating these white beans all the time. Sometimes the beans stay whole--especially if I've kept them a touch undercooked, like a responsible cooker of beans--but more often they end up melting into a delightful mess.

Soften a chopped onion and/or several cloves of garlic in a little olive oil, adding chopped hot pepper to taste. Season with your choice of herb; I like marjoram, oregano, and basil. If you want to add some more vegetables--bell peppers or mushrooms, for instance--go for it. When all your vegetables are tender, add cooked, drained white beans and fry to your preferred color & texture, deglazing with white vermouth if needed. Correct seasonings & you're done.

Eat your delightful mess of white beans with couscous, copious arugula, and an entire chopped fresh tomato. Hooray!

16 July 2012

Jes's Coriander Tempeh & Zucchini with Couscous Upma

Coriander Tempeh and Zucchini with Couscous Upma

Welcome to Ham Pie Sandwiches' first guest post! Well, it's the first guest post if you don't count that one time I was going crazy studying for the GRE and John wrote up a delightful pasta recipe. So. Welcome to Ham Pie Sandwiches' second guest post!

This post comes courtesy of Jes of Eating Appalachia. I’ve been reading about Jes’s food adventures for years--from her vegan days in Atlanta to her current locally sourced Virginia cuisine.

Jes sets a perfect example for eating a truly varied diet. From Pesto-Stuffed Eight-Ball Zucchini and Vegan Pulled Pork with Rhubarb BBQ Sauce to intriguing baked goods like Balsamic Chipotle Roasted Strawberry Brownies and Buckwheat Sauerkraut Rolls, the range of different delicious meatless options is stunning. But Jes also features local and sustainable meat and dairy delights, especially in her restaurant reviews--a great resource for visits up and down the Appalachian range, as well as farther afield. It reads like a perfect Michael Pollan-y dream: food (& not too much of it) made from mostly plants, with some tidbits of delicious meat mixed in here and there. What's not to love?

This year, both Jes and I have been elbow deep in our respective gardens, eager to grow and eat the most local vegetables we possibly can. The zucchini is just starting to run amok--and what better way to use abundant garden zucchini than in Jes's Coriander Tempeh & Zucchini with Couscous Upma?

***

Coriander Tempeh and Zucchini with Couscous Upma

This is the first year that I’ve worked to create a semi-diverse garden. I planted my first garden two years ago as a joint effort with friends, but we ended up harvesting only potatoes and some collards since no one took responsibility for the management of it. So we let it grow wild and we harvested what was edible. Last year, I planted my second garden in the same space and grew mostly tomatoes and peppers with a few eggplants thrown in for color. While I harvested enough tomatoes to can as sauce and last through the winter, it wasn’t extraordinarily diverse and, overall, I didn’t put in the effort or creative thinking to make the garden thrive.

This year I’m a woman with a plan. (Which isn’t to say that the plan hasn’t derailed at least ten times already…)

Garden boxes built in our new front yard (we don’t have a backyard and thankfully the neighbors are fantastic about the non-traditional vegetables), seeds dutifully ordered and started, now, by mid-July, I feel like I can finally say the words “I tend to a vegetable garden.”

I tend to a vegetable garden. Or, more accurately, I cater to a vegetable garden. I say “cater to” because, by now, I’ve learned that the plants have a mind and will of their own, and, supplied with an auto-timed watering system (my partner is an engineer, and, as a writer, I consider his garden contributions akin to magic) and some soil amendments, they’ll outgrow their boxes and take over the sidewalk and rest of the front lawn. I’ve begun to think that the butternut squash vines are just using me for their own end. But I can’t walk away, I’m in love with them too much. I’m truly that woman.

If you think I’m waxing a little too poetically (or overdramatically), let me tell you about the time this year I went on vacation for five days and came home to four 2-4 pound zucchinis. Those zucchinis were only dreams in the mother zucchini’s imagination, maybe a flower at most. Four pound zucchinis. One was adopted, the other three left to me and my endless all-zucchini-all-the-time dinners. Pasta with sautéed zucchini. Zucchini & mozzarella pizza. Zucchini quiche. Zucchini and garlic as a side dish. Zucchini noodles. Pickled zucchini.

It’s too early in the year for this, so help me, and I actually ripped one of the plants out of the garden. Three was just too many zucchini plants. Now that we’re down to two, I’m hoping to keep the harvest manageable, but I’m more than ok with dropping bags of zucchinis on my neighbor’s porches if it comes down to it. Don’t tell them.

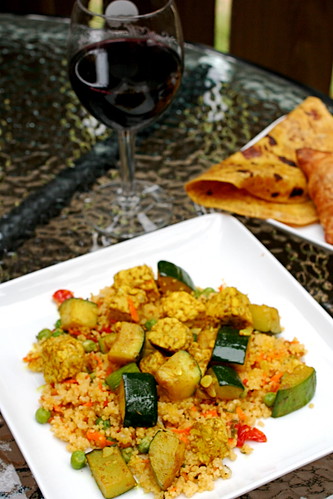
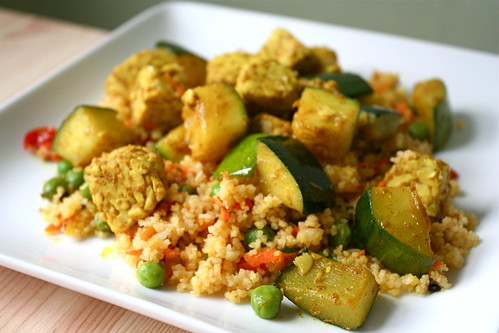
In the meantime, as I’m drowning in zucchini, one of my favorite dishes thus far has been Coriander Tempeh and Zucchini and Couscous Upma. A marriage of two different recipes with a little adaptation, this Indian meal is a crowd pleaser. Not hot at all (depending on if you use peppers) but with plenty of savory spice, the meaty tempeh pairs well with the fresh zucchini, the couscous upma a fun take on a traditional dish.

Coriander Tempeh Mise en Place

Key to the meal is preparation, preparation, preparation. Having a fully prepared mise en place will expedite the cooking, which is necessary since you’re working with very hot oil and spices. If you waste a second, the spices will burn and you’ll have to start all over again. This isn’t to say that it’s a difficult meal to prepare, just that you need to think ahead and have all of your ingredients laid out and ready to throw in the pot.

Feel free to use whatever vegetables you have on hand for the upma or to use shrimp as the original recipe calls for with the zucchini. As far as it goes though, this light yet filling vegetarian meal is pretty darn good just the way it is—not to mention its powers of making zucchini disappear into everyone’s bellies.

Coriander Tempeh and Zucchini with Couscous Upma

Coriander Tempeh & Zucchini with Couscous Upma

Slightly adapted from Ruta Kahate & Geetha’s Kitchen

For the Coriander Tempeh & Zucchini:

2 packages tempeh
1 tsp turmeric
2 tbsp Indian sesame oil
1 bay leaf
2 green Thai/Indian chilis
2 tsp ground cumin, divided
2 tsp ground coriander, divided
½ tsp freshly grated ginger
1 tsp salt
2 lb zucchini, chopped into ½ inch cubes

For the Couscous Upma:

2 tbsp Indian Sesame Oil
1/2 tsp Brown Mustard Seeds
1 tbsp split skinless chana Dal
1 tbsp split skinless urad Dal
1 pinch Asafetida powder
1 tbsp fresh Ginger, finely grated
2 Thai/Indian chilis
1 sprig fresh curry leaves, chopped
1 small onion, finely chopped
1 handful cherry tomatoes
1 c frozen or fresh peas
1 carrot, grated
1 tsp salt
1 ¼ c couscous
1 c water

Fill a medium saucepot ¾ full with water. Bring to a boil.

Meanwhile, prepare all of your ingredients to cook—-before cooking it is essential to have everything measured and ready to throw in the pot or pan as these dishes do not take very long to cook but have a decent-sized ingredient list.
  • Cut each block of tempeh in half. Set aside.
  • Place 1 tsp cumin, 1 tsp coriander in a small bowl and set aside.
  • Cut the zucchini into ½ inch chunks. Set aside in a bowl.
  • Cut the ends off 2 of the green chilis (if using) and slice length-wise. Use a spoon to scrape out the seeds (if you’re sensitive to the burn the oils will leave on your hands, wear gloves). Slice into super thin ribbons. Set aside in a small bowl.
  • Repeat with the other two chilis (if using) and set aside in a different bowl.
  • Place the bay leaf, 1 tsp cumin, 1 tsp coriander, ½ tsp freshly grated ginger, and 1 tsp salt in one of the bowls with the chili ribbons. Set aside.
  • Place 1 tbsp freshly grated ginger, 1 spring’s worth of chopped curry leaves (I used 6 leaves), and 1 tsp salt in the other bowl with the chili ribbons. Set aside.
  • Place the mustard seeds, chana dal, and urad dal in a small bowl and set next to the stove.
  • Place the Asafetida powder next to the stove.
  • Place the chopped onion in a small bowl and set aside.
  • Place the cherry tomatoes, peas, grated carrot in a bowl and stet aside.
  • Measure out the couscous and the water and set aside.
Now that everything is prepared and the water is boiling, place the tempeh halves into the boiling water and add the 1 tsp cumin and 1 tsp coriander to the water. Reduce to a low boil and let boil for 10 minutes. After ten minutes, drain the water and set the tempeh aside.

In a heavy bottomed pot (I used a cast iron Dutch oven), warm 2 tbsp Indian sesame oil over medium heat. Add the mustard seeds, chana Dal, and urad Dal. Cover the pot with a lid and let the mustard seeds pop.

Once they finish popping (or are very close to it—the popping noise slows down as with popcorn), lower the heat to medium-low and stir in a pinch of Asafetida powder. Immediately add the 1 tbsp grated ginger, curry leaves, chilis, and onions. Stir to combine. Let cook for 4-5 minutes, until the onion softens.

Add the remaining vegetables (cherry tomatoes, peas, carrot) and the water (1 ¼ c) and bring to a boil. Once boiling, add the couscous, stir, turn off the heat, place the lid on top, and leave on the stove until ready to eat.

After the couscous has been prepared, return to your pre-boiled tempeh. Cut the tempeh (it will have expanded) into bite-sized chunks (mine were ½” chunks).

In a wok, heat 2 tbsp Indian sesame oil over medium-high and add the turmeric, bay leaf, chilis, cumin, coriander, ginger, and salt. Stir and cook till fragrant, 20 seconds or so.

Add the zucchini to the oil & spice mixture. Coat well and cover with a large pot lid (the lid from my largest stock pot works well for this). Lower to medium. Cook until the zucchini begins to soften, ~5 minutes, stirring every now and then.

Once the zucchini begins to soften (and liquid is in the bottom of the wok), add the tempeh, and stir to combine. Once everything is coated in the spice mixture, turn off the heat and serve with the couscous upma.

Serves Six.

13 July 2012

Soupe au pistou at Eating Appalachia


Today, gentle reader, I have the honor of sharing my recipe for soupe au pistou in a guest post over at Jes's beautiful blog, Eating Appalachia.

Do you have zucchini, tomatoes, basil, or green beans bursting out of your kitchen? This is the perfect way to use them. Hop on over!

12 July 2012

Plums III: revenge of the smoothies

plum yogurt spinach smoothie

My preferred breakfast these days is coffee with milk. Half the time I don't eat anything else until 1 pm. Clearly this is not the best plan. So, since I still had a million plums everywhere, I decided to follow the Guybrush Threepwood school of cooking and address my need to eat actual food-based breakfast by using my abundant fruit with the common household blender.

I don't generally do a lot of smoothies, green monsters, or what have you, so I just improvised. The result was a delightful tangy mauve concoction, thickened by yogurt & sweetened by all the fruit in the land. Good deal.

Plum-yogurt-spinach smoothie

3/4c plain yogurt
1 tsp flaxseed meal
1 handful spinach leaves with stems, washed
10 small plums (or 3-4 large plums)
1 nectarine (or more plums)

Put everything in a blender (in order, so the leaves block the flaxseed meal from flying all over the place, and the fruit weighs everything down such that everything mixes with minimal scraping) and blend until smooth.

plum yogurt spinach smoothie

Drink.

I left a little bit of texture in the finished product. I will say that I could taste the spinach--probably since I didn't want to add any ubiquitious smoothie bananas--but I don't think that's a problem. The best breakfasts have some vegetables in them anyway, right? It's like Brooklyn brunch: it always comes with a salad. Perfect.

11 July 2012

Mid-July garden update with bonus Anagrabble

Well, the pillbug scourge appears to be over, and my vegetables are actually growing up big and strong. Hooray!

homegrown garlic

Garlic! I pulled one but left the others in the ground to age a bit more. This head is currently hanging in my kitchen curing. I cannot wait to eat the homegrown garlic.

homegrown purple bush beans

Purple bush beans! This is the one (ONE) plant that didn't get killed by pillbugs. But it has beans on it and I will eat them. SOON.

homegrown green onions scallions

The scallions are our one complete success so far. (Ok the scallions and the plums are our two successes, but I didn't technically plant the plum tree or do anything to achieve plums, so...yeah.) They're all a good three feet tall, and are abundant and totally delicious.

homegrown garlic

The rest of the heads of garlic look like this. Garlic garlic garlic! I want to plant a lot more garlic next year.

homegrown onion flower

I stuck an onion that had sprouted in our cabinet into the garden, because why not? It grew some enormous 4-foot stalks, sprouted blossoms, and burst into gigantic flowers. Even if I can't eat the root, I get to stick my face in an onion flower or two every day.

And of course the tomatoes are starting to shoot up. Pictures of that one to follow in August or so, when they start getting terrifyingly large.

***

Anagrabble is kind of difficult to explain in words! It's a Scrabble variant using anagrams, but our version doesn't match any versions I can find online. You need a set (or more) of Scrabble tiles, at least two players, and a tabletop instead of the Scrabble board.

Start by turning all the tiles face down on your table. Then begin turning tiles over, one at a time, to create a pool of letters in play. Any player can turn tiles over at any time, but it's best to go VERY SLOWLY after the first few are available, so players have a chance to process the new additions.

Once there are enough letters turned up to make words, players can begin calling them by saying a word and arranging it in front of them. Words must be four letters or more, with no proper names and no foreign language words (although you can make exceptions for agreed-on loan words if you want) allowed.

After players have claimed words, they become available to steal. You steal other players' words (or vary your own & make them more difficult to steal) by adding an additional letter or letters in play to make a different word. The new words don't have to be anagrams--they can't literally be, since we're adding extra letters--but they're based on letter rearrangement. So if a player had claimed the word "part" and there was an S in play, another player could steal the word "traps". Or they could add an L to "pays" to create "plays". It's fine to steal a word back and forth over and over, but it becomes harder and harder to do so as the word grows.

Players can't steal a word by keeping it intact and just adding a letter or letters to its beginning or end--they must change the letters in some way. So you couldn't steal "clap" by changing it to "claps" because the letters in "clap" are all still in the same order. In other words: no substrings.

Players can make new words or steal others at any time until all the tiles are used up. After you're done, count up the points on your tiles; the most points clearly win.

So that's Anagrabble, and it is great. Hooray!

09 July 2012

PORTLAND

portland oregon

We had a most excellent time.

Traditionally, I am alternately stressed out and bored out of my mind on vacations. This was entirely different. I don't think I've actually relaxed on vacation in years. It was spectacular.

I took almost zero pictures. Go team!

Food highlights:
- Eating an entire double carton of raspberries while watching fireworks over the Willamette.
- Evil Prince curry with tofu at E-San Thai.
- Coffee: Stumptown, Public Domain, Barista. Like you do.
- Rye (beer, not liquor) at Tugboat Brewing Co, where we would totally have pints and play anagrabble every week if we actually lived in Portland. There are Zero bars like this anywhere near our house and that is a travesty.
- BBQ brussels bowl at the Bye & Bye.
- Salt & Straw ice cream; I wanted John's salt ice cream with caramel (although my coffee-bourbon was very good too).
- Massive Lebanese feast at Karam, including perfect cauliflower fritters with tahini and eggplant stew with lamb kibbeh.

alberta park portland oregon

Non-food highlights:
- Long conversations with friends; yay!
- Wandering around by myself in the early mornings.
- Alberta Park: full of old-growth cedar trees and PUPPIES. Actually, all the parks were pretty great.
- High-stakes mini-golf tournament!!
- Soaking our feet at Ashiyu foot spa after walking around all morning. Bonus: it was hot enough out that nobody else was there.
- Portland is so much friendlier than SV. The amount of random people I talked to went up really dramatically.
- Near-complete shutdown of all my CA-based allergies. This seems weird since I have heard many tales of Portland instead inducing allergies, but no! I am evidently only allergic to CA plants!
- Actual public trans that works.
- Cool air, less direct sun, and northern trees. I miss them so.
- Oh yeah! POWELLS.

In conclusion, yay Portland!

03 July 2012

How to pit cherries without a cherry pitter

fresh sweet cherries

I don't know about you guys, but I don't own a cherry pitter. For the most part, this means that I just don't bother pitting cherries or concocting much of anything out of them; instead, I just eat them.

However, sometimes you just need some pitted cherries.

So you don't have a cherry pitter. Do you have a paper clip? If so, you can go ahead and pit your cherries with wild abandon. Well, not too much abandon--you don't want cherry juice stains all over the kitchen. But you can pit your cherries with moderate abandon at least.

pitting a cherry with a paper clip

First, bend your paper clip into an S.

(Actually, first wash your paper clip and then bend it into an S. Washing not pictured.)

pitting a cherry with a paper clip

Insert the larger end of your paper clip into the stem scar of a cherry. Then just scoop around with the curve of the clip to dig out the pit.

pitting a cherry with a paper clip

Repeat until you've pitted all your cherries. Voila!

Now you can use your cherries in baking, blending, mixing, freezing or muddling--all without the threat of the pit.

cherries pitted with a paperclip

Personally, I just pitted a few cherries to put in my pre-holiday beverage.

Cherry vodka tonic

3 pitted sweet cherries
vodka of your choice
tonic water
ice
lemon wedge

Muddle your cherries in the bottom of a cocktail glass. I think collins glasses are usual for vodka tonics, aren't they? Add several ice cubes, a shot (or your preferred amount) of vodka, and top with tonic. Squeeze a lemon wedge over the top before dropping it in. Mix gently and consume at your leisure.

cherry vodka tonic

I don't know about you, but my leisure is going to be pretty great this week. Tomorrow we're flying out to Portland for a few days--the only few days in the year, it seems, that Portland is going to have the exact same weather as Silicon Valley. Curses! We were hoping for some greyness after the unrelenting sun of California. On the other hand, this does mean we get to ride bikes around Portland with no need for rain gear. I hope all of you from the US have a similarly delightful holiday planned!

02 July 2012

CORN FOR ALL

fresh farmer's market corn

There was corn at the farmer's market! CORN CORN CORN CORN CORN. Let's eat it!

Personally, although I love fresh corn, I don't like to gnaw it off the cob. This means that we don't normally do the plain boiled corn that so many people heart so hard. Instead, for our first foray into sweet summer corn, I decided to just saute the kernels with a little bit of green onion. Straightforward and perfect.

Simple sauteed corn with green onion

fresh corn
olive oil
green onion
salt & pepper

Husk your corn and cut it off the cob. It's easiest to slice the corn off the cob if you hold your knife at an angle, so you're using more than an inch of the blade, and slide it back and forth as you move it down the side of the cob. I used two ears of corn for two people.

Trim and chop your green onion. I used one gigantic green onion from the garden, but you may want to use two. The green onions are by far the biggest success in this year's garden, incidentally.

When you're all ready, warm a little olive oil in a saute pan. Toss in your green onion, reserving a handful or two of the most delicate greens. Saute for two to three minutes, or until just wilted. Add the corn and season with salt and pepper. Continue to saute for another few minutes, or until the corn is done to your liking.

Add your reserved green onion greens at the last second. Stir to mix, correct seasonings, and serve. Voila!

We ate our corn in tacos with flame-toasted corn tortillas, refried beans, and curtido de repollo. Then we ate the leftovers fork-first out of the pan. Delicious.

tacos with refried beans, corn with green onion, and curtido de repollo

If you want to get richer (and possibly even more delicious), you can make rajas poblanas--roasted poblano peppers with corn and cream. For our second foray into summer corn cooking, I followed this recipe from Not Just Baked, with some minor changes.

First, I halved the recipe, since I was only feeding myself. This meant I used three poblanos and one ear of corn. I think you could use any proportion you like, however.

Second, I wasn't using a grill, so I decided to just add my corn to the onion-poblano-cream business raw. This worked out admirably, but I'm sure the results would be even more delicious with roasted corn.

rajas poblanas

Rajas poblanas

poblano peppers
fresh corn
olive oil
onion
garlic
cream

Start by roasting your poblanos, preferably over open flame. A grill is obviously ideal, but a gas burner works well too, as does a broiler. Use tongs (preferably with an insulated handle) to position your poblanos and char the skin evenly all over. When each poblano is roasted, put it in a container and lid it; this will keep in the heat and steam off the skin. I use a big plastic bowl with a lid, but even a paper bag can give good results.

If you happen to be using a grill, you can grill the corn too.

roasting poblano pepper

While your poblanos are steaming, chop up an onion and a couple cloves of garlic. Heat a slug of oil in a wide saute pan on low. Slowly caramelize the onion in the oil, stirring frequently. This can take a good twenty minutes; add the garlic in the last few minutes of cooking. Use the waiting time to prep your finished poblanos and corn.

After your poblanos have had at least five minutes to steam, open the container and flake off the skin with your fingers. This works best in a bowl of water. Remove the stems and seeds and slice or tear the roasted poblano flesh into long strips. Husk your corn and slice the kernels off each cob.

When the onions are completely soft and just golden-brown, mix in your poblanos and corn to the pan. Pour in cream to barely cover; I used one cup.

Heat everything to a low simmer and cook gently, stirring occasionally and making sure not to burn, for about a half hour. The cream will reduce gradually to create a delightful sauce.

burrito with rajas poblanas

When your rajas poblanas are done, you can eat them whatever way you see fit. I made burritos with rajas and refried beans. Any leftovers are excellent in early morning breakfast quesadillas. You guys eat early morning breakfast quesadillas, right?

Needless to say, we'll be cramming more and more corn in our gaping maws for the foreseeable future. There should be corn until the end of August, and maybe into September if we're lucky. Excellent.