14 January 2009

Repeat repeat repeat

1. Fagioli. We had a zucchini, so I cut it up and cooked it in the sauce. Zucchini fagioli purees just as well as all the other kinds of fagioli. It's a little more liquid, and pretty mild-tasting. Far too many things work in fagioli. I have to try artichoke hearts at some point.

I plonked what was left of the greek yogurt into the leftovers. This was an excellent idea for thick and creamy profit.

2. Seared fish; pea and parmesan risotto. Since we made multiple things, this was one of the more complex dinners we've had in a few weeks. Each component is similarly easy to make; they are just very different.

This time I was feeling awful and foodless. I started making risotto, which of course takes at least a half hour and a lot of constant attention. Good plan! Then John stepped in and made me a fish to tide me over and make me functional again.

The fish was frozen, so he stuck some water in the pan, slapped on the lid, and let it steam a little. This worked admirably. The peas were there to soak up any extra butter, and to be delicious. I sat on the counter and ate it while he stirred the risotto pan.

Later I couldn't even wait to have risotto cakes for breakfast. I ate it all cold around midnight. Cold risotto is definitely good.

3. Big pasta bake. It's winter.

I made a super vegetable sauce with garlic, onion, an entire diced eggplant, zucchini, red pepper, tomato. I think that's it. Tossed with cooked pasta and cubed mozzarella, baked at 350F for a long time. There were crispy pasta bits on the top and melty cheese bits in the middle.

This could have been better had I spread it out into two pans to make thin layers with plenty of crispy bits for everybody. It was still good, dense, and soporific, but more crispy bits are always better.

13 January 2009

Green and black rice

The rice has been creeping up on me this winter.

It's been hard to get into a food rhythm in NYC. I have to do research to find out where to buy decent food, as opposed to walking up the street to one of several awesome, easily findable stores. It's an expedition to get to any of the food co-ops here. Then there's the part where I am a cheap and independent-minded bastard, and therefore have multiple issues with just going to the Union Square Whole Foods. Also, why is it so hard to find any store with bulk bins? It must be all about controlling vermin. But bulk bins! Bulk tea! Bulk flour and almonds and spices and lentils! AUGH.

So we've really been living off what we can find at the farmer's market (clearly good) and the supermarket up the street (not so good at all). This means we have a very small ingredient supply from which to create random weekday dinner. That's not good. I mean, I love fagioli, but I've been eating it practically once a week, plus leftovers. I've had way too many quesadillas. There's been too much pasta and not enough grain. So I went to Trader Joe's (another expedition) and got actually reasonably priced arborio rice and couscous. Grain will be dinner.

I combined ideas from about three rice recipes in Deborah Madison's The Savory Way to come up with this. Essentially, I made rice, mixed it with delicious additions, and ate it. Super easy.

Green and black rice

brown rice
olive oil/butter
shallot
garlic
green onion
fresh parsley
salt, black pepper
parmesan

Put your rice on to cook in double its volume of water. I made a cup of rice, for leftover potential. Of course then we ate the entire finished pan, but that's ok.

While the rice is cooking, warm some olive oil in a saute pan over low-medium heat.

Consider your allium stock. Alliums are plants in the onion/garlic area, with bulbs that grow underground; they're obviously here for the savory component. Pretty much any onion type will work well as long as you cook it very slowly to get it all sweet and nice. If I had any red onion, I would have totally added that. In this instance I had two shallots and four or five cloves of garlic, so I minced those up and put them on to soften.

Trim and slice a few green onions. We're actually using these for more of a green vegetable component, so yes: use them along with the shallot/garlic. You can also use any other greens you think would be good; spinach and chard are obvious choices. Cut everything up into little pieces, so it will mix well with the rice later.

Herbs: strip a big handful of parsley stems, then mince the leaves. If you have other fresh herbs that need to be used up, this is a good place to put them. The original green rice lists marjoram, dill, and cilantro; I think things like sage and chives would work well too. It really depends on your tastes. I'd probably keep parsley dominant and use smaller amounts of any other herbs, but whatever you like will be fine.

When the shallots and garlic are nice and soft, and the rice is done, add your chopped greens to the pan. Keep the herbs back for last-minute addition. Saute the greens for a minute or two, until wilted. You may need to add a little more oil or butter here if the pan is too dry.

Add the chopped herbs. Stir the pan up to mix and quickly wilt them, then take it off the heat. Season with some salt and as much black pepper as you can stand to grind. Now you have the green and black; you only need the rice.

Tip the greens into the rice pan, mixing thoroughly. Again, if it's too dry, add a little drip or two of olive oil.

Now you can either eat it plain or toss it with a bunch of parmesan. I wanted this to be my entire dinner, so I added a big handful of cubed cheese, let it melt for a minute, then ate the hell out of it.

Eating is good. More grain in future.

07 January 2009

Yogurt fail; cookie win

This weekend Bethany, Danny and Faire came over to hang out and attempt our first batch of homemade yogurt.

In theory, this should have been easy. The process is pretty straightforward: sterilize equipment, scald milk, cool milk to between 100-110F, mix in the yogurt culture, pour yogurtized milk into jars, and incubate in the same temperature range until it sets, i.e. 3-8 hours.

In practice, we didn't have a candy thermometer, so instead of keeping the yogurt cultures in the correct range, we accidentally fried them. It's a good thing you can rescald and retry this with the same milk. I'm totally going to redo it as soon as I find a candy thermometer.

In the meantime, I did actually rescald a jar of the milk (which was still really yogurt-scented and tangy beforehand; was there some other problem besides killing the culture? Hmm). Then I made molasses cookies.

Molasses cookies do not fail.

9 1/2 tbsp butter at room temp
1 cup sugar/brown sugar/whichever
1 egg at room temp
1/4 cup serious molasses
2 1/2 tbsp milk
2 cups wheat flour
2 tsp baking soda
1/4 tsp salt
cinnamon and ginger

This works like any other cookie recipe: cream wet ingredients, add dry, form into balls, bake. So start with the butter and sugar. My butter was frozen, so I stuck it in the toaster oven to melt a little before mixing. For sugar, you can probably use anything you have on hand. White sugar will give you a less intense molasses flavor; brown will do the opposite. In this case, dark brown sugar would be optimal, but you can get by without it. I used turbinado sugar.

Cream the sugar and butter until fluffy, then add the egg, molasses, and milk. Mix until everything is incorporated and uniform.

Add the baking soda, salt, and spices to the wet mix. You can use any spice that's reasonably cookielike here. Ginger and cinnamon are the obvious choices, but you can try cloves, nutmeg, allspice, or whatever else you think sounds good. Go for about two teaspoons of mixed spice.

When everything else is mixed in, add the flour in batches. I did this a half cup at a time, so as to avoid giant clouds.

Form the finished dough into balls. If you wet your hands first, the dough will have a harder time sticking to them. I made mine about the size of a walnut, for maybe two dozen cookies.

Bake at 375F for 10-12 minutes, until the tops are cracked and you can see a tiny bit of encroaching golden brown coloring. If you're in doubt, take them out earlier rather than later; the dark color of the dough makes it pretty difficult to see any potential burn.

Give your finished cookies a minute to solidify before you put them on a cooling rack.

Eat.

Store what's left of the batch in something airtight, so they stay chewy and nice. Then you can have them for breakfast in the morning.

No, seriously: molasses cookies with banana are great. You could potentially break them all up and add whipped cream, for a gigantic trifly thing, or use them as the crust to a banana cream concoction. In my case, after eating a banana and cookies out of hand, I remembered that we had the end of the (thick, greek) yogurt starter still in the refrigerator, and opened, so we couldn't use the contaminated sample for our second try.

Clearly, cookies with plain good yogurt and banana slices are the best idea ever.

04 January 2009

January chili

New year's is the best possible day to make a gigantic pot of chili, eat a lot of it, and freeze the rest of it for future chili consumption. Not that we ever make a tiny amount of chili with no intention of preservation: it's always best in a giant pot that bubbles for hours, with chili fumes making you hungrier and hungrier until you can't stand it anymore. Then you can eat as many bowls as you want before packing the remnant up and gloating over how much is still left.

The freezer is by far my favorite preserving device. I wonder how well it would work to can something like this, though? The tomato is clearly acidic enough to be canned on its own. Research necessary.
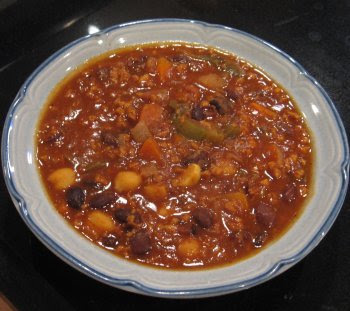
It's January chili

onion
garlic
olive oil
carrot
celery
hot pepper
green/other bell pepper
black beans
red beans
garbanzo beans
tomato puree/other
veg broth
tvp
corn
cayenne, cumin, paprika
salt, pepper

You can use as much of each ingredient as you want in this situation. For our huge pot of chili: 1 huge onion, five or six cloves of garlic, 1 huge carrot, no celery actually, two jalapenos, 1 green pepper, probably about four cups of collective beans, a 24-oz can of tomato puree, maybe 2/3 cup of tvp, an entire small bag of frozen corn, lots of cumin, paprika, and black pepper, and a little cayenne and salt. The broth quotient is negotiable based on how liquid you like your chili.

OK LET'S GO

Get out your biggest, deepest pot, heat some olive oil in it, and throw in chopped onion, garlic, carrot, celery, and hot pepper to soften. Spice with cumin and paprika, plus a little cayenne if you want it, to start.

Save the peels and root/stem ends from the onion, garlic, carrot, and celery. Put them in a separate pot with some water and whatever odds and ends of vegetables you have collected in your stockpile/at the bottom of the crisper. Good things to add: mushrooms, potato, spinach or parsley stems, winter greens. Stay away from cabbage, broccoli, and any strong flavored vegetables. Make sure the vegetables are covered with water, cover the pan, and simmer to make veg broth. Easy! You're also making food out of trash, which is highly satisfying.

As the onion mix softens, chop and add any other vegetables you want in your chili. I think green pepper is absolutely necessary; other peppers are also good. If you have fresh tomatoes, chop and add them at this point too. Corn can go in now or it can wait until nearly the end of cooking.

Once all the vegetables that need to soften are softened, add any canned tomatoes and the beans. We used a combination of precooked dried beans and canned beans. For canned beans, I waver between rinsing all the can broth out or just adding it. I'll add black bean broth, for instance, but rinse garbanzos since their "broth" is more like "slightly slimy water". For the beans I've cooked myself, all the broth goes in, especially because I usually freeze the beans in their broth and then whack the entire frozen block into the chili.

Also add the tvp, if you want and have it. Chili is clearly fine with just beans/tomato/pepper, but if you want chewy bits and extra protein content, tvp is an excellent way to go. We use dry tvp as opposed to the freezer crumbles.

At this point we need to add some water or broth to keep things liquid and prevent burning. Open your broth pot, lower a measuring cup in with its mouth against the side of the pan, scoop up a bunch of hot broth, and add it to the chili. Do this several times to get a lot of the liquid out. Since tvp soaks up an incredible amount of liquid, make sure the pot is appropriately overwet and soakable; you can add water too if you run out of broth.

Add some more water to the broth pot and keep it simmering for any later liquid additions, and/or to have leftover broth to freeze along with the leftover chili.

Bring the chili to a boil, do a second round of spicing, and leave the entire business (covered, on low) to simmer while you go do something else. Leave it for at least an hour, checking occasionally to stir the solids off the bottom and make sure that everything smells appropriately delicious.

When you can't stand it anymore, it's time to make a couple decisions. John likes chili very smooth, so we tend to puree ours. This is actually why we add corn at the end: so we can have the corn bits floating around in the otherwise smooth chili. I like chunky stewy chili better, so I serve myself a bowl before we attack the pot with the stick blender. Normally I'd just leave it as is and eat it, though.

Eat as much chili as possible.

Supplements:
- toast
- cornbread/muffins
- chips to dip in it (a point in favor of puree here)
- sauteed dark greens
- sour cream/plain yogurt
- cheese if you feel the need

Freeze the rest of the chili. We pour it into tupperware, let it cool down for a while, then stick it in the freezer. The end. For this batch, we both ate at least two bowls of chili, which left a little more than half the pot to pack up. Now every time you want chili, you can pop a brick of it out of your freezer.

Reheating: ok, we don't have a microwave, so we always reheat in pots on the stove. Put an inch or two of water in the bottom of a pot, add the brick of chili, and turn on the heat. Steam/boiling water will soon envelop the chili, melting it down. It's really important to use water; otherwise, since a lot of water evaporated in the initial cooking, there might not be enough moisture, and the chili might burn. Also there's the part where steam is hotter than water, so steam will help the brick defrost faster. Physics!

01 January 2009

HAPPY NEW YEAR

Wool + champagne = awesome.

Usually we like to get the Chandon blanc de noirs, but this extra dry riche was also good.

We went to see the Pratt steam whistles which were LOUD and AWESOME. There's also plenty of Youtube footage if you're somewhere where LOUD NOISE is fine.