19 June 2014

Pork roulade with beet greens and plum-thyme sauce

Pork roulade with beet greens and plum-thyme sauce

When you have a backyard full of plums -- especially if you're just not that into jam -- you really have to get creative about using them. So we decided to get fancy. How about a savory plum sauce?

We could have gone for the classic Chinese plum sauce with spring rolls, but we also had a bunch of fresh thyme and that beautiful CSA honey kicking around. So a more French-inspired sauce seemed in order. And what could we serve with this kind of sauce? The obvious answer is pork. How about a roulade?

So. We're essentially going to butterfly a pork chop per person, make a filling of greens and nuts, stuff the chop, and sear until done. Then we'll simmer pureed plums and seasonings to make a sauce. The end result looks complicated, and is amazingly delicious, but it's really not very difficult to cook at all.

This recipe will make enough filling and sauce for two pork chops. Any extra greens are delicious as a side dish.

If you want to feed a crowd and use up a boatload of plums, you can also double the filling and sauce recipes and stuff an entire pork tenderloin. You'll just need to roast it in the oven for a bit after searing, since such a large piece of meat won't cook through with just a sear. And OH MAN would that crowd be impressed when you served it. I'm just saying.

If you don't eat meat, you can still try out the greens and sauce! Cook them both (minus meat juices, of course), roast some potatoes, sear a piece of tofu, and you're all set for a delicious dinner. And I have one more vegetarian-appropriate sauce application to come later this week. Stay tuned!

Pork roulade with beet greens and plum-thyme sauce

Pork roulade with beet greens and plum-thyme sauce

Filling:
butter/olive oil
4 cloves garlic
1 bunch beet greens
double handful almonds, raw or roasted
salt & pepper

Roulade:
1 deboned, trimmed pork chop per person OR split it between two less meaty eaters
more salt & pepper
4-6 sprigs fresh thyme per chop
meat mallet or rolling pin
cooking twine or tinfoil to tie

Plum sauce:
butter/olive oil
~ 1 cup chopped fresh plums
1/2 cup water
leaves of 4 sprigs fresh thyme
1 tbsp honey, to taste
2 tbsp dry white wine
yet more salt & pepper

Start by making the roulade filling. Melt a pat of butter in a wide saute pan while you crush and slice a few garlic cloves. Add the garlic to the pan and cook for 2-3 minutes, or until it begins to turn golden.

Wash and chop a bunch of beet greens. You can also sub in chard or spinach here if you prefer (though spinach will cook down more, so you'll need two bunches if you go that direction).

Add the greens to the pan and season with salt and pepper. Cook, stirring occasionally, for about five minutes, or until the greens are wilted. Chop your almonds and add them to the greens. Mix it together, and your filling is done.

Now is the time to start heating your meat pan. Just put a sufficiently large stainless steel or cast iron pan over medium-high heat and let it warm up while you're prepping your meat. A hot pan will ensure a good sear.

Butterfly your pork chops. You can check out this video for a visual. First, put your chop on a cutting board. Using a very sharp knife, cut gradually in from the side opposite the fat cap, dividing the meat in half horizontally as best you can. If you make a mistake and cut through to the board, it's ok! Just back up and make a correct cut over the mistake. You won't even notice any mistakes once you're done. Cut 4/5 of the way through the chop, leaving it connected at the end. Then open it up like a book. Voila! You just butterflied a pork chop.

Lay your butterflied chop flat and cover with a piece of plastic wrap or butcher paper. Use a meat mallet or rolling pin to pound it to an even 1/2-inch thickness.

To stuff your chop, season it liberally with salt and pepper and arrange it nicest side down. Put several spoonfuls of filling down the middle of the chop. You want to use just enough filling to let the meat wrap completely around it; mine is a little overfull here.

Pork roulade with beet greens and plum-thyme sauce

Roll up your chop and secure it with butcher twine or a few strips of tinfoil. I used a classic butcher's truss (video), but it's totally fine to improvise. Tuck your sprigs of thyme under the twine in several different spots around the chop.

Sear your roulades quickly on all sides in the prepared pan. It should take about three minutes per side to get a nice golden brown crust. If the roulade sticks, your pan may not be hot enough, or the meat may not be completely seared yet. Turn up the heat or try a few good shakes to release the meat from the pan.

When your roulades are seared, remove them from the pan to a plate and let them rest, covered loosely with foil, for a good five to seven minutes. Resting meat is super important! It will give the hot juices time to reabsorb into the meat, making for a juicy and evenly cooked roulade.

While you're waiting, it's time to make the sauce. Wash and chop your plums. Put them in a blender with the water and liquefy as best you can. There will be bits of plum peel floating around; that's ok.

Pour the liquefied plums into the same pan you used for the roulade and cook over medium-high, stirring to deglaze the crystallized meat juices. You can also add any accumulated juices from the meat plate. Add the thyme, honey, and white wine, season with a scant pinch of salt and a few grinds of pepper, and cook, stirring frequently, for about five minutes, or until the sauce is thickened and reduced to approximately half its volume. Correct the seasonings, and your sauce is done. Hooray!

Pork roulade with beet greens and plum-thyme sauce

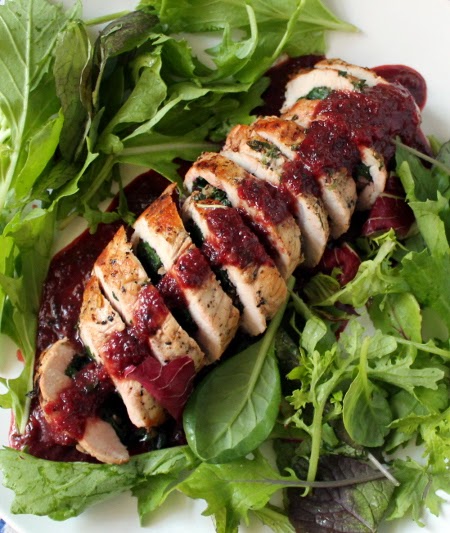
It's time to serve! Remove the butcher twine and thyme sprigs and slice your roulades into six or eight medallions each. Arrange them on a plate (on extra greens if you have any, or in a puddle of sauce if not) and ladle a few spoonfuls of sauce over the top. Four slices is a perfectly adequate serving, especially with some mashed potatoes and salad on the side; an entire roulade is a huge but very satisfying serving. It's all good.

Now serve it to your amazed guests. Or, you know, yourself.

This is hands down one of the best dinners we've made in months.

PS: Want more roulades? How about a venison roulade?

17 June 2014

Salad of plums, almonds, and arugula

Salad of plums, almonds, and arugula

The plums are ripe.

They're constantly falling off the tree into the backyard. Squirrels take single bites and leave the rest of the fruit hanging from their stems. Birds peck.

It's ok, though; we've rescued plenty. So now, it's plum week!

I kicked it off with a very simple but VERY delicious salad: a bed of tender baby arugula with chopped plums and roasted almonds, topped off with a minimal drizzle of olive oil and squeeze of lemon. Perfect.

The discerning viewer will notice that the salad in the picture is actually made with little gem lettuce. This is because we tore through the original arugula-based salads way too quickly to take any pictures, but I am not going out to buy more baby arugula when we have a CSA shipment of lettuce to get through once a week. The little gem version was good, but the arugula was better. Take note.

This can be easily adapted for any number of servings. Make as much as you like!

Salad of plums, almonds, and arugula

Salad of plums, almonds, and arugula

baby arugula
fresh plums
roasted almonds
olive oil
salt, pepper
lemon wedges

Wash and spin dry your arugula. Arrange big handfuls on each salad plate.

Wash your plums. Slice them off their pits and into fourths or eighths. Scatter handfuls of plum across each plate of arugula. Pour any accumulated juice over each salad.

Roughly chop your almonds and add them to your salads. If you have raw almonds instead of roasted, toast them in a frying pan for about 5 minute, or until fragrant and starting to turn golden, before you chop.

Drizzle a thin stream of olive oil over each salad. Season with a little salt and pepper. Serve with a lemon wedge, or just squeeze a spray of juice over each salad.

The finished salad is so simple and so good. The sweet plums, the spicy arugula, and the crunchy almonds are a perfect combination of contrasting textures and flavors.

Plum almond arugula salad

What could you eat with this salad? Practically anything. A plate of pasta with creamy sauce, a bowl of hearty, wine-laced soup, a perfectly seared piece of meat or fish, or a huge sandwich stuffed sky-high with every filling under the sun: any or all of these would be great.

What new and creative dishes are you cooking with your summer stone fruit?

10 June 2014

Apricot crisp with oat crumble topping

Apricot crisp with oat crumble topping

Someone in our neighborhood had an epic apricot harvest, and this is the result, at least at our house. Hello, fruit!

It's a standard thing around here to get overwhelmed by your burgeoning fruit trees. When that happens, you spend an hour or two picking fruit and put the results in a bag in your front yard with a big FREE sign. Then everyone walking past gets to bring home a bounty of fresh fruit. We do this all the time with our annual pineapple guava deluge. It's great: the glut of fruit gets used instead of rotting away on your back lawn.

This time I came across a big tray of apricots, picked out a bagful, and brought them home for delightful baking escapades. Crumble for all!

A huge variety of other fruit would work well here. Strawberry and rhubarb are excellent and seasonal. Cherries, plums, peaches, nectarines, or a mixture of any of the above would be delicious. In the fall, apples or pears would work beautifully. And you can always add a handful of blackberries, blueberries, or raspberries to punctuate a panful of stone fruit. Delightful.

Apricot crisp with oat crumble topping

Apricot crisp with oat crumble topping

Fruit:
10 apricots, or about 2 cups sliced fruit
1 tbsp sugar
1/4 tsp cinnamon

Crumble:
1/2 cup rolled oats
1/4 cup flour of your choice
2 tbsp sugar
4 tbsp butter/oil

Start by prepping your apricots. Wash them, halve them, remove their pits, trim off any bruises or other issues, and slice them. I ended up cutting each half apricot into five or six pieces, but you can quarter them or even leave the halves as-is if you prefer. It's all good.

Butter an 8x8 inch pan. Tip in your prepared fruit, sprinkle it with sugar and cinnamon, and stir to mix. Flatten your apricots into an even layer.

For the crumble, mix together your oats, flour, and sugar in a bowl. Add the butter, cut into chunks, and rub it into the dry ingredients with your fingertips.

Spread your crumble mixture evenly over your fruit. Dot with additional butter if you feel like it (and have more butter lying around).

Bake at 350F for 45 minutes or until lovely and bubbling around the edges and browned on top.

Apricot crisp with oat crumble topping

This crisp is best eaten hot, right out of the oven. The apricots melt into an intensely flavored jam, while the crumble provides a perfect nutty contrast. You're going to want to have some good seed-specked vanilla ice cream with it, too.

What are you doing with your new summer fruit?

09 June 2014

Classic potato leek soup for the win

potato leek soup

It's supposed to be 85F out today, so why don't we talk about soup? That sounds totally rational, right?

We got a huge bunch of amazing leeks in our latest CSA box. And yes, we could have made so many different things from leeks. Leek gratin! Simple leek and cream sauce for pasta! Tiny leek quiches! All of those sound really good, actually. But we decided to go for the most traditional leek dish of all, and made a huge vat of potato leek soup.

This soup is excellent because it lets you use 100% of the leek to make a delicious, exciting, filling dish. The greens go into a very leeky vegetable broth while the whites melt down into delicious oniony shreds. It's super satisfying if you want to prevent food waste. And the soup itself is not only DELICIOUS but so, so cheap to make. Such a good idea.

This is almost a classic potato leek soup, with a few tiny twists. First, I made my soup subtly spicy with jalapeño, red pepper flake, and smoked paprika. Second, I added more veg, because what on earth does one do with a handful of turnips? Well, one probably roasts them, but I have yet to do that. The turnip is actually a really nice addition here, since it adds a touch of spice and some interesting vegetable complexity to the finished product.

I didn't take any pictures of the leek-prepping process, but Elise at Simply Recipes has a great post on how to clean leeks if you want some more detailed info. Or watch Jacques Pepin prep leeks! That's always fun.

potato leek soup

Potato leek soup

3 leeks with greens
additional veg scraps for broth
lots of water
butter/oil of choice
1-2 carrots
1-2 sticks celery
1 small turnip (optional, depending on whether it came in your CSA box)
1 jalapeño (optional, depending on your spice preference)
~5 potatoes
salt, pepper, bay leaf, red pepper flake, smoked paprika, thyme, sage, marjoram
milk, cream, or plain yogurt of your choice
fresh parsley to garnish

Start by trimming your leeks. Cut off the darkest greens one at a time, keeping the core of lighter green leaves intact. Rinse your trimmings well in cold water. Then add them to a 3-quart or larger pot along with a few handfuls of mixed vegetable scraps (from the stockpile) and a bay leaf. Cover the whole business with lots of water, bring it to a boil, reduce the heat, cover, and let simmer while you're making the rest of your soup. Your broth will be done after about 15 minutes of simmering. Strain out the solids and have it ready to use.

Of course, if you have vegetable stock already made, you can use that instead and freeze your leek greens for future broth application.

Next, clean your leeks. Keeping the root end intact, slice down the stalk toward the greens to split the leek in half. Rotate 90 degrees and slice again to create four quarters of leek. Wash extremely well under cold water. Be diligent here, because leeks are almost uniformly FILTHY and need real attention. Then trim off the root ends and slice your leeks into 1-inch pieces.

Melt some butter in a large soup pot over medium heat. Add your leeks, stir, and let cook for 5 minutes or so while you prep all the rest of your soup veg.

Scrub and chop your carrots. Rinse and chop your celery. If you have a turnip hanging around, scrub or peel it (depending on age) and cube it up. If you like spice, dice a hot pepper of your choice. Put all of these into your soup pot, add a sprinkling of salt, and cook, stirring occasionally, until softened.

You can add other sturdy vegetables too if you have them hanging around. If you want to add greens, you'll need to reserve them and wilt them in quickly at the end of cooking. One of the greatest things about a soup like this is that it can take practically anything you throw at it.

Next up: potatoes. I used yukon gold, but any boiling potato should be good here. Scrub your potatoes well and dice them into half-inch cubes. Add them to your softened aromatic veg. Season with pepper, red pepper flake, smoked paprika, thyme, sage, and marjoram, stir everything together, and cook for another five minutes or so.

Now is the time to add your strained broth. You'll want to add at least four cups or so, or enough to cover all your vegetables by a finger's width; top it up with water if necessary. Bring to a boil, cover, reduce heat, and simmer until your potatoes are cooked through. This should take about 20 minutes, depending on the size of your potato pieces.

When your potatoes are tender, pull the pot off the heat and puree your soup to the texture of your choice using an immersion blender. Then return the pot to the heat, taste and correct the seasonings, and continue to simmer gently until your soup has reduced to your desired texture.

Add the milk, cream, or yogurt of your choice off the heat, or even to individual bowls. I kept the main body of the soup creamless since I wanted to freeze it; if you do this, which I definitely recommend for future ultra-fast and delicious meals, you can just add your dairy at the end of a simple reheat. Super easy.

Hooray! It's soup! Garnish each bowl with parsley and serve a giant crispy salad on the side.

What ridiculously inappropriate food are you eating lately?

05 June 2014

Joe's cinnamon orange tequila shots

Joe's cinnamon orange tequila shots

Our friend Chrissy filed her dissertation paperwork and will be receiving her PhD in two weeks. This calls for a celebration! Tequila shots all around!

Yes, tequila shots: those things with which you and all your friends probably had at least one bad experience in college. (Second place: Jägermeister.) But! When you go for a nice bottle of añejo silver instead of the ubiquitous Jose Cuervo, somehow the experience improves. A lot.

The typical tequila shot requires salt and lemon. You lick the back of your left hand in the flat space at the junction of thumb and index finger, sprinkle on some salt, and pick up a wedge of lemon. In your right hand is the shot of tequila. Lick the salt, take the shot, and bite the lemon. One tequila shot.

That's okay if you want to strip all the enamel off your teeth. This method is better.

Instead of salt and lemon, we use cinnamon and orange. This combination was pioneered by our friend Joe, again during the much more tequila-centric days of college. And what a huge difference it makes.

Needless to say, you'll want to do this on a full stomach. These are tequila shots, after all.

Joe's cinnamon orange tequila shots

(Yes, our grout is indeed 80 years old. Fun times!)

Joe's cinnamon orange tequila shots

cinnamon
orange wedges
good añejo tequila of your choice

We're going to do this step by step.

First, pour a shot of your tequila. Set it aside for a moment.

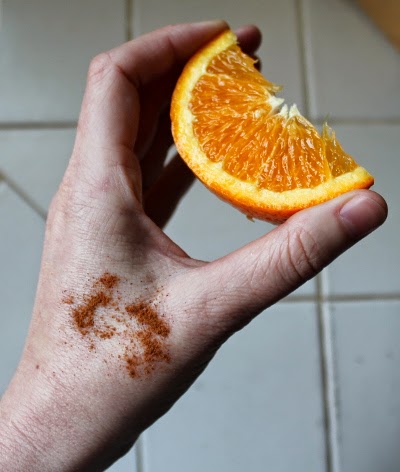
Lick your hand and sprinkle on some cinnamon. Not too much -- this is not the cinnamon challenge. Just get a tap or two out of the bottle.

Pick up a piece of orange in your cinnamon hand. It should look like this.

Joe's cinnamon orange tequila shots

Pick up your tequila shot with your other hand. Lick the cinnamon, take the shot, and eat the orange.

Have you ever had such a good tequila shot?

If you object to getting cinnamon on your hand, you can change up the situation by simply sprinkling a little cinnamon on your orange slice. Then just take the shot and bite the slice, no licking required. Either way is delicious. This second way just won't leave your hand smelling charmingly like a pastry shop.

A fitting celebration for achieving a PhD.