14 August 2014
Emergency dinner: mashed potatoes with homemade ranch & salad with green beans & eggs
Sometimes you just need emergency dinner.
First, put a pot of salted water on to boil. Scrub your potatoes under running water, cut into quarters, and simmer until tender.
Put your eggs into the potato pot to cook along with them. Scoop them out after about eight minutes and put them in a bowl of ice water to cool. When you're ready, whack them all over with the back of a spoon, peel them, and cut them into quarters.
Wash and trim your green beans. Put them in a steamer that fits over your potato pot. Put the steamer over the pot and steam until done to your liking. Shock briefly in cold water.
While your potatoes finish cooking, make a batch of The Chubby Vegetarian's yogurt ranch dressing. Put it in the fridge until you're ready to serve.
When the potatoes are done, drain them well and mash them with butter, salt, and pepper. Mash in some ranch dressing if you don't have any yogurt-haters in the house.
Get out a dinner plate. On one side, throw down a handful of the clean salad leaves of your choice. Top with green beans and eggs; season with salt and pepper. Drizzle on some olive oil if you so choose. On the other side of the plate, deposit a huge scoop of mashed potatoes. Top the potatoes with as much ranch dressing as you like.
Now eat it. Eat it all.
And for those of you watching at home, here's what it looks like when you hard-boil a double-yolked egg.
I've been saving this picture for months! And now, finally, there is a reason to post it. Eggs are the best, you guys.
What do you eat for emergency midsummer dinner?
Labels:
cheap,
dairy,
easy,
fast,
salads,
vegetables,
vegetarian
11 August 2014
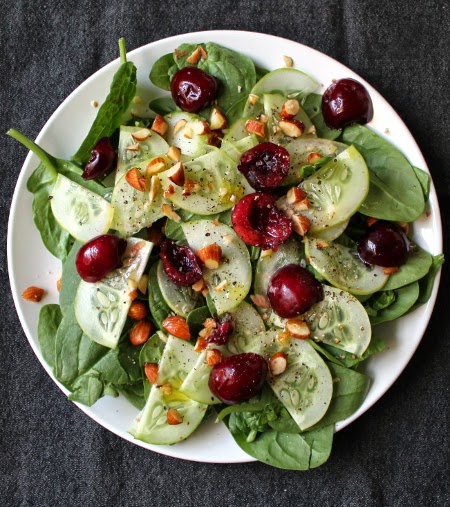
Spinach salad with lemon cucumber, toasted almonds, and summer cherries
Well, we are still essentially buried under a massive amount of fresh CSA veg at all times.
This means salads. Lots of salads. Salads at dinner, yes; salads at lunch, yes. Salads at breakfast? Also yes.
Breakfast salads are one of my favorite things. This stems from our year and a half living in Brooklyn, during which we tried our best to eat at every restaurant possible, and consequently ended up eating a lot of brunch. I mean, we would have ended up eating lots of brunch anyway, but Brooklyn is one of those towns in which brunch is practically an institution. So we ate lots of brunch at lots of different places, and the main thing those places had in common was salad. Every time we ate brunch anywhere even the smallest step up from the classic diner, we discovered that our orders came with a handful of mesclun and shredded carrot, tossed with vinaigrette and deposited next to the egg of our choice.
And now I don't really want to eat breakfast without some sort of serious vegetable content.
So. Salad for breakfast?
We received both a bag of baby spinach and a few lemon cucumbers in the last CSA box. Clearly, those were the basis for an excellent salad.
Lemon cucumber is not a variety I use much, mostly because it's not the best choice for pickling. But when I'm not making pickles, I find its mild flavor and subtle crunch to be delicious in salads and sandwiches.
The cherries came into play after we found bags of them on sale for $2 per pound. You can't say no to that. And once you have cherries, you have to have a handful of crunchy, rich almonds as well.
Boom. Salad.
Spinach salad with lemon cucumber, toasted almonds, and summer cherries
baby spinach
lemon cucumber
toasted almonds
sweet cherries
olive oil
salt, pepper
lemon juice
Arrange a few handfuls of spinach on each salad plate. Scatter a few drops of olive oil over them.
Trim your lemon cucumber, halve it, and slice it into thin slices. Arrange half a cucumber's worth of slices over each salad.
Roughly chop a handful of almonds and scatter them over each salad.
Pit your cherries, either using a cherry pitter or the paperclip method. Cut them in half. Strew a generous handful of cherry halves over each salad.
Dress your salads with a drizzle of olive oil, a squeeze of lemon juice, and some salt and pepper. Done.
While these salads are excellent alongside a plate of traditional breakfast eggs and toast, they would also clearly be fine additions to the lunch or dinner table. Eat them with a huge sandwich, a seared piece of halibut and a side of green beans, a bowlful of rice and curry. It's all good.
What is your favorite summertime salad?
Labels:
easy,
fast,
fruit,
nuts,
recipes,
salads,
vegan,
vegetables,
vegetarian
07 August 2014
Red cabbage curtido de repollo
If you want to make the pinkest pickle imaginable, I have just the recipe for you!
I've been making gigantic batches of curtido de repollo -- essentially, spicy pickled cabbage slaw -- ever since I first tasted it at our local Salvadorean restaurant. There, you stuff platefuls of pupusas with as much curtido as you so desire. The contrast between soft, chewy masa, creamy beans, and crunchy, tangy curtido is pretty spectacular.
At home, I've never yet attempted a batch of pupusas. Note to self: this really needs to happen as soon as possible. However, the curtido has been flowing freely. We eat it in tacos, in burritos, on top of big bowls of chili, and occasionally all by itself. SO good.
Normally, I use standard green cabbage and yellow onion to make curtido. This time, I had a lot of red cabbage and red onion from our CSA. Pink curtido it is!
Red cabbage curtido de repollo
1 small or 1/2 large red cabbage
a carrot
half a small red onion
1 1/2 cups white vinegar
1 cup water
2 serrano peppers, or whatever works for your spice tolerance
1 tbsp salt
Start by coring and shredding your cabbage and dicing your carrot and red onion. Put them in a large non-metal mixing bowl (mine is 4 quarts) and toss to mix.
Put your vinegar, water, peppers (chopped roughly), and salt in a blender. Liquefy. Be sure to keep your hand and maybe a towel over the top of the blender, so you can combat any liquid leaks. The result will be a light green brine with a layer of foam on top.
Pour your completed brine over your bowl of vegetables. Stir, getting all the vegetables wet.
The brine will not come up to the top of the bowl; this is fine. As the cabbage pickles, it will wilt and exude liquid, so the amount of brine will increase to cover all the veg within a few hours.
It will also turn pink from the red onion and cabbage. Hooray! Pink pickles!
Cover the bowl, put it in the refrigerator, and let it sit for at least three to four hours. Mix every so often, so the surface cabbage gets submerged in the brine. When the liquid level comes up to the top of the vegetables, you can stop mixing.
Congratulations! You are the proud owner of a big batch of curtido -- about 8 to 10 cups, depending on the size of your cabbage. It will keep well in the refrigerator for a good two weeks, getting gradually more and more pickley as it ages.
Eat your curtido with pupusas or arepas, on tacos, in burritos, on top of servings of chili, or alongside big bowls of tortilla soup. So crispy and tangy and delicious!
What's your favorite bright pink food?
Labels:
cheap,
CSA,
easy,
pickles,
preserves,
recipes,
salads,
vegan,
vegetables,
vegetarian
05 August 2014
Lamb meatballs with chive tzatziki
As most of you know, although the typical meal at our house is either vegetarian or vegan, I am actually an omnivore. Meat happens on limited occasion. This was one of them.
This time, I wanted to make a freezer stockpile of little juicy meatballs to use for emergency solo lunches. I wanted them to be full of flavor, but not so particularly spiced that I couldn't use them for a variety of applications. So I grabbed some lamb (the best of all red meats), added a handful of garlic, onion, and parsley, and went to town.
I decided to oven-bake these instead of frying them for several reasons. First, baked items cook with minimal attention. Second, you can sidestep the otherwise unavoidable barrage of hot fat particles burning you intermittently and greasifying everything in your kitchen. Third, this batch was big enough that it wouldn't all fit in my biggest frying pan at once. However, if you want to brave all these issues, you can absolutely cook these guys in the frying pan or cast-iron skillet of your choice. The latter would certainly let you achieve an excellent crust!
If you don't like lamb, you can go for pretty much any other ground meat you prefer, or use a blend of different meats. If you're planning on going for a very lean meat, such as ground turkey, you may want to mix it with some ground pork, so the fat content is still high enough to make a juicy meatball.
And, of course, you can always double or triple the recipe if you want to have meatballs in the freezer for the next few months. Either freeze the cooked meatballs in one layer on a cookie sheet and remove to a freezer bag when solid, or portion them into containers and freeze them that way. It's all good.
Lamb meatballs
Makes 4 dozen small meatballs or 2 dozen large meatballs.
2 pieces bread to make approx 3/4 cup breadcrumbs
1/4 cup milk or another soaking liquid of your choice
1/2 small red onion
4-5 cloves garlic
1/2 red, yellow, or orange bell pepper
a mushroom or two if you have them lying around
1/4 bunch (approx 2 tbsp) chopped parsley
1 1/2 tsp salt
2 tbsp dried red New Mexico chile/your choice of red pepper flake
as much freshly ground pepper as you desire
1 lb ground lamb
Preheat your oven to 350F.
Start by making breadcrumbs. Grab a couple slices of bread and finely chop them with a chef's knife or in a food processor. Of course, if you have premade breadcrumbs around, you can definitely use those instead.
Put your breadcrumbs in a large bowl. Add your milk and let the breadcrumbs soak it up while you prep your other ingredients.
Mince your red onion, bell pepper, mushrooms, and parsley as finely as you can. It's important to chop everything super-finely so your meatballs cohere well. Again, if you have a food processor, you may want to use it.
Add all your chopped veg and herbs to the bowl, along with your salt, pepper, chile, and ground lamb. Mix well, using your hands to distribute all the different elements as evenly as possible.
Form your meatballs by pinching off a small chunk of your meat mixture and patting or rolling it together. I like small meatballs, so I made mine a bit smaller than a ping-pong ball. You can go up to the size of a golf ball or even larger if you prefer. Arrange your meatballs in rows, either on a rimmed cookie sheet or in a glass casserole dish with sides.
Bake for about 20-25 minutes, or until your meatballs are cooked through but still juicy and tender inside. If you're making much bigger meatballs, you'll probably need to extend the cooking time to 30 or 35 minutes. They will be brown on the outside and exuding several tablespoons of hot liquid fat. (This is why it's important to use rimmed cookie sheets instead of flat ones.) If you like, pour off the fat and save it for sauteing greens later. Won't that be excellent?
Test for doneness by cutting a meatball in half, checking the color, and eating it. The tray above needed just a few more minutes in the oven to be fully browned.
Now you can either eat your meatballs right away or freeze them for later. I kept a few out for immediate eating and froze the rest, portioned out into small containers. This way, I'll be able to defrost and reheat one container's worth at a time. Then they'll go into soup, into a pasta sauce, on top of a big salad, or into a sandwich. Hooray!
What did I do with my first serving of meatballs? I put them in a wrap and had the most satisfying lunch on the planet.
I made a tiny batch of tzatziki to go along with my meatballs. There was no fresh dill in the house (although there is now plenty of dried dill around!), so I decided to change it up with some chives. Super simple.
Chive tzatziki for one
2 tbsp Greek yogurt, labneh, or strained full-fat yogurt
~2 tbsp chopped chives
~2 tbsp shredded or julienned cucumber, seeds removed
salt and pepper to taste
Mix all your ingredients together. Taste and adjust seasonings. Voila!
Next, use it to make:
A delightful lamb meatball wrap
flatbread, tortilla, pita, or naan of your choice
hot meatballs
chive tzatziki
avocado slices
lettuce leaves
Warm a piece of flatbread in the toaster oven until flexible. This should take about 2-3 minutes at 275F. You can also do this on the stovetop in a frying pan.
Fill the warm flatbread with leaf lettuce, meatballs, tzatziki, avocado slices, and any other vegetable that sounds good to you.
Roll it up, skewer it with a toothpick or encase it in foil, and eat it with gusto.
Hooray! A delicious and satisfying lunch.
What are your favorite sandwiches lately?

Labels:
condiments,
dairy,
easy,
freezer,
meat,
recipes,
sandwiches
28 July 2014
How to dry fresh herbs
Because you can't just pickle an abundance of fresh dill, but you can dry it out, crumble it up, and use it to pickle other things!
Drying herbs at home is actually really, really easy. All you need is a place to let your herbs dry undisturbed and a little patience.
If you have lots of fresh herbs -- whether you grow them yourself, get them spontaneously through a CSA, or have good access to cheap farmer's market deals or foraging -- you should absolutely dry your excess so you can use them all winter long. It takes very little work, produces MUCH higher quality dried herbs than you can buy at the supermarket, and takes advantage of the super-cheap summer harvest. Give it a try!
I like to dry my herbs in the laundry room, because that's how I roll. Actually, a lot of blog stuff gets done in the laundry room. It has good light via multiple windows, which means the top of the dryer is very frequently where I set up my photo shoots. Yes! Secrets of foodblogging revealed!
ANYWAY.
So. Drying herbs.
Generally, you want to spread herbs out to dry, so they get good air circulation. You want them to be out of direct sunlight, so the sun doesn't bleach them and their oils don't evaporate. And you want to put them somewhere where they'll be undisturbed for at least a week. You have a choice of several different methods by means of which to do this.
First, the plate method.
This is the simplest possible way to dry herbs. Just spread your clean herbs on a plate and leave them alone for about a week, or until they are entirely crispy and crumble easily between your fingers. No elaborate drying screens necessary!
This method works really well as long as you can ensure your herbs remain undisturbed. If you have an inquisitive cat, for instance, this might not be the best choice for you. But if you can put them in a room (a laundry room, perhaps?) with a door you can keep shut, you're probably good to go.
Second, the hanging method.
Here, you'll separate your clean herbs into a series of small bunches and hang them somewhere to dry. Then just leave them alone for a good week, or until they're completely dry through.
I usually attach all my bunches of herbs to a wire hanger and hook it over a plant hook in the laundry room ceiling. (In case you were wondering, this is sufficiently above the windows to eliminate the direct sunlight issue.)
"Attach" can mean securing the bunch with a twist tie and then wrapping its ends around the hanger wire, or it can mean gently separating each bunch of herbs in half up to the tie and sliding that over the hanger, so the herbs fall to either side and the tie rests on top of the wire. Lots of other methods can work well too. Give it a try and see what's most practical for you.
When your herbs are dry (by either method), carefully pick the leaves from the stems, working over a cutting board or plate to catch all the fragments. For some herbs, this takes more effort than others. Greener and more delicate herbs are easier to process; dill, for instance, generally crumbles right off its stem. Woody herbs like sage and thyme can take a bit more care, since you don't want to end up chewing on an inedible stem later. But unless you're harvesting an entire field's worth of dried herbs, you probably won't have too much trouble.
Next, crush, grind, or chop your dried herb leaves to your preferred texture. I usually roughly chop mine with a chef's knife. A mortar and pestle or spice grinder can come in handy if you want a finer texture. Do what works for you.
Finally, funnel your finished dried herbs into jars and store them until needed.
Hooray! You just saved a bunch of herbs from melting into a puddle of swampy goo in the bottom of the crisper! And you'll also be able to keep your money instead of shelling out for yet another jar of dried basil in mid-January.
Are you drying any food this summer? I keep meaning to build a solar dehydrator, but it hasn't happened yet. Any other less usual methods of food preservation in the house?
And hello to all the excellent women I met this past weekend at BlogHer! So nice to meet all of you! I have a stack of business cards and a whole lot of new blogs to visit and twitter feeds to follow...as soon as I take a day or two to nap. :)
Drying herbs at home is actually really, really easy. All you need is a place to let your herbs dry undisturbed and a little patience.
If you have lots of fresh herbs -- whether you grow them yourself, get them spontaneously through a CSA, or have good access to cheap farmer's market deals or foraging -- you should absolutely dry your excess so you can use them all winter long. It takes very little work, produces MUCH higher quality dried herbs than you can buy at the supermarket, and takes advantage of the super-cheap summer harvest. Give it a try!
I like to dry my herbs in the laundry room, because that's how I roll. Actually, a lot of blog stuff gets done in the laundry room. It has good light via multiple windows, which means the top of the dryer is very frequently where I set up my photo shoots. Yes! Secrets of foodblogging revealed!
ANYWAY.
So. Drying herbs.
Generally, you want to spread herbs out to dry, so they get good air circulation. You want them to be out of direct sunlight, so the sun doesn't bleach them and their oils don't evaporate. And you want to put them somewhere where they'll be undisturbed for at least a week. You have a choice of several different methods by means of which to do this.
First, the plate method.
This is the simplest possible way to dry herbs. Just spread your clean herbs on a plate and leave them alone for about a week, or until they are entirely crispy and crumble easily between your fingers. No elaborate drying screens necessary!
This method works really well as long as you can ensure your herbs remain undisturbed. If you have an inquisitive cat, for instance, this might not be the best choice for you. But if you can put them in a room (a laundry room, perhaps?) with a door you can keep shut, you're probably good to go.
Second, the hanging method.
Here, you'll separate your clean herbs into a series of small bunches and hang them somewhere to dry. Then just leave them alone for a good week, or until they're completely dry through.
I usually attach all my bunches of herbs to a wire hanger and hook it over a plant hook in the laundry room ceiling. (In case you were wondering, this is sufficiently above the windows to eliminate the direct sunlight issue.)
"Attach" can mean securing the bunch with a twist tie and then wrapping its ends around the hanger wire, or it can mean gently separating each bunch of herbs in half up to the tie and sliding that over the hanger, so the herbs fall to either side and the tie rests on top of the wire. Lots of other methods can work well too. Give it a try and see what's most practical for you.
When your herbs are dry (by either method), carefully pick the leaves from the stems, working over a cutting board or plate to catch all the fragments. For some herbs, this takes more effort than others. Greener and more delicate herbs are easier to process; dill, for instance, generally crumbles right off its stem. Woody herbs like sage and thyme can take a bit more care, since you don't want to end up chewing on an inedible stem later. But unless you're harvesting an entire field's worth of dried herbs, you probably won't have too much trouble.
Next, crush, grind, or chop your dried herb leaves to your preferred texture. I usually roughly chop mine with a chef's knife. A mortar and pestle or spice grinder can come in handy if you want a finer texture. Do what works for you.
Finally, funnel your finished dried herbs into jars and store them until needed.
Hooray! You just saved a bunch of herbs from melting into a puddle of swampy goo in the bottom of the crisper! And you'll also be able to keep your money instead of shelling out for yet another jar of dried basil in mid-January.
Are you drying any food this summer? I keep meaning to build a solar dehydrator, but it hasn't happened yet. Any other less usual methods of food preservation in the house?
And hello to all the excellent women I met this past weekend at BlogHer! So nice to meet all of you! I have a stack of business cards and a whole lot of new blogs to visit and twitter feeds to follow...as soon as I take a day or two to nap. :)
Subscribe to:
Posts (Atom)