29 May 2012

Ginger almond yogurt cake

ginger almond yogurt cake

You guys may have noticed that nobody has much of a sweet tooth at our house, but when I saw Mary's recipe for ginger almond bread the other day, I couldn't resist. A batter redolent of sugar, butter, and eggs, plus a massive amount of fresh ginger and a scattering of almonds? Yes. I can do that.

Of course, I had to change the recipe just a little. This is more of a cake than a bread, to my mind, with a dense, moist crumb and a delicate sweetness. So let's change the title first, shall we?

We don't generally have either sour cream or milk around, but we do have lots of plain yogurt. This was not Greek yogurt, but ordinary semi-runny yogurt. So I switched out the original 1/3 cup sour cream and 1/4 cup milk for 1/2 cup yogurt and a splash--probably 1/8 cup--of water. I also used vanilla instead of almond extract, because we bake seldom enough that we don't actually own any almond extract.

The original recipe also called for 1 full cup of fresh ginger. WOW. That is some serious punch. I didn't actually end up measuring how much chopped ginger I got from my 5-inch root--I just peeled and finely chopped the whole thing. I'm guessing I used about 3/4 cup total. I think using the full cup would still be great, though, so I'm keeping that as the official measurement.

Finally, because I am a lazy baker, I made the entire cake batter in one bowl, with no pre-sifting of dry ingredients. This worked out fine (it nearly always does). If you are a more careful baker, you may want to mix all the dry ingredients together before you add them, but hey! Do whatever works for you.

ginger almond yogurt cake

Ginger Almond Yogurt Bread Cake

3/4 cup room temperature butter
1 cup sugar
1/2 cup plain yogurt
3 eggs
1/4 tsp vanilla
1 cup fresh ginger
1/2 cup sliced almonds
1 tsp baking powder
1/4 tsp salt
2 cups flour
extra almonds for garnish

First, preheat your oven to 350F/175C. Butter a loaf pan and line it with parchment paper. Or you can just butter and flour the pan if you prefer.

Prep your ginger before starting the whole baking process. Peel your ginger using the spoon trick (just scrape it with a teaspoon & the skin will come off), and chop it as finely as you like. If your almonds are whole, slice them up as well. It's certainly faster to just buy sliced almonds, though.

Cream the butter with the sugar in a large mixing bowl. Add the yogurt and mix until smooth, scraping the bowl down as needed. Then mix in your eggs (I added mine all at once) and vanilla.

ginger almond yogurt cake batter

Add your ginger and almonds to the batter, folding them in with a spatula. Sprinkle the baking powder and salt over the top of the batter and fold them in gently but thoroughly. Then add the flour, one cup at a time. After each addition, fold gently with the spatula until the flour is thoroughly incorporated with the wet batter. No overmixing!

Pour and scrape your batter into your prepared loaf pan. The batter will smell great, but try not to eat too much, ok? Spread a couple handfuls of additional almonds over the top.

ginger almond yogurt cake batter

Bake for approximately one hour, or until the cake is golden brown and a toothpick inserted in the middle comes out clean. I actually did not have an eye on the clock at all while baking, so I'm not quite sure of the time I needed, but it was in the general neighborhood of one hour.

Let cool in the pan for about 15-30 minutes before removing. (This is why I like parchment paper--you can just lift it up and the cake comes out perfectly intact.) Then cool the finished cake to room temperature on a wire rack.

Now you can eat cake! Eat it with coffee. Eat it with tea. Eat it for breakfast, certainly. The finished cake is dense enough that you can walk out the door with a slice on your way to work, no problem.

ginger almond yogurt cake

What else might you want to put in this cake? Grated lemon zest might be a nice idea. Dried cranberries or apricots might work. Chopped dried cherries could definitely work. I think I'd reduce the amount of sugar to 3/4 cup if I added fruit, though, since it'd tip the balance toward more sweetness.

CAKE!

25 May 2012

Food storage: welcome to my freezer

I thought this glorious US holiday weekend called for one thing and one thing only. That's right: pictures of my freezer!

Oh, okay, you can have a beer too. There's beer in the fridge part. Also wine up top. Choices, choices.

So you guys want to see my freezer? BEHOLD.

freezer storage

freezer storage

No, we really, really can't get the ice cream maker in there.

Note that this is only the first layer of stuff. Everything is approximately three deep, and mostly stored in pint containers.

The container idea came from living in Brooklyn and ordering Indian delivery every once in a while. The food came in these exciting little pint containers that perfectly held 2 cups of whatever you might want to put in them. They also were free, and stacked perfectly. So I started washing them out and reusing them. Eventually we went ahead and ordered 100 new, for ultimate freezer organization power. This also means we now have many fewer incidents in which, say, a bag of dried chickpeas suddenly splits in your hand and showers its contents all over the freezer. Good times.

Yes, they're plastic, and that's certainly not optimal, but it works for us at this point in time. The black containers are also reused takeout boxes, but they're made from corn. We feel a little better about using them, but we don't know where to find more!

We stuff all kinds of things into the freezer. Flours, grains, beans, pulses, and some baking supplies go in the freezer because after you've experienced one infestation, you don't want any more, ever. We could probably take these out and store them in the cabinet after a week or so in the freezer--there are a few containers of dried pintos and chickpeas in the pantry--but, well, why bother? This works out fine for now.

You can see my impulse for making ice cream is pretty well under control if that's my attitude.

So. Freezer contents.

I started labeling but had to stop because there is just too much stuff to list in one picture.

freezer storage

Grains, flours, & baking:
short-grain brown rice
long-grain white rice
arborio rice
barley
quinoa
oatmeal
couscous
polenta/coarse cornmeal
wheat flour
white wheat flour
gluten flour
chickpea/gram flour
rice flour
buckwheat flour
bulk yeast
turbinado sugar

Dried beans & pulses:
white beans
black beans
red kidney beans
pinto beans
adzuki beans
mung beans
chickpeas/garbanzo beans
yellow split peas/urad dal
green split peas
puy lentils
red lentils
green lentils

Broths:
chicken
fish
veg
bean (right now it's chickpea broth)

Vegetables:
stockpile
corn
peas

Meat & fish:
bacon
pork loin steaks
roasted chicken
precooked chicken sausage
(shrimp & whitefish filets pop in & out frequently)

Fruit:
dried sour cherries
dried sweet cherries
dried cranberries
dried apricots
backyard plums
strawberry & banana chunks
whole black bananas

Nuts & seeds:
cashews
almonds, slivered & whole
pecans
sesame seeds
(walnuts should be there but aren't)

Prepared food, which is to say, food I made:
chili
lentil soup
carrot soup
mini quiches
several black bean & rice-stuffed peppers
cooked beans in their broth (various)

Store-bought prepared food:
ice cream
a pound cake
half a box of disgusting fish sticks I really need to throw out
(sometimes we have frozen burritos or pizza)

Miscellaneous:
tempeh
ice
coffee

And that's just what's in there right now, for a household of two, one of whom is vegetarian! Imagine if we were serious coupon people, or fishers coming home with six gigantic salmon at a time, or hunters bringing home a deer!

This is why I now own a canner, incidentally. I want the summer tomatoes all year, but can they fit in there? No, they cannot. I want a lot more vegetables in the freezer as well as out, actually. We'll have to see what we can do about that. I mean, the freezer isn't organized, though it may seem so to the naked eye. It's just full of easily stackable containers. If I really got in there and went at it, I could almost certainly preserve a lot more food in the freezer. Hmm. I'm going to have to think about that one.

In the meantime I'm going to have a beer, though. Holiday weekend! Hooray!

22 May 2012

Farmer's market fruit extravaganza

Breakfast time!

farmer's market strawberries and oatmeal with yogurt

I had farmer's market strawberries and oatmeal with yogurt, chopped dried apricots, and a handful of random chopped almonds and cashews.

Snack time!

farmer's market cherries and apricots

I had a bowl of farmer's market cherries and apricots.

Dinnertime!

farmer's market strawberries and quesadillas

I had farmer's market strawberries and a couple of quesadillas with refried beans, spinach, garlic-sauteed summer squash, and cheddar.

Dessert time!

farmer's market cherries

Note to self: get more fruit next week, okay?

18 May 2012

Dinner in 15 minutes: chicken sausage with green beans

Chicken sausage with green beans

John and I run a fairly minimal house. We have no tchotchkes on our shelves, no pictures on our walls; only our bookshelves are crowded. Well, our bookshelves and our freezer. Yes: I stuff the freezer with everything imaginable. Dried fruit and nuts, flours, beans and pulses of all kinds, similar varieties of grains, roasted chicken and its broth, soaked and cooked beans and their broth, the vast vegetable stockpile and its resulting broth, leftover soups and stews, yeast, tortellini, dumplings, bacon (one package can last us a year, seriously), tempeh, butter: practically anything that requires cold air for preservation is in our freezer.

Oh, and ice.

This means I can grab something from the freezer to produce nearly instant dinner. In this instance, I grabbed a frozen chicken sausage, threw it in some warm tap water to defrost, and tossed it in a pan with some green beans and spices.

Zoom! Bang! Pow! Dinner is served!

Chicken sausage with green beans

onion/shallot/garlic
olive oil
optional hot pepper
precooked chicken sausage
lots of green beans
red bell pepper
dry vermouth to deglaze
salt, pepper, basil, oregano

The proportions here are flexible. Use what you have; use as much as you like. They're your taste buds.

Saute chopped onion and/or garlic in a little olive oil. If you like hot pepper, chop that up and add it too. While the veg are softening, slice a chicken sausage per person into half-moons. Add sausage to the pan, season with salt, pepper, basil, and oregano, and cook, shaking and stirring occasionally, over medium-high heat. While things are cooking, wash, top and tail, and chop a large handful of green beans per person. After about five minutes, when the sausage is beginning to turn golden on both sides, add the green beans. Toss again and cook while you dice a red pepper; give it maybe three minutes before you dump it in the pan too. Cook another few minutes, deglazing the pan with vermouth as needed. Taste and correct seasonings.

Eat with vigor.

16 May 2012

Raw cashew cheese

raw cashew cheese

So the other day, after months of saying "I should really make some cashew cheese one of these days..." I finally made a batch of Gena's sun-dried tomato and basil raw cashew cheese. I left out the miso, since we didn't have any, but otherwise made no changes whatever to the ingredient list.

I haven't done the cashew cheese thing before for a few reasons. First, I frequently eat all our cashews before I have the chance to use them in recipes that require two hours of soaking. Second, I don't have a food processor and have no plans to get one.

Wait, what? No food processor? No. I mean, we have an immersion blender that came with a tiny little processor-like attachment, but it is definitely not big enough to handle a full batch of cashew cheese. Instead, I used my blender, which was slightly problematic but worked out fine in the end. It really only meant that I added liquid at the beginning of processing instead of the end, and that I scraped and pulsed a lot more. Have you ever tried to get a thickish nut paste out of the bottom of your blender? Yeah. It was a little interesting.

raw cashew cheese

But ultimately the whole experiment was a success. I soaked my cashews patiently without eating a single one in advance. I blended everything together with minimal drama. And then I had a beautiful big batch of delicious homemade cashew cheese to eat with dinner! Hooray!

Gena calls this "pizza cheese" due to the super Italian flavors of sun-dried tomato and basil. So I decided to combine it with some of my favorite vegetables to have on pizza--fresh spinach and red pepper--as well as a pile of baguette slices, for an ultra-simple, vegetable-focused dinner.

raw cashew cheese

Crinkly spear-shaped spinach leaves don't exactly lend themselves to formal wraps, but that's ok. I just spread spoonfuls of cashew cheese down the middle of each leaf folded them in half, and ate them that way. Spinach tacos!

The red pepper provided a more solid boat on which to rest the cheese, but its strong flavor overwhelmed the more delicate cashews. Next time I'll probably go get a narrow head of radicchio or endive and fill a bunch of individual leaves with spoonfuls of cheese, shredded crispy carrot, radish, or cucumber, and maybe a sprinkling of sprouts or other fine greens.

John and I clearly couldn't eat an entire batch of cashew cheese in one meal, no matter how tasty. Maybe I can actually try it out in my tiny food processor attachment next time--I'll just halve or third the batch, and then we can eat it all in one go! Anyway, this meant I knew exactly how to garnish my dinner of angel hair with shallots, zucchini, green beans, and spinach the next day. The cashew cheese worked perfectly--tasty and fresh.

spinach and angel hair with raw cashew cheese

After this experience, I definitely think I will be making nut cheeses more often. Just imagine the hundred different ingredients I could add to the basic mix of soaked nuts, salt, and water. Scallions, ginger, smoked paprika, carrot, shallots--I want to try them all!


15 May 2012

Mutant kiwi: hooray!

farmer's market double kiwi

So here's what you get when you buy kiwi at the farmer's market in California.

DOUBLE KIWI.

farmer's market double kiwi

In some cases you even get triple kiwi.

You know how stores select for the most nonthreatening, standardized, perfectly identical produce? This experience makes that even more obvious.

farmer's market double kiwi

And why? I mean, yeah, it's probably because they don't nest well in standard shipping crates...but come on! Double and triple kiwi look extra gorgeous when you slice them up.

(Yes, I did just eat the equivalent of six kiwis. Why do you ask?)

farmer's market double kiwi

14 May 2012

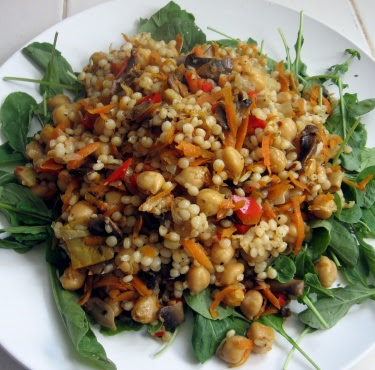
Israeli couscous with chickpeas & Mediterranean vegetables

Israeli couscous with chickpeas and Mediterranean vegetables

This is just about exactly what I want to eat for lunch every day: a giant mess of vegetables, pasta or grains (I tend to treat Israeli couscous as a grain and not as pasta at all), and chickpeas or another appropriate pulse.

At the same time, this is a totally standard and normal thing for me to eat. Does that mean it's boring? No. No, it does not. In fact, it's super easy to vary this dish based on the different vegetables, grains, and pulses you may have. No chickpeas? Throw in some navy beans, green or black lentils, giant cannellini, or black-eyed peas. No Israeli couscous? Steam rice, barley, millet, or quinoa, make a big pot of polenta, boil some gemelli, fettuccine, or conchiglie, or go a totally different direction and whip up some baked or mashed potatoes, sweet or otherwise. And of course the vegetables can be pretty much anything you want, as long as you get some allium content in there.

I tend to gravitate toward a mix of Mediterranean vegetables: artichoke hearts, peppers, lemon, oregano, olives. These highly flavored vegetables make for an especially nice combination with the more neutral chickpeas.

Israeli couscous with chickpeas and Mediterranean vegetables

Israeli couscous with chickpeas & Mediterranean vegetables

For couscous:
olive oil
onion
Israeli couscous
water or veg broth

For veg:
olive oil again
onion &/or garlic
mushrooms
artichoke hearts
carrot
red bell pepper
cooked, drained chickpeas
dry vermouth to deglaze
salt, pepper
oregano, marjoram, red pepper flake
maybe some lemon juice or white wine vinegar to finish
arugula or other nice salad greens of your choice
optional parsley & grating cheese for garnish

Game plan: put couscous on to cook; make veg; combine; plate over all the delicious greens you desire.

I cook Israeli couscous like a grain, in what is essentially a simple pilaf preparation. So. Start by warming a slug of olive oil in the bottom of a 3-quart pot with a lid. Dice up a medium onion and add it to the oil. Let cook to soften for about 3-5 minutes. (While you're waiting, you can start chopping up veg.) When the onion has turned soft, add in a cup of couscous.

Now it's time to add your liquid. The formula here is a little odd. Instead of adding 1.5X the volume of couscous (which I think is close to correct), you want to add water just to cover the couscous, then add the same amount of water as couscous. Since we're making one cup of couscous, we'll add one more cup of water.

You can vary this formula for any amount of couscous. For 2 cups of couscous, you'd just cover the couscous with water and then add 2 more cups; if you were making 2/3 cup, you'd cover the couscous with water and add another 2/3 cup of water. Makes sense?

Cover the pan, bring it up to a fast simmer, turn the heat to low, and cook for about 10-15 minutes, or until all the water is absorbed. Voila! Israeli couscous!

Okay. While the couscous is cooking, get out a wide saute pan and cook your vegetables. Start by dicing and sauteing half an onion and a couple cloves of garlic in a little olive oil. Gradually chop and add the vegetables, starting with the mushrooms and proceeding down the list in order of how long they take to cook. Shred the carrot instead of chopping it if you so desire; I did. Season with salt, pepper, oregano, marjoram, and maybe some red pepper flake if you want some spice. Add the chickpeas and continue to cook for a good five minutes, or until things are cooked through to your liking. Deglaze with some dry vermouth and let cook another couple minutes before you turn off the heat.

Check to make sure your couscous is finished, stir it up, and add it to your vegetable pan. Taste and correct the seasonings. If you want a little acid, you can add a squeeze of lemon juice or a splash of white wine vinegar. Lemon zest might be good here too.

Israeli couscous with chickpeas and Mediterranean vegetables

To serve, cover a plate with salad greens of your choice. I personally prefer darker greens, so I used arugula, but just about any salad green that can stand a light wilting would probably work out fine.

Do you want garnish? Chopped parsley is definitely great here; basil would probably be good as well. A dusting of grating cheese--parmesan, romano, pecorino, whatever--is also a good move.

I like to stir everything up into a big mess before eating it. You know the messiest food tastes the best, right? Hooray for mess!

09 May 2012

Spring garden: drying mint

So you remember the mint that was exploding all over my side bed about a month and a half ago?

Me too--especially because "exploding" is exactly the right term to describe what it was then doing, and now continues to do. Clearly, something had to change. For one thing, I want to plant some zucchini starts in the front of that bed, and the mint was steadily encroaching further and further out.

That's how I came to spend last weekend making this.

how to dry mint without a dehydrator

Contrary to popular belief (er, are there many popular beliefs about drying herbs in this day and age?), you do not need a dehydrator to dry home-grown herbs. All you really need is some string and somewhere to hang the herb stems, preferably out of direct sunlight.

This method should work with most herbs that grow on a stem that is reasonable to hang. If you live in a particularly damp climate, or don't have a good place to hang your herbs, I recommend using a dehydrator or very low oven instead.

Drying mint without a dehydrator

Target healthy, green, beautiful mint leaves for drying. You want to dry them before they bolt and flower, so May isn't too preposterous a time to start.

To harvest, use kitchen scissors to cut your mint stalks near the base of the plant. The best time to harvest herbs is supposedly early in the morning, since the essential oils are supposed to be most abundant then, but I haven't found any actual evidence to support this. So I cut a good 40 or 50 stems of spearmint sometime around 3 pm, because that's what time this project occurred to me. Why not?

Wash your mint well in cold water, leaving the healthy leaves on the stems. Strip off shriveled, yellowed, or buggy leaves. Gently pat dry between kitchen towels.

Tie your mint into bundles of six or eight stems, taking care not to crowd them too much. I actually sewed mine together. Why? An excellent question, since I could certainly have just tied them.

Now hang your bundles up to dry. Again, don't crowd them--you want the air to come in contact with all the leaves. I tied mine to a couple of hangers and made a mobile over our washing machine. Decorative and beautifully scented!

dried spearmint

Now my mint looks like this!

Drying time is going to vary based on all kinds of different environmental factors. My mint seems to be dry now, after about five days hanging out in the laundry room. However, I'm planning to leave it up for another couple days, just to be sure. Bottling herbs that are not totally dehydrated will become problematic for obvious mold reasons, so let's just not go there, okay? You can check for dryness by breaking a leaf in half and seeing if it oozes any beads of moisture.

When your mint is thoroughly dry, you can strip the leaves off the stems, crumble them to your specifications, and put them in jars or other reasonable containers. I'm planning to put all my leaves in a plastic bag, crunch them up with a rolling pin, and use them as loose-leaf mint tea.

You now have homemade dried mint! Hooray!

07 May 2012

Roasted asparagus with infused olive oil

roasted asparagus with infused olive oil

Yay, it's still asparagus season!

What could be better than a plate of roasted asparagus? How about a plate of asparagus roasted in olive oil infused with garlic and herbs?

Although we've roasted many pans of different vegetables with homemade dijon vinaigrette, we hadn't tried using infused olive oil before. So this was an experiment that went incredibly right.

roasted asparagus with infused olive oil

Roasted asparagus with infused olive oil

olive oil
garlic
chives
red pepper flake
salt, pepper
asparagus

First, infuse your olive oil. It's going to need to sit for at least a half hour, and preferably longer, for the flavors to permeate. I used about 1/3 cup of oil, which I just poured into a measuring cup.

You can infuse your oil with practically any herb or spice combination that sounds delicious to you, and in any proportion you like. I used two cloves of garlic, two very large and thick chives, several good coarse grinds of black pepper, and a little smattering of salt and red pepper flake. Peel your garlic and chop both it and your chives before adding them to the oil. Otherwise, just put all your herbs and spices into the oil, stir, and let infuse.

When you're ready to cook, preheat your oven to 400F.

Prepare a cookie sheet by covering it with parchment paper or a silicone liner. Wash and lightly dry your asparagus, snap off the woody ends, and arrange the spears in one layer on your cookie sheet. Now use a pastry brush to coat all the asparagus spears with infused oil. You may need to mix a bit with your hands to ensure that all your asparagus is covered with a thin coat of oil. Some garlic and herbs will stick to your asparagus; this is more than fine. Sprinkle a bit of extra salt over the tray before you put it in the oven.

Roast your asparagus for about 25 minutes, or until tender and slightly browned. If you have particularly thin or fat asparagus, you may need to adjust the time a little.

roasted asparagus with infused olive oil

Eat hot or let cool to lukewarm. Either way, it's going to be delicious.

I recommend you eat your asparagus with your fingers. It tastes best that way.

Variations:
- Infuse your oil with parsley and copious lemon zest. Throw in a few capers if they float your boat.
- I don't like anchovies, but my brain is saying they might be great with the parsley-lemon combination as well.
- Replace part of the olive oil with melted butter or ghee.
- Infuse your oil--maybe use peanut?--with garlic, ginger, and orange zest, and add a little soy sauce and rice wine vinegar. Serve with toasted sesame seeds or gomasio.
- Use your infused oil to roast something else entirely: cauliflower, green beans, radishes, broccolini.
- Eat your finished roasted asparagus on top of a massive salad of tender greens.

Hooray asparagus!

04 May 2012

Fishy fishy who's got the fishy

Here, fishy fishy...hop into my hot hot cast-iron pan filled with sizzling butter, why don't you?

seared butterfish filet

After poaching and baking, searing is definitely the next step up the ladder toward fish mastery. This is my favorite method of cooking fish by far. It's incredibly fast and easy, requires minimal equipment and ingredients, and produces a remarkably delicious piece of finished fish--and yet it seems that most people just learning to cook fish are scared of it.

It's ok! You can do it! Searing only really requires a hot pan, a decent spatula, and a close eye on the cooking situation. The most likely danger is overcooking--but unless you walk out of the kitchen and let your entire pan burn to a crisp, the finished product will be at least edible, and more likely very good indeed.

On this occasion, I had a filet of butterfish, a piece of butter, a couple chives, and some salt and pepper--and you could get away without the chives.

I prefer to cook thinner filets of fish as opposed to gigantic swordfish steaks, for instance, so these instructions are written for filets maybe 3/4 inch/2 cm thick.

seared butterfish filet

Seared whitefish filet

whitefish filet: butterfish, tilapia, perch, sole, cod, whatev.
butter
salt, pepper
chives or parsley
wedge of lemon to serve

To begin, find a reasonable cast-iron or stainless steel frying pan and put it over high heat. Nonstick pans will work too, but high heat is supposed to make them release chemicals, so...yeah. You need to get the pan very hot; this will 1. make the fish taste great and 2. keep the fish from sticking to the pan. Have an oven mitt ready, as the handle will most likely get hot too.

While your pan is heating, pat your fish filet dry with a paper towel and season it on both sides with salt and pepper. It's important to dry the fish so it won't spatter when it hits the hot butter later. You know what they say about oil and water, right?

When your pan is hot, put your oven mitt on the hand you'll use to hold the pan handle. Deposit a good tablespoon of butter into the pan; it will sizzle and froth almost immediately. Turn the pan so the butter gets distributed over its surface. Then quickly pick up your fish with a spatula (or fingers, if you're ok with the high heat cooking experience) and lay it flat in the pan. It will sizzle loudly.

Now LEAVE YOUR FISH STILL for about two to three minutes. Don't leave the kitchen. You can chop up a couple chives or a few leaves of parsley if you want, but make sure to watch the pan pretty closely.

After two or three minutes, depending on your stove, you'll start to see the fish contracting, turning opaque, and maybe even starting to flake around the edges. When this happens, the filet should be cooked and browned nicely on the bottom. So. Shake the pan a few times to loosen the fish filet; it'll be much more likely to stay intact if you shake instead of prying, so don't prod unless it's really stuck. When the filet slides free, flip it over with your spatula. Cook another two minutes, or until the entire filet is opaque and just barely ready to flake.

seared butterfish filet with cucumber mint raita

Put your finished filet on a plate. You may notice that it really wants to break into pieces at this point. That's totally fine (if a little messy); it just means the fish is entirely cooked. If you want, you can melt a little extra butter in the pan and pour it over the fish. Or you can just pour whatever butter is left in the pan over it.

Sprinkle your fish with chives or parsley, stick a wedge of lemon on the side, and eat ASAP. Fish must be eaten HOT.

I had my butterfish with cucumber and mint raita.

Cucumber and mint raita

plain yogurt
cucumber
mint
pepper

Chop up a cucumber (peeled or seeded at your discretion) and a handful of mint leaves. Mix them with a couple spoonfuls of yogurt and season with pepper. Eat.

Hooray! You seared fish! That wasn't so bad, was it?

02 May 2012

So many muffins

banana espresso muffins

So, guess what you get when you bake Heidi's recipe for 12 regular banana espresso muffins from Super Natural Cooking?

Nine regular muffins and TWENTY-FOUR mini muffins.

I didn't even add the walnuts, so the overall batter volume was lower than normal. I imagine I could've gotten up to a full twelve regular muffins in that case. You know--plus the additional 24.

banana espresso muffins

In conclusion, I WIN.