14 July 2014

Nocino: Italian black walnut liqueur

Nocino: Italian black walnut liqueur

Green black walnuts are clustering in the trees and staining the sidewalks in our neighborhood, so I foraged a few nice specimens and brought them home to make a batch of nocino.

What is nocino, you ask? Well. Nocino is an Italian black walnut liqueur flavored with lemon zest and cinnamon. It's traditionally made at the very end of June, since that's when the walnuts are fully formed but still green enough that you can easily chop them up. But for those of you who live in a climate a little less balmy than that of Italy, I'm guessing now is the perfect time to go find some green walnuts and start your own batch.

I still have a huge selection of homemade schnappses and liqueurs hanging around our kitchen cupboards, but I couldn't resist adding at least a tiny batch of authentic nocino. So here's what I'm doing to make one pint jar's worth of nocino this year. The results are going to be small, but so worth it.

Caution: walnuts stain! Be sure to wash your cutting board and knife immediately after chopping your walnuts, or you will have some serious fluorescent green to deal with in the future.

Nocino: Italian black walnut liqueur

Small batch homemade nocino

5-6 unripe black walnuts, quartered (to fill ~2/3 pint jar)
zest of 1/2 lemon
1-inch piece cinnamon stick
about half a 750 ml bottle of vodka
mason jar with lid
simple syrup to taste

Put your walnuts, lemon zest, and cinnamon stick into your jar. Cover with vodka up to the rim of the jar. Lid the jar, label it, and put it into a dark cupboard to steep.

Agitate the jar every few days for the first week or so of steeping, and once every week or two after that. The walnuts will oxidize and the vodka will turn disturbingly dark within a few days. Don't be alarmed! This is normal! You'll want to take off the lid every once in a while to introduce fresh oxygen and promote the oxidation process. As you continue steeping, the color will mellow to a rich dark walnut brown. So pretty.

Steeping time varies from recipe to recipe. I'd recommend you steep your nocino for at least a month, and up to three months if you can stand the wait. Then, when you're ready to bottle, strain out all the solids through a fine sieve or coffee filter. You may need a second or third straining to remove all the organic material.

Nocino: Italian black walnut liqueur

Flavor your nocino with a simple syrup made from 2 parts sugar to 1 part water. I'd suggest starting with about a tablespoon of simple syrup per cup of liqueur. Then taste and consider whether you want to add more syrup. Pour your final concoction into the jar or bottle of your choice.

Put your finished nocino in the liquor cupboard to age for at least a few weeks before you drink it. The last time I made black walnut schnapps (a very similar liqueur, just omitting the lemon zest and cinnamon), I aged it for a full year before drinking. That produced an excellent liqueur! But if you are impatient, you are definitely free to taste your nocino and drink it when you think it's sufficiently delicious.

How should you drink nocino? Well, you can certainly have it plain as a totally different and delightful aperitif, but I suggest you experiment with some cocktail recipes, such as Savvy Housekeeping's black walnut manhattan. SO good.

Are you making any interesting infusions this summer?

09 July 2014

Plum orangeade

Plum orangeade

For the last installment of plum week (or is it three weeks now?), we have the easiest possible thing to make: a drink.

Just as the plums were at the top of their game, our next-door neighbor brought us a grocery bag full of oranges from her tree. On the one hand, great! Double fruit harvest! On the other hand, we suddenly had twice as much fruit to eat before it all went bad.

The obvious solution was to combine them. Thus, plum orangeade was born.

This simple blender drink is sweet and refreshing. It's excellent served over ice all by itself, but you can also add a shot of vodka or rum, or just make a simple sparkler with half juice and half sparkling water.

The texture of the finished product is up to you. I don't mind pulpy juice, so I just threw my oranges into the blender in big pieces. If you are a non-pulp person, you will probably want to juice your oranges instead. To get two cups of juice, you may need a third orange.

As you can see, the orangeade is pretty foamy right out of the blender. If you like, you can always pass it through a sieve to eliminate the fragments of plum skin and other fibrous bits. I just left mine as-is and drank it. Why throw out any of the fruit? It's all good.

Makes approximately 6 cups.

Plum orangeade

Plum orangeade

2 cups plums, pitted and quartered
2 oranges, peeled and quartered
1-2 cups water, depending on the juiciness of your fruit
simple syrup to taste

Liquefy your plums, oranges, and water in your blender. Taste the resulting orangeade and decide if you want to add any simple syrup. My fruit made a perfectly sweet orangeade all by itself, but if you have less sweet fruit, you can always adjust.

Drink over ice, with or without the added alcohol of your choice. Super refreshing!

What are you drinking to beat the heat this summer?

07 July 2014

Strawberry, nectarine, basil, and fennel frond salad

Strawberry, nectarine, basil, and fennel frond salad

I don't know about you, but salad is just about the only thing I'm really craving right now. It's cool, refreshing, and delicious. It's an excellent way to eat as much delicate summer fruit as possible -- and vegetables as well. And it's certainly the season for a bounty of fresh produce!

Lately, our CSA box has been showering us with assorted greens, heads of fennel, baskets of strawberries, and even a still-rooted basil plant that's been resting happily in a jar of water for a good week. I supplemented this mix with a single white nectarine, and ten minutes later sat down to a huge plate of delicious fruit, herbs, and vegetables. So good.

I used a mix of butter lettuce and baby spinach for the base of this salad. Spinach and strawberry, together forever, right? The butter lettuce upped the crunch factor for a good contrast with the soft fruit and herbs. If you want an even greater contrast, you could also add in some bitter crunchy greens like endive or radicchio. Or toss on some toasted almonds, if that floats your boat. It's all good.

For dressing, I went super simple with olive oil and lemon. This salad could definitely stand up to a syrupy balsamic vinegar instead of the lemon -- I just tend not to ever have such a thing in the house. Yes, a foodblogger without balsamic vinegar! But no matter what my kitchen stock may be, berries and stone fruit with balsamic are still completely classic.

Strawberry, nectarine, basil, and fennel frond salad

Strawberry, nectarine, basil, and fennel frond salad

lettuce of your choice
2-3 strawberries per serving
1/2 nectarine per serving
3 fennel fronds per serving
4-5 basil leaves per serving
olive oil
lemon wedge
salt, pepper

Chop up your lettuce, wash, and spin dry. Arrange a few handfuls on as many salad plates as you want servings. Drizzle with a few drops of olive oil.

Wash your strawberries, halve or quarter them according to size, and scatter them across your plates of lettuce.

Wash your nectarine, twist the halves off the pit, and slice into thin slices. If your pit clings, slice individual slices off the nectarine, using the remaining flesh as a pivot for your knife, and gradually rotate until you have enough. Add your nectarine to your salads.

Roughly chop your fennel fronds and slice your basil leaves into thin strips. Distribute them over your salads.

Drizzle some olive oil over each plate of salad. Season with salt and pepper. Serve each salad with a lemon wedge for individual acid adjustment, or just squeeze and serve if you prefer.

Strawberry, nectarine, basil, and fennel frond salad

This salad is great by itself, or with a few crackers and cheese on the side as a simple lunch, but it would also work very well with all kinds of other dishes. Vivid carrot soup, garlicky white bean salad, or a piece of simple poached fish -- it's all good. Or shred some leftover chicken and add it in for a full meal in salad form. Hooray, salad!

Are you eating any of your summer fruit in salad form?

30 June 2014

Cornmeal pancakes with fresh cherry plums

Cornmeal pancakes with fresh cherry plums

PANCAKES!

It has been far too long since I've had a huge plateful of hot, delightful pancakes, so a few days ago I decided to break out the cast iron skillet and go for it. Cornmeal pancakes sounded like an excellent idea. And on top? Some of the summer's best fruit. In my case, that meant our backyard cherry plums.

My initial plan was to embed a few slices of plums into the surface of each pancake, but this turned out to be a challenge. The batter was really too thin to handle big chunks of anything. Fortunately, my backup plan -- simple diced plums on top of each pancake -- worked out exceptionally well.

I went for the silver dollar size, but larger cakes are fine as well. It all depends on your personal preferences, with a glance or two toward the size of your skillet.

Cornmeal pancakes with fresh cherry plums

These corn cakes work very well with as many sweet plums as you can handle, but they could also go savory, especially if you leave out the maple syrup. That means, among other things, that if you have some of this plum-thyme sauce left over, you should absolutely try it out on these pancakes. A little slice of leftover pork and a leaf of greens would not go amiss either. Pancakes for dinner? Yes.

The best part is folding each pancake into a little plummy taco and eating it with your hands. So good!

Cornmeal pancakes with fresh cherry plums

Cornmeal pancakes with fresh cherry plums (or plum sauce)

3/4 cup cornmeal
3/4 cup whole wheat flour
1/4 tsp salt
2 tsp baking powder
pinch nutmeg
2 eggs
3 tbsp melted butter or oil
1 1/2 cups milk of choice
2 tbsp maple syrup
1 tsp vanilla
3-4 chopped plums and/or plum sauce to serve

Start by greasing your skillet or griddle lightly with a little butter or flavorless oil. Put it over medium-high heat to get hot while you make your batter.

In a large bowl, combine your cornmeal, flour salt, baking powder, and nutmeg. In another bowl, combine your eggs, butter, milk, maple syrup, and vanilla.

Pour the wet ingredients into the dry ingredients and mix together until just combined. I find that a large wooden spoon or paddle works well here. The finished batter will be thin, but no worries! The resulting pancakes are just fine.

Test your pan to see if it's hot enough by flicking a little water onto the surface. If the water immediately boils away, the pan is hot enough. You may need to adjust your heat for optimal cooking temperature.

To cook your pancakes, use a ladle to pour portions of batter onto your hot griddle. Let cook until you see bubbles breaking through the batter all over the surface of your pancake. Check to make sure the underside is golden brown, and then flip. Cook for another 2-3 minutes, or until the second side is also golden brown. Remove to a warm plate and cover with a tea towel until ready to serve.

Repeat until all your batter is used up.

Eat your pancakes topped with plums or plum sauce. A little sour cream would be excellent with the fresh plums. Some extra butter wouldn't go amiss, either.

Cornmeal pancakes with fresh cherry plums

I got about 40 silver dollar pancakes from one batch of batter. Obviously, we couldn't eat that much at once. But guess what we could do? Put them in bags and freeze them for future nearly-instant pancake consumption. Now, when I want pancakes, I can just pull a bag out of the freezer, put the cakes in the toaster oven in one layer, and heat them through. It's super nice for an instant breakfast or snack.

Hooray for pancakes!

What delicious and exciting breakfasts are you eating lately? (Or are your breakfasts usually made of coffee? Most of mine are, too. It's ok!)

24 June 2014

Baby artichoke and roasted red pepper salad with chickpeas and mesclun

Baby artichoke and roasted red pepper salad with chickpeas and mesclun

We interrupt plum week (uh, two weeks?) to bring you this important bulletin.

SALAD IS AWESOME.

Maud at Food Feud was talking about advance prep for a week's worth of salads. Yes! LET'S DO IT.

On the menu:
- baby artichokes
- roasted red pepper
- and then a delightful salad! YAY.

I needed to use all the baby artichokes from the CSA box before they went off. This is always a challenge, since artichokes are not noticeably tender or easy to cut when raw. So I broke out our steel, sharpened my knives, and got to work.

cooked baby artichokes

How to cook baby artichokes

baby artichokes
1-2 lemons
water
1 1/2 tbsp salt
1/4 cup apple cider vinegar or lemon juice
1 1/2 tbsp olive oil
1 garlic clove for each 2 baby artichokes

Start by trimming your baby artichokes. This is the hardest part of the whole process. Essentially, you want to chop off the top third of the artichoke, trim the bottom of the stem and peel it thickly, and then cut around and around the edges of your artichoke until all the dark green and purple is removed. You should be left with a little yellow-green nugget of excellence.

Have a big bowl of water ready with the juice of one or two lemons squeezed into it (and the empty peels dropped in too). As you trim each artichoke, drop it into the acidulated water. This will keep your artichokes from oxidizing and turning black.

When all your artichokes are trimmed, bring a pot of water to a boil. Add salt, lemon juice or apple cider vinegar, olive oil, and crushed garlic cloves. Then toss in your artichokes, right side up. Simmer, covered, for about 12 to 15 minutes, or until tender to the point of a knife. Full-size artichokes can go up to 35 minutes.

When your artichokes are done, pull them out of the water and drain them upside down for a few minutes. Then you can halve or quarter them, or leave them whole if they are particularly small. Note that you do not have to remove chokes from baby artichokes, as they are not yet formed. If you're doing this with full-size artichokes, you'll need to get in there with a spoon and scoop out any sharp thistley bits.

Store your artichokes with the lemon husks in a closed container in the fridge. Now you can pull out a handful whenever you want salad!

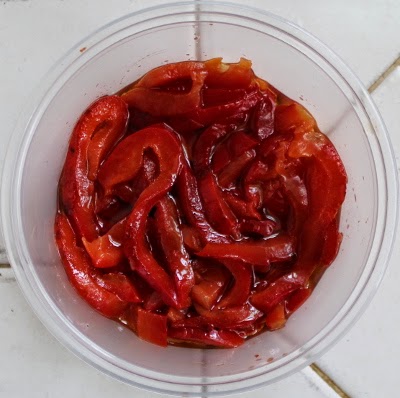
roasted red pepper strips in olive oil

How to roast bell peppers over the gas flame

bell peppers of your choice
tongs
paper bag or sealable container large enough to hold your peppers

This is easy but requires some attention and care.

If your peppers have stems, cut them off. This is just to keep any dangling bits from catching on fire. The base of the stem can stay on, so the pepper as a whole is intact.

Turn on your gas burner to medium-high. Using your tongs, set the pepper right on the grate over the flame.

The flames will gradually char and roast the pepper. Turn your pepper as it cooks, so all the flesh is evenly blistered and blackened. The creases in the pepper may not want to char; this is okay.

When the majority of your pepper skin is charred, take your pepper off the heat. Put it into a paper bag or other unmeltable container and seal. Leave it there for at least five minutes. Inside the bag, the steam from the hot pepper will loosen the skin.

Repeat this for all the peppers you want to roast.

Remove your roasted peppers from the bag and remove the skins by rubbing them under a stream of cool water. Most of the skin will flake off easily. It's fine to leave any stuck bits of uncharred skin on the flesh.

Tear each pepper in half and remove the stem and seeds. Separate into sections and chop up into any shapes you like.

Voila! Roasted red pepper! I cut mine into strips and stored them in a little olive oil in the refrigerator.

Now that you have a selection of delightful vegetables ready to go at a moment's notice, you can make a salad like this in no time flat.

Baby artichoke and roasted red pepper salad with chickpeas and mesclun

Baby artichoke and roasted red pepper salad with chickpeas and mesclun

mesclun mix
cooked baby artichokes
roasted red pepper
cooked chickpeas (canned or previously cooked & cooled)
olive oil
lemon juice or vinegar
salt, pepper

Arrange your mesclun mix on a plate. Scatter with big handfuls of artichokes, red pepper, and well-drained chickpeas.

Make a simple dressing by drizzling some olive oil over your plate, squeezing a lemon wedge over the top, and seasoning with salt and pepper. Or just use the vinaigrette of your choice.

Eat with vigor! Hooray!

And since you have the rest of the baby artichokes and red pepper strips in the refrigerator, you can have salads like this all week. Or use them for other things! Blend the baby artichokes with some white beans and garlic to make the world's best dip and/or sandwich spread. Toss the roasted pepper into a rice pilaf. Put big handfuls of both artichokes and peppers into a hearty pasta sauce. HAVE IT ALL.

What delights do you like to have on hand for an emergency salad session?