Showing posts with label freezer. Show all posts
02 September 2014
Lamb meatball soup with somen noodles, cabbage, and carrot
I don't know about you guys, but I am SO GLAD August is over. Now that September is here, I feel like I can take a deep breath and get on with my life. And I say this as someone living in a state without fall and everything.
Anyway. Guess what I made for lunch today!
I made soup with lamb meatballs, somen noodles, and shredded cabbage and carrot, and it took maybe fifteen minutes, start to finish. You heard me. It was easy and fast and delicious and totally appropriate for the very first days of not-quite-fall. SOUP, you guys.
Okay. How do you make a complete meal like this in fifteen minutes? By being prepared and having things previously stashed in the freezer, that's how. I had both broth and lamb meatballs just waiting for me to throw them into a pot and heat them up, and you can too!
I also kept things quick by using somen noodles instead of a longer-cooking noodle like udon. Somen are very, very thin Japanese noodles that are usually served cold with a dipping sauce. But you know what? They are also excellent hot, plunked into a pot of soup.
If you are not in the meat-eating boat, fear not. You can absolutely use the frozen dumplings or won tons of your choice in place of the meatballs and somen. I do that very frequently when we have dumplings or won tons in the freezer, and it is just as delicious. Give it a try!
I ate this entire recipe's worth of soup myself, but it would be totally feasible to divide it up into two portions if you are planning on adding a side or two to the meal.
Lamb meatball soup with somen noodles, cabbage, and carrot
~2 cups veg broth (or chicken broth)
6 precooked and frozen lamb meatballs
~1 cup shredded cabbage
1 small shredded carrot
1 bundle somen noodles
handful chopped fresh cilantro
soy sauce, sriracha, sesame oil, rice wine vinegar
Start by heating up your broth. I used a mixture of ordinary vegetable broth and tomato broth, both of which were previously homemade and frozen in convenient puck form. I popped them out of their containers, put them in a pot with a little water, and brought them to a boil, covered. This took about five to seven minutes. If you are using liquid broth, it should take even less time.
When your broth is hot, add your meatballs and continue cooking for another three to five minutes, or until hot through. This will take longer if your meatballs are frozen and shorter if they are not, shockingly enough.
While your pot bubbles away, shred your cabbage and carrot and chop your your cilantro. When your meatballs are hot, add the cabbage and carrot to the pan. Stir to mix and cook for another few minutes, or until your vegetables have wilted.
Add your somen noodles to the pot and stir to submerge. These guys are so thin that they will only take a minute or two to cook. When your noodles are tender, immediately remove the pan from the heat.
Season your soup to taste with cilantro, soy sauce, sriracha, sesame oil, and rice wine vinegar. Make it as hot and spicy as you like. Yeah! Then serve in a big bowl with both chopsticks and a soup spoon.
Hooray! Instant food-preparedness lunch!
What delights do you have stashed away in your freezer?
05 August 2014
Lamb meatballs with chive tzatziki
As most of you know, although the typical meal at our house is either vegetarian or vegan, I am actually an omnivore. Meat happens on limited occasion. This was one of them.
This time, I wanted to make a freezer stockpile of little juicy meatballs to use for emergency solo lunches. I wanted them to be full of flavor, but not so particularly spiced that I couldn't use them for a variety of applications. So I grabbed some lamb (the best of all red meats), added a handful of garlic, onion, and parsley, and went to town.
I decided to oven-bake these instead of frying them for several reasons. First, baked items cook with minimal attention. Second, you can sidestep the otherwise unavoidable barrage of hot fat particles burning you intermittently and greasifying everything in your kitchen. Third, this batch was big enough that it wouldn't all fit in my biggest frying pan at once. However, if you want to brave all these issues, you can absolutely cook these guys in the frying pan or cast-iron skillet of your choice. The latter would certainly let you achieve an excellent crust!
If you don't like lamb, you can go for pretty much any other ground meat you prefer, or use a blend of different meats. If you're planning on going for a very lean meat, such as ground turkey, you may want to mix it with some ground pork, so the fat content is still high enough to make a juicy meatball.
And, of course, you can always double or triple the recipe if you want to have meatballs in the freezer for the next few months. Either freeze the cooked meatballs in one layer on a cookie sheet and remove to a freezer bag when solid, or portion them into containers and freeze them that way. It's all good.
Lamb meatballs
Makes 4 dozen small meatballs or 2 dozen large meatballs.
2 pieces bread to make approx 3/4 cup breadcrumbs
1/4 cup milk or another soaking liquid of your choice
1/2 small red onion
4-5 cloves garlic
1/2 red, yellow, or orange bell pepper
a mushroom or two if you have them lying around
1/4 bunch (approx 2 tbsp) chopped parsley
1 1/2 tsp salt
2 tbsp dried red New Mexico chile/your choice of red pepper flake
as much freshly ground pepper as you desire
1 lb ground lamb
Preheat your oven to 350F.
Start by making breadcrumbs. Grab a couple slices of bread and finely chop them with a chef's knife or in a food processor. Of course, if you have premade breadcrumbs around, you can definitely use those instead.
Put your breadcrumbs in a large bowl. Add your milk and let the breadcrumbs soak it up while you prep your other ingredients.
Mince your red onion, bell pepper, mushrooms, and parsley as finely as you can. It's important to chop everything super-finely so your meatballs cohere well. Again, if you have a food processor, you may want to use it.
Add all your chopped veg and herbs to the bowl, along with your salt, pepper, chile, and ground lamb. Mix well, using your hands to distribute all the different elements as evenly as possible.
Form your meatballs by pinching off a small chunk of your meat mixture and patting or rolling it together. I like small meatballs, so I made mine a bit smaller than a ping-pong ball. You can go up to the size of a golf ball or even larger if you prefer. Arrange your meatballs in rows, either on a rimmed cookie sheet or in a glass casserole dish with sides.
Bake for about 20-25 minutes, or until your meatballs are cooked through but still juicy and tender inside. If you're making much bigger meatballs, you'll probably need to extend the cooking time to 30 or 35 minutes. They will be brown on the outside and exuding several tablespoons of hot liquid fat. (This is why it's important to use rimmed cookie sheets instead of flat ones.) If you like, pour off the fat and save it for sauteing greens later. Won't that be excellent?
Test for doneness by cutting a meatball in half, checking the color, and eating it. The tray above needed just a few more minutes in the oven to be fully browned.
Now you can either eat your meatballs right away or freeze them for later. I kept a few out for immediate eating and froze the rest, portioned out into small containers. This way, I'll be able to defrost and reheat one container's worth at a time. Then they'll go into soup, into a pasta sauce, on top of a big salad, or into a sandwich. Hooray!
What did I do with my first serving of meatballs? I put them in a wrap and had the most satisfying lunch on the planet.
I made a tiny batch of tzatziki to go along with my meatballs. There was no fresh dill in the house (although there is now plenty of dried dill around!), so I decided to change it up with some chives. Super simple.
Chive tzatziki for one
2 tbsp Greek yogurt, labneh, or strained full-fat yogurt
~2 tbsp chopped chives
~2 tbsp shredded or julienned cucumber, seeds removed
salt and pepper to taste
Mix all your ingredients together. Taste and adjust seasonings. Voila!
Next, use it to make:
A delightful lamb meatball wrap
flatbread, tortilla, pita, or naan of your choice
hot meatballs
chive tzatziki
avocado slices
lettuce leaves
Warm a piece of flatbread in the toaster oven until flexible. This should take about 2-3 minutes at 275F. You can also do this on the stovetop in a frying pan.
Fill the warm flatbread with leaf lettuce, meatballs, tzatziki, avocado slices, and any other vegetable that sounds good to you.
Roll it up, skewer it with a toothpick or encase it in foil, and eat it with gusto.
Hooray! A delicious and satisfying lunch.
What are your favorite sandwiches lately?
Labels:
condiments,
dairy,
easy,
freezer,
meat,
recipes,
sandwiches
30 June 2014
Cornmeal pancakes with fresh cherry plums
PANCAKES!
It has been far too long since I've had a huge plateful of hot, delightful pancakes, so a few days ago I decided to break out the cast iron skillet and go for it. Cornmeal pancakes sounded like an excellent idea. And on top? Some of the summer's best fruit. In my case, that meant our backyard cherry plums.
My initial plan was to embed a few slices of plums into the surface of each pancake, but this turned out to be a challenge. The batter was really too thin to handle big chunks of anything. Fortunately, my backup plan -- simple diced plums on top of each pancake -- worked out exceptionally well.
I went for the silver dollar size, but larger cakes are fine as well. It all depends on your personal preferences, with a glance or two toward the size of your skillet.
These corn cakes work very well with as many sweet plums as you can handle, but they could also go savory, especially if you leave out the maple syrup. That means, among other things, that if you have some of this plum-thyme sauce left over, you should absolutely try it out on these pancakes. A little slice of leftover pork and a leaf of greens would not go amiss either. Pancakes for dinner? Yes.
The best part is folding each pancake into a little plummy taco and eating it with your hands. So good!
Cornmeal pancakes with fresh cherry plums (or plum sauce)
3/4 cup cornmeal
3/4 cup whole wheat flour
1/4 tsp salt
2 tsp baking powder
pinch nutmeg
2 eggs
3 tbsp melted butter or oil
1 1/2 cups milk of choice
2 tbsp maple syrup
1 tsp vanilla
3-4 chopped plums and/or plum sauce to serve
Start by greasing your skillet or griddle lightly with a little butter or flavorless oil. Put it over medium-high heat to get hot while you make your batter.
In a large bowl, combine your cornmeal, flour salt, baking powder, and nutmeg. In another bowl, combine your eggs, butter, milk, maple syrup, and vanilla.
Pour the wet ingredients into the dry ingredients and mix together until just combined. I find that a large wooden spoon or paddle works well here. The finished batter will be thin, but no worries! The resulting pancakes are just fine.
Test your pan to see if it's hot enough by flicking a little water onto the surface. If the water immediately boils away, the pan is hot enough. You may need to adjust your heat for optimal cooking temperature.
To cook your pancakes, use a ladle to pour portions of batter onto your hot griddle. Let cook until you see bubbles breaking through the batter all over the surface of your pancake. Check to make sure the underside is golden brown, and then flip. Cook for another 2-3 minutes, or until the second side is also golden brown. Remove to a warm plate and cover with a tea towel until ready to serve.
Repeat until all your batter is used up.
Eat your pancakes topped with plums or plum sauce. A little sour cream would be excellent with the fresh plums. Some extra butter wouldn't go amiss, either.
I got about 40 silver dollar pancakes from one batch of batter. Obviously, we couldn't eat that much at once. But guess what we could do? Put them in bags and freeze them for future nearly-instant pancake consumption. Now, when I want pancakes, I can just pull a bag out of the freezer, put the cakes in the toaster oven in one layer, and heat them through. It's super nice for an instant breakfast or snack.
Hooray for pancakes!
What delicious and exciting breakfasts are you eating lately? (Or are your breakfasts usually made of coffee? Most of mine are, too. It's ok!)
09 June 2014
Classic potato leek soup for the win
It's supposed to be 85F out today, so why don't we talk about soup? That sounds totally rational, right?
We got a huge bunch of amazing leeks in our latest CSA box. And yes, we could have made so many different things from leeks. Leek gratin! Simple leek and cream sauce for pasta! Tiny leek quiches! All of those sound really good, actually. But we decided to go for the most traditional leek dish of all, and made a huge vat of potato leek soup.
This soup is excellent because it lets you use 100% of the leek to make a delicious, exciting, filling dish. The greens go into a very leeky vegetable broth while the whites melt down into delicious oniony shreds. It's super satisfying if you want to prevent food waste. And the soup itself is not only DELICIOUS but so, so cheap to make. Such a good idea.
This is almost a classic potato leek soup, with a few tiny twists. First, I made my soup subtly spicy with jalapeño, red pepper flake, and smoked paprika. Second, I added more veg, because what on earth does one do with a handful of turnips? Well, one probably roasts them, but I have yet to do that. The turnip is actually a really nice addition here, since it adds a touch of spice and some interesting vegetable complexity to the finished product.
I didn't take any pictures of the leek-prepping process, but Elise at Simply Recipes has a great post on how to clean leeks if you want some more detailed info. Or watch Jacques Pepin prep leeks! That's always fun.
Potato leek soup
3 leeks with greens
additional veg scraps for broth
lots of water
butter/oil of choice
1-2 carrots
1-2 sticks celery
1 small turnip (optional, depending on whether it came in your CSA box)
1 jalapeño (optional, depending on your spice preference)
~5 potatoes
salt, pepper, bay leaf, red pepper flake, smoked paprika, thyme, sage, marjoram
milk, cream, or plain yogurt of your choice
fresh parsley to garnish
Start by trimming your leeks. Cut off the darkest greens one at a time, keeping the core of lighter green leaves intact. Rinse your trimmings well in cold water. Then add them to a 3-quart or larger pot along with a few handfuls of mixed vegetable scraps (from the stockpile) and a bay leaf. Cover the whole business with lots of water, bring it to a boil, reduce the heat, cover, and let simmer while you're making the rest of your soup. Your broth will be done after about 15 minutes of simmering. Strain out the solids and have it ready to use.
Of course, if you have vegetable stock already made, you can use that instead and freeze your leek greens for future broth application.
Next, clean your leeks. Keeping the root end intact, slice down the stalk toward the greens to split the leek in half. Rotate 90 degrees and slice again to create four quarters of leek. Wash extremely well under cold water. Be diligent here, because leeks are almost uniformly FILTHY and need real attention. Then trim off the root ends and slice your leeks into 1-inch pieces.
Melt some butter in a large soup pot over medium heat. Add your leeks, stir, and let cook for 5 minutes or so while you prep all the rest of your soup veg.
Scrub and chop your carrots. Rinse and chop your celery. If you have a turnip hanging around, scrub or peel it (depending on age) and cube it up. If you like spice, dice a hot pepper of your choice. Put all of these into your soup pot, add a sprinkling of salt, and cook, stirring occasionally, until softened.
You can add other sturdy vegetables too if you have them hanging around. If you want to add greens, you'll need to reserve them and wilt them in quickly at the end of cooking. One of the greatest things about a soup like this is that it can take practically anything you throw at it.
Next up: potatoes. I used yukon gold, but any boiling potato should be good here. Scrub your potatoes well and dice them into half-inch cubes. Add them to your softened aromatic veg. Season with pepper, red pepper flake, smoked paprika, thyme, sage, and marjoram, stir everything together, and cook for another five minutes or so.
Now is the time to add your strained broth. You'll want to add at least four cups or so, or enough to cover all your vegetables by a finger's width; top it up with water if necessary. Bring to a boil, cover, reduce heat, and simmer until your potatoes are cooked through. This should take about 20 minutes, depending on the size of your potato pieces.
When your potatoes are tender, pull the pot off the heat and puree your soup to the texture of your choice using an immersion blender. Then return the pot to the heat, taste and correct the seasonings, and continue to simmer gently until your soup has reduced to your desired texture.
Add the milk, cream, or yogurt of your choice off the heat, or even to individual bowls. I kept the main body of the soup creamless since I wanted to freeze it; if you do this, which I definitely recommend for future ultra-fast and delicious meals, you can just add your dairy at the end of a simple reheat. Super easy.
Hooray! It's soup! Garnish each bowl with parsley and serve a giant crispy salad on the side.
What ridiculously inappropriate food are you eating lately?
Labels:
cheap,
easy,
freezer,
potentially vegan,
recipes,
soups,
vegetables,
vegetarian
24 March 2014
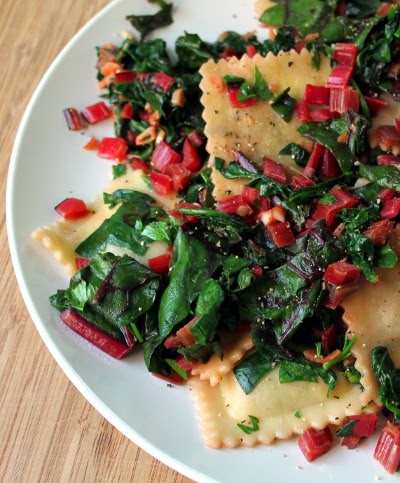
Ravioli with super garlic butter greens
It's spring! I don't know about you, but I want as many vegetables as I can possibly get my hands on. So I went to the farmer's market and came home with two bunches of kale, one of chard, a big bag of spinach, and a bunch of beets with beautiful tops. All the greens in the land!
And what's the best way to make greens the star of the show? Keep them simple and abundant. So I chopped up some chard, spinach and beet greens, sauteed them quickly with garlic, and finished them with butter and parsley.
It's almost ridiculously easy to make a mess of greens into a full meal. A poached or fried egg on top would be classic, as would a sliced and browned sausage or a slab of seared marinated tempeh. But I wanted pasta, so I decided I would mix my greens with a bag of local ravioli that I'd stashed in the freezer for just such an occasion. Such a perfect combination with a huge pile of garlicky, butter-drenched greens.
This is a particularly quick and easy way to stuff your face with all the freshest and best spring vegetables. It took about fifteen minutes for me to go from zero to lunch. Perfect.
Ravioli with garlic-sauteed greens
frozen ravioli or other pasta
garlic
butter or olive oil
mixed spring greens (chard, beet, & spinach, or your choice of others)
salt, pepper, maybe a few red pepper flakes if you want them
fresh parsley
Start by putting a pot of water on to boil for your pasta. Let it heat while you start your veg, and cook your ravioli at an appropriate point in the proceedings. Obviously, although ravioli is great, you can also switch it out for any kind of pasta you like.
Smash and chop as many cloves of garlic as you like. I used five or six for about two servings of pasta, because that's how I roll.
Saute your garlic in butter or olive oil in a wide saute pan over medium to medium-low heat. While it's cooking, wash, trim, and chop up all your greens. Since I was using chard and beet greens, I cut off their stems and chopped them separately from the leaves. Use as many greens as you can possibly cram into your pan, because they will wilt and reduce in size dramatically. I probably used around four or five cups.
When your garlic has started to turn slightly golden, add your chopped stems to the pan, along with a pinch of salt. Turn the heat up slightly and saute for about five minutes, or until the stems have softened. Then add all your greens to the pan. You may need to do this in a couple batches, letting the first batch start to wilt before adding the second. Saute gently for about five more minutes, or until all your greens have wilted into a vivid green (and possibly also pink) mass.
By this point your pasta should be done, so drain it and add it to the greens. Season with salt and pepper and mix together gently. Then turn off the heat and add a pat of butter or a few drips of olive oil to the pan. Stir a few times to let the butter melt and distribute it evenly. Done!
Serve your ravioli in massive piles and garnish them with fresh parsley and a grind or two of pepper. If you want to add any more garnishes, go for it. Parmesan cheese, chopped toasted almonds, or even some crispy golden breadcrumbs would work well here, but resist the urge to go too far. The freshness of the greens will make them shine pretty beautifully on their own.
Springiest lunch ever!
How are you eating all your spring greens?
Labels:
cheap,
easy,
fast,
freezer,
pasta,
potentially vegan,
recipes,
vegetables,
vegetarian
06 February 2014
Leftovers, the freezer, and dinner
Here's what we had for dinner this Tuesday. I had gotten a crown put on that afternoon, so my face was numb up into the scalp, and I really didn't want to make any effort to cook whatever. John got home later than usual after a send-off for a departing colleague. And yet we sat down to eat full, satisfying plates filled with four different dishes after maybe twenty minutes total in the kitchen. How? Through the magic of leftovers.
I made the kale salad and baked the cornbread on Monday night. The sweet potatoes were waiting in the freezer. The only things not actively left over were our sausages--chicken and sun-dried tomato for me, vegetarian andouille for John--and mine were in the freezer for long-term consumption nonetheless.
We had an excellent dinner, and you can too.
I made these mashed sweet potatoes mirepoix for Thanksgiving and froze them for an occasion just like this. To warm them up, I popped them out of their container in one big frozen brick, deposited them in a saucepan with a splash of water, added a lid, and put the pan over medium-high heat. After fifteen minutes, everything was entirely hot. I took the lid off the pot, lowered the heat, and let the extra liquid steam off before serving. Zero effort; 100% flavor.
The kale salad was super simple: raw kale massaged with vinaigrette. The dressing was just olive oil, chive blossom vinegar, dijon mustard, and a few grinds of salt and pepper. Since I'd dressed the salad the night before, I didn't need to do anything to the greens but pile them on the plate.
That's right! Raw kale salads do not suffer when kept overnight in their dressing. I don't know about you, but I basically had my jaw on the floor when I realized this. Leftover salad that isn't a mass of sad brown goo! How could this be? We've eaten WAY more winter salad since then, which should come as no surprise.
So I chopped up the almonds for last-minute garnish, and that was it. Beautiful, delicious salad!
The cornbread was actually a double shot of food preservation goodness. It was left over from the night before, yes, but guess where the jalapenos came from? That's right--I used the last of a jar of my pickled garden jalapenos. Hooray! I threw a couple pieces in the toaster oven to warm through before serving, and that was it.
All I actually had to cook were our sausages, which were easy enough. Defrost in hot water, slice, brown on both sides in separate frying pans, and serve. Five minutes on the heat and they were done.
And that's how we were able to finish our dinners and be ready to relax by 7 pm on a weeknight.
Using leftovers: a tiny guide
- It's clearly a good idea to make enough of certain dishes to just eat them again the next day. Baked goods, casseroles, a whole roast: you can just eat these with minimal effort. This is a particularly good plan if you pack a lunch for work.
- If you can freeze your leftovers, do it! That way you'll have an emergency backup, but you won't get sick of a particular dish after eating it three days in a row. Soup, tomato sauce, and beans work really well in the freezer.
- Simple reheating methods keep food tasting fresh and delicious. Avoid the microwave unless you're heating something like soup, with no texture issue to consider. Stovetop or toaster oven reheats are well worth the minimal effort.
- If your leftovers are supposed to be eaten cold, that's all the better. Things like grain salads are a good idea here.
- Minor bits of garnish can go a long way toward making leftover dishes seem brand-new. Nuts, ground pepper, snipped herbs, hot sauce, yogurt--anything that sounds good to you can work.
- And, although this doesn't apply in this particular story, you can always repurpose leftover components into entirely new dishes. Precooked rice, vegetables, beans, or meat are all super useful when you're trying to assemble a salad, burrito, or omelet in no time flat.
How do you use your leftovers? What other tips and tricks work well for you?
15 December 2013
Dried tart cherry rum orange shortbread cookies
Are you ready to descend into the holiday cookie vortex? I mean, the entire foodblogging population seems to be there already, wildly waving quarter sheet pans and spatulas and sporting an amazing array of holiday aprons as they spin through billowing gusts of flour and sugar. Let's go!
First on the agenda: dried tart cherry rum orange shortbread cookies. Super festive!
I have a taste for teeny tiny cookies, and also for homemade slice-and-bakes. So what did I do? I made a simple shortbread dough and mixed it up with fresh orange zest and dried tart cherries soaked in rum. I made the dough into four long, thin rolls, squared them off (just for a change--although round cookies are probably technically superior since they don't have any corners sticking out for accidental burning), let them chill, and cut them into a plethora of little squares. Then I baked them and cooled them and wow! Tender, fruit-filled cookies for all!
I made these for our annual knitters' cookie exchange, which meant I needed a whole lot of cookies to divide up and distribute. One batch of dough made roughly 180 tiny cookies. Perfect! If you make bigger rolls of dough, you will get fewer cookies, but it's still going to be the same amount of overall goodness, so hey.
I actually only had to bake half the dough to get a full complement of cookies for all; the other half is still hanging out in our fridge, waiting for future cookie-baking endeavors (i.e. for us to eat all the other cookies I brought home from said exchange). This brings us to another selling point: you can make up a couple rolls of dough, refrigerate or freeze them, and bake whenever you so desire. Super convenient for those late-night cookie impulses.
Also, the leftover rum that the cherries didn't soak up? HIGHLY recommended. There was only a tiny bit left in my pan, but it was amazing: almost like a cherry-flavored port. I'm definitely going to experiment with infusing a batch of dried tart cherry rum now.
Dried tart cherry rum orange shortbread cookies
Adapted from Everybody Likes Sandwiches' cranberry rum shortbread cookies.
1 cup dried tart cherries
1/2 cup plain old white rum
1 cup softened butter
zest of one orange
1/2 tsp vanilla
1/2 cup powdered sugar
2 cups flour
1/4 tsp salt
1/4 tsp baking powder
Start by finely chopping your cherries. This will be especially important if you want to make tiny cookies; big chunks of cherry tended to encourage crumbling in the finished product. You can avoid that by chopping your cherries now. The smaller your cookies, the tinier your cherry pieces should be for overall physical stability. My cherries were too big. Take note!
Put your cherries and your rum in a small saucepan. Bring the pan to a boil, lid, and turn off the heat. Let the cherries soak up all the rummy goodness for at least half an hour.
To make the dough, cream together your butter, orange zest, vanilla, and powdered sugar. Sift the remaining dry ingredients together in another bowl (I actually did the separate dry mixture this time! A culinary first). Add the dry mix to the wet in batches, beating well with a wooden spoon or the implement of your choice. You may need to get in there and use your hands with the last batch of dry ingredients. Add the drained cherries and mix or knead to distribute them throughout the dough.
Separate your dough into four equal parts. Form each part into a roll, wrap in plastic wrap or foil, and refrigerate for several hours or overnight. At this point you can also chuck a roll or two in the freezer to save for later instant-cookie baking.
To bake, preheat your oven to 375F. Cut a roll or two of your dough into quarter-inch slices and arrange them on parchment-lined cookie sheets. Bake for about ten minutes, checking a bit earlier if you're making particularly tiny cookies. Your cookies are done when they are set and have turned lightly golden around the edges. Let cool on the sheet for about 5 minutes before removing to a rack.
Eat with tea, coffee, or the proverbial nog. Or pack your cookies into bags and send them home with all your friends! It's all good.
What kind of cookies are you baking this holiday season?
27 September 2013
Mushroom pelmeny saved my lunch
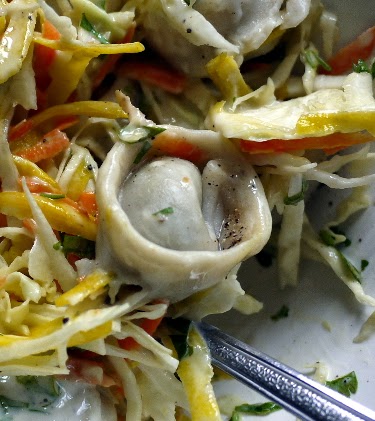
Here's a thing that can happen when you're feeling tired and down for no good reason, but you know you need to eat lunch. You look through the kitchen for a few minutes. Nothing looks good, even though you have enough food to feed an army consisting of far more than the two adults who actually live in the house. So you decide to go for emergency food and get out the backup package of mushroom pelmeny, exquisite and hand-shaped and local, and also a food only you will eat because you are the only person in the house who likes mushrooms. You drop the frozen pelmeny into a pot of boiling water with some salt.
What are you going to eat with them? Normally you'd have the energy to saute some onions in butter with salt and pepper and paprika, but not today, so you decide the plain yogurt in the fridge will make a good enough sauce. Still, you're really going to regret it if you don't eat some form of vegetable with your bowl of dumplings. There's cabbage in the crisper, so you get out a cutting board and shred a chunk. It can be a bed of raw crispy veg in the bottom of your bowl, and that will be okay. Wait, don't you have a container of shredded golden beet and carrot in the fridge for future salad applications? Why not use some of that? Those go into the bowl too.
By this time your pelmeny are boiling furiously and rising to the surface of the pan. You drain them and scoop a bunch of them into your bowl. A couple good spoonfuls of yogurt go on top. Good so far, but it needs one more thing, or else it'll be bland. So you grind a bunch of black pepper across the top of your bowl of pelmeny and yogurt and cabbage and beet and carrot. Wait, one more thing. You don't have any fresh dill, but you do have parsley. So you snip some parsley and scatter it across the top of your bowl.
By this time you are actually feeling like a human, even before you eat anything. You sit down to eat and discover that everything is totally delicious, and you eat it all, thinking that maybe next time you should add a little bit of spicy brown mustard too, and you go get a second helping of pelmeny and yogurt, at which point you realize that you're really going to need something to mop up all the delicious fragments of mushroom and carrot and beet and cabbage and sour cream and pepper off the side of the bowl. Then you remember that you also have a loaf of sourdough in the fridge, so you throw a piece in the toaster oven to get lovely and fragrant and golden brown and crisp. You mop up the side of the bowl with the bread and eat every last tiny bit, and you still want more.
I'm going to eat this so many times.
Have a nice lunch.
Labels:
easy,
fast,
freezer,
pasta,
recipes,
vegetables,
vegetarian
03 September 2013
What to do with almond pulp
Have you ever made a big batch of nut milk, only to be left wondering what to do with the leftover pulp? Well, wonder no more!
A couple months ago, when I made up a batch of almond milk to drink in cold-brewed coffee, I was left with a substantial pile of pulp. I wasn't sure what to do with it, so I froze it in convenient 1-tbsp cube form for future application. This turned out to be the best possible idea. Now I get to throw delicious almond pulp into various recipes at my leisure!
Most of the time, these guys make an appearance at breakfast. I think my favorite way to use them is in smoothies. They provide great texture and a bit of protein while eliminating the need to use the ever-present frozen banana: a win on all counts.
This time, I broke out a few of the overabundant nectarines in our crisper, and pulled both almond pulp and flaxseed meal out of the freezer. With a whack of plain yogurt, everything combined to make
Nectarine smoothie with frozen almond pulp, yogurt, & flaxseed meal
2-3 nectarines or peaches
3 tbsp frozen almond pulp
1 tbsp flaxseed meal
several large spoonfuls plain yogurt/your choice of vegan sub
Pit your nectarines and chop them roughly. Add to a blender with your cubes of frozen almond pulp, flaxseed meal, and yogurt.
If you want to add anything else, such as more fruit or greens, now is the time. I think a big handful of mint would go exceptionally well with this combination. Or maybe some shredded coconut...
Blend everything together thoroughly, pour into a glass of your choice, and drink with gusto. Hooray, smoothie!
Okay. So what if you want a more substantial breakfast? Almond pulp can definitely make an appearance there too. I mean, I wouldn't try mixing them into scrambled eggs--that is, unless I were already doing some sort of fried rice presentation. Actually, that might be interesting. Mental note: try more obviously savory things with almond pulp. Anyway, since almond pulp goes beautifully with grains, why not throw a couple cubes into a pan of oatmeal?
In this case, your pulp doesn't need to be frozen (although it can be--it'll just defrost in the pan in that case), so it's an excellent breakfast to make and eat along with your fresh almond milk latte.
Almond pulp & flaxseed oatmeal with bananas, yogurt, dried apricots, & sesame seeds
3 big handfuls rolled oats
2-3 tbsp almond pulp
2 tsp flaxseed meal
large pinch salt
water to cover
fruit, yogurt, & seeds to taste
I never measure anything when making oatmeal, so this is all estimated.
Put your rolled oats, almond pulp, and flaxseed meal into a small saucepan. Season with a big pinch or two of salt. Add water to cover by about a finger's width.
Cook over medium-high heat, stirring occasionally, until your oats are done to your taste. You may need to add a bit more water if you prefer a thinner oatmeal. I like mine pretty thick, personally.
Put your finished oatmeal in a bowl and top with your choice of yogurt, fruit, seeds, and nuts. I really like dried apricots and toasted sesame seeds in a bowl of oatmeal, but go ahead and add whatever sounds good to you.
Eat, with almond milk latte optional. Yay, breakfast!
What do you guys do with the pulp left over from making nut milk? I'm thinking I need to branch out into using it in baked goods pretty soon.
25 March 2013
GIANT BURRITO
There comes a time in every girl's life when she just wants to eat the most gigantic burrito possible.
Actually, for "a time" substitute "all the time."
Yeah. This weekend we happened on the largest tortillas I've ever seen--12 inches in diameter. What better excuse could we possibly have for making gigantic burritos?
I sauteed some garlic, jalapeno, red and green pepper, and frozen corn in olive oil, seasoned the pan with cumin, oregano, ground New Mexican hot chile, and onion powder (there being no actual onion in the house), and mixed that with a couple cans of refried black beans. You could clearly use your own black or pinto beans instead. I made short-grain brown rice in the rice cooker and warmed up the tortillas in a foil packet in the oven. They were too big to fit in the toaster oven. Yeah.
Assembly: beans, rice, thinly sliced cheddar, hot sauce, avocado, and some mixed lettuce from the farmer's market. I had cilantro in mine too. We forgot to cut up the green onion, but oh well. Note the random piece of purple lettuce peeking out of the end.
The result? One huge burrito for each of us, and three additional similarly huge burritos for the freezer. I left the avocado and lettuce out of the frozen versions, since those obviously would not do so well in the cold. But I can't say I'll mind smashing up a batch of guacamole or pouring a bunch of tomatillo salsa over a hot emergency burrito in the future.
MOST SATISFYING DINNER EVER.
Labels:
beans,
easy,
fast,
freezer,
grains,
potentially vegan,
pulses,
recipes,
vegetables,
vegetarian
07 December 2012
Almond poppyseed cookies for all & sundry
December is the height of cookie season at my house. Actually, we tend not to have any cookies at any other time, so I suppose it's the only part of cookie season. Um.
It's cookie season! Let's make some cookies!
Nearly every winter I bake a batch of our now-traditional Swedish farmer cookies. You may have heard of these, since they're one of the few kinds of cookies I ever make. But this year I decided it was time to step it up a notch. So yesterday I not only made a batch of Swedish farmer cookies for our annual cookie exchange, but also a totally new-to-me cookie: almond poppyseed cookies.
This was a great choice for a few different reasons.
1. I have a big bag of poppyseeds hanging out in our spice cabinet, and it's hard to find ways to use more than a tablespoon at a time.
2. There was significant ingredient overlap between the two cookie recipes, so I didn't have to do much prep at all between batches. I also completely used up the almonds, which is good, since my freezer is still just as full as ever.
3. Both recipes are for refrigerator cookies, so it was more than plausible that I'd bake only some of each batch and freeze the rest. Now I have all the cookie dough in the land hanging out in my freezer, waiting for emergency late-night cookie-baking sessions. Hooray!
This recipe comes recommended by my friend Veronica, who is a pretty amazing baker in her own right. The original version is from Penzey's.
Almond Poppyseed Cookies
1 cup softened butter
3/4 cup sugar
1 egg
1 tsp vanilla extract
2 cups flour
1/2 cup finely ground almonds
1/2 cup poppy seeds
1/4 tsp salt
additional sugar for decoration
Cream the butter with the sugar. If you are unfamiliar with the term "cream" as used in this context, it's ok; it just means "beat until light and fluffy". Add your egg and vanilla and beat well.
Mix all the dry ingredients (minus decorating sugar) in a separate bowl. Add the dry ingredients to the wet in several batches, beating well after each addition. Or, if you are me, you can add the almond meal, poppyseeds, and salt to the wet mix first, beat well, and then add the flour in smaller increments. I used a cup and a half of plain all-purpose flour and half a cup of whole wheat, because that's how I roll. I would also like to note that it is not necessarily the best idea to grind your almonds in a coffee grinder if you have other options available. I'm just saying.
The finished dough will be pliable and easy to handle. Gather it into a ball, divide it into equal parts--the original recipe said two parts, but I made four, because I like smaller cookies--and roll each part into a log. If you want to end up with cookies edged in sparkling sugar, roll your dough logs in the sugar of your choice. I rolled two of mine in raw sugar, but found that the large granules were not super interested in sticking to the dough, so I left the other two plain.
Wrap your dough logs in waxed paper, plastic wrap, or tinfoil, and stick them in the refrigerator for at least an hour. You can also freeze a few of the rolls for super easy slice and bake action later, if you prefer. I highly recommend this course of action.
When you're ready to bake, preheat the oven to 325F. Slice your dough into 1/4 inch cookies, arrange on parchment or silicone-lined baking sheets, and bake for about 12 minutes, or until just starting to brown around the edges.
Cool on a rack until you can't possibly wait any longer.
Eat.
These guys are very buttery, not too sweet, and excitingly full of seeds that pop under your teeth. They're also very good with tea, as all shortbready cookies tend to be. Really, is there a cookie on the planet that is bad with tea?
Which cookies are holiday traditions at your house?
27 August 2012
I love you, freezer.
It has not been the easiest few days. Good thing I have a bunch of soup in the freezer.
This one was a basic lentil soup with potato, carrot, and onion. I defrosted it on the stovetop with a little water. In the meantime, I loaded the rice cooker with quinoa, pulled some sungold tomatoes and scallion greens out of the garden, and excavated the fridge in search of plain yogurt and sambal oelek.
Voila: lentil soup with hot quinoa, tangy yogurt, spicy sambal, and delicious fresh vegetables.
Everything seems much more doable after a lunch like this.
Labels:
freezer,
grains,
potentially vegan,
pulses,
soups,
storage,
vegetarian
03 August 2012
Freezing summer corn for fun & profit
Corn! You can buy bags of it pre-frozen in the grocery store, of course, but where's the fun in that? And how much better does the farmer's market fresh corn taste? Why not take advantage of the abundant midsummer corn harvest to freeze your own?
So that's exactly what I did last weekend. I grabbed an armful of corn at the farmer's market, dragged it all back home, and proceeded to enhance my freezer stash.
First, I husked ten ears of white corn. Easy but annoying!
Then I cut all the corn kernels off the cobs. Usually I do this by laying the whole cob down on the cutting board, holding my knife at an angle, and using a sawing motion to slice from tip to end. This gets the kernels off the cob with minimal fuss, and without a huge corn mess spraying everywhere. If you want to hold your corn upright while you slice off the kernels, you can put the ear in a big bowl first, but why bother?
I brought a pot of water to a boil, blanched my corn kernels for about a minute, and drained them all. I used a big pasta pot with an insert so I could just lift all the corn out at once. This worked admirably.
After some time to cool, I filled my bags with beautiful fresh corn. Normally I'd spread my corn kernels out on a cookie sheet, freeze them that way (to avoid kernels sticking together), and remove the frozen kernels to a few large containers. However, I've had a box of tiny little snack-size ziplocs hanging around since the holidays, and I wanted to get them out of the way, so I decided to fill them up instead.
Ten ears' worth of corn kernels filled up nine bags, which I left open on the counter to cool completely. Afterward, I pressed the air out of the bags, sealed them, and put them in the freezer. Bonus: now I know each bag has just over one ear of corn in it. When I want to use the corn, I'll just throw a bag in a bowl of warm water to defrost & separate. Easy!
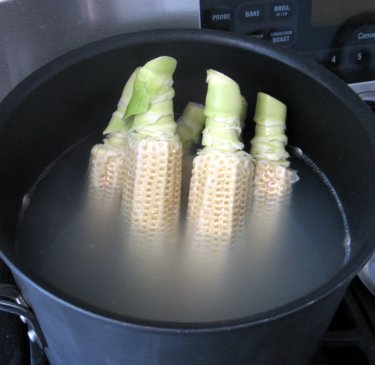
After I was done blanching corn, I had a big pot of freshly boiled corn-scented water. I also had a stack of corncobs. So, guys, are you pondering what I'm pondering?
I put the water back on the heat, dropped in a bunch of the stripped corncobs, and simmered for about 20 more minutes. Voila: a massive pot of fresh corn broth!
The resulting broth filled eight 2-cup containers, which I left to cool on the countertop. It's important to fully cool broth before you lid and freeze it; otherwise it'll start to ferment. A few hours of waiting took care of that problem. Then they went into the freezer too.
So about one hour of effort gave me a full supply of delicious corn and broth. Hooray!
Then I proceeded to sauce & can 12 pounds of tomatoes, but that's another story.
What vegetables do you guys freeze in summer? Do any of you go the pressure canner route instead?
Labels:
easy,
fast,
freezer,
preserves,
vegan,
vegetables,
vegetarian
27 June 2012
Macaroni and lamb casserole with red wine tomato sauce
It's summer! It's hot! Let's talk about making hearty, rib-sticking casseroles, ok?
HA HA HA oh I'm actually serious. You can take the girl out of the midwest, I guess.
I work at home, so I frequently end up actually stopping work and cooking lunch in the middle of the day. While this is ok--breaks generally help with work--it can definitely become a major intrusion if I'm in the middle of something but realize I need to eat ASAP. So I decided it would be a good plan to freeze a batch of casseroles that I can just stick in the oven (or, better yet, the toaster oven) to cook while I work.
I decided on the ultimate heritagenous comfort food: macaroni casserole. When I was growing up, this consisted of browned ground beef and tomato sauce mixed with macaroni and mozzarella cheese and baked. This time, for a little more interest and a little less ground beef, I decided to go for ground lamb in a red wine sauce with fennel seed and oregano. A good deal all around.
I made about enough pasta to fill an ordinary 9x13 casserole dish, but split everything into three smaller dishes. If you want to have a larger freezer stash, or bake half and eat it now, feel free to make as much as you please.
Macaroni and lamb casserole with red wine tomato sauce
ground lamb
olive oil
onion & garlic
mushrooms, red pepper, whatever other veg you want
tomato puree/sauce/whatev
dry red wine of your choice
fennel seeds, oregano, basil, red pepper flake, salt, pepper
macaroni/chunky pasta of choice
mozzarella/other cheeses of choice
Game plan: Brown lamb. Make sauce. Cook pasta. Combine everything into a selection of casserole dishes. Bake or freeze according to your current priorities.
Ok! Start by heating up a wide & deep saute pan, adding a small slug of olive oil, and crumbling in half a pound (or more) of lamb. You could also use a deeper sauce pot, since you'll be cooking the sauce in this pan, but I like the wide pan for faster liquid evaporation. Season with some salt, pepper, and fennel seed, and stir to mix, breaking up any larger chunks of lamb as you go. Cook until browned, stirring frequently. Then drain off and discard most of the fat, leaving just enough to saute your vegetables, and remove the lamb to a plate.
Chop up an onion and a handful of garlic cloves and add them to your saute pan. Cook to soften while you chop up whatever other vegetables you want. I used mushrooms and red pepper, but hearty greens, summer squash, or eggplant would all work too. Add your veg to the pan in order of necessary cooking time, starting with those that take longer. Season with salt, pepper, oregano, basil, and some red pepper flake to taste; cook to soften. This is also a good time to put on the water for your pasta.
Next, add your tomato puree, stirring to mix & deglaze. Bring to a simmer before adding the cooked lamb and a glassful of red wine of your choice. You could also use dry vermouth (or no alcohol at all) if you don't want to deal with an open bottle of red wine. Stir well and bring back to a simmer. Reduce the heat and cook slowly for about ten minutes, or until the sauce reaches your preferred consistency.
Don't you just want to get in there and swim around? No? It's just me?
Ok. While your sauce is simmering, cook your pasta. Any chunky pasta should work here; I used a ridged macaroni. You can also shred or chop the cheese of your choice while you're waiting. I used mozzarella for ultimate heritagenousness, but various grating cheeses, provolone, or more highly flavored oozy-melting cheeses like fontina should all work. It just depends on your tastes.
When your pasta is done, drain it. Taste your sauce and correct any seasonings. Add your drained pasta to the sauce, stirring well.
Your pan should look like this, complete with unruly steam curling up into every picture.
Everything is cooked; now it's time to assemble. Add an even layer of the pasta and sauce to your casserole dish(es), filling it a bit less than halfway. Add a layer of the cheese of your choice. Cover with another layer of pasta and sauce. Finish with a second layer of cheese.
Now you can either bake your casserole or cover it and put it in the freezer for future application. I froze all of mine, personally.
When you want to bake, take your casserole out of the freezer and let defrost a bit while you preheat the oven to 350F/175C. If you're using Pyrex or other ovenproof glass, it's important to bring the glass up to room temperature before you put it in the oven. I usually run them under warm tap water if I don't have enough time to defrost them for real. This is not a big deal as long as your casserole dishes have lids. If you're using ordinary tins, it's fine to just put them straight into the oven.
Bake for 45 minutes to an hour, or until hot through and bubbling.
Hooray! Low-effort, hearty, & serious food!
08 June 2012
Massive freezer burrito stash!
Ideally, we'd make and eat a delicious, healthy, quick, easy, and mood-targeted dinner every single night. However, sometimes you just need to eat but don't have the time/energy/desire to make the effort to cook. Why else does the frozen entree industry exist?
So. To circumvent the impulse to buy packages of frozen burritos--one of our favorite ridiculous convenience foods--I decided to make my own.
The first step was making a gigantic batch of refried beans. I soaked a whole bunch of pinto beans overnight, drained and rinsed them, and boiled them until tender with a couple of bay leaves and twice their depth of water in my biggest pot. This gave me not just a whole lot of perfectly soft and tender pinto beans, but also five--count them, five--containers of pinto bean broth to pop in the freezer for future soup enrichment. That's ten cups of broth! Hooray!
To make the refried beans, I warmed some olive oil in a big pot and added an onion, a handful of garlic cloves, half a serrano, a whole jalapeño, and a couple of chipotle peppers in adobo sauce, all of which were chopped. I seasoned everything with cumin, oregano, salt, and more chipotle in the form of powder. When all the vegetables were softened and super-fragrant, I added ALL THE BEANS IN THE WORLD and their remaining broth. I mixed it all together and let it cook for maybe fifteen or twenty minutes, to give the beans a chance to absorb some more flavor. To get the beans to ultimate smoothness, I took the pot off the heat, let it cool slightly, and pureed with an immersion blender.
Voila! A massive pan of refried beans!
To set up my burrito-making station, I cooked some brown rice in the rice cooker. I cut up some green onions. I sliced up some cheese. I found a bottle of hot sauce. I took the beans and tortillas out of the fridge to warm up enough to use. Then it was just a matter of starting the assembly line.
Lay out tortillas. Add beans, rice, onions, cheese, and a little dribble of hot sauce. Fold. Repeat.
I ended up with a massive batch of eighteen bean, cheese, and rice burritos. Hooray!
To freeze, lay your finished burritos on a cookie sheet, seam side down (so they won't unroll). Stick the entire sheet in the freezer for maybe half a day, or until everything is frozen. Then remove the pan, stick your brozen burritos in a resealable bag or other container, and stick them back in the freezer. You could also wrap them each in foil if you're planning to take them to work for lunch. This process ensures that your burritos won't freeze together, so you can actually get out one at a time without having to defrost the entire bag.
To heat frozen burritos, we bake them in the oven or toaster oven at 350F/175C for twenty minutes, or until hot through and beginning to brown. You can use the microwave if you have one. Since microwave power can vary, I'd start with one minute and heat for longer as needed.
These are obviously pretty standard burritos, but the method would work for practically any filling you want to try. I'd shy away from more liquid ingredients--raw chopped tomatoes come to mind--but otherwise, the sky's the limit. I think a black bean, sweet potato, corn, and kale burrito may be next on the list, or maybe a black bean, rice, garlic-seared summer squash, cotija, and cilantro burrito. I may even test out freezing a refried bean and sour cream burrito, for an ultimate sleepytime feast on nights when I want to do nothing whatsoever.
Success!
Labels:
beans,
cheap,
easy,
fast,
freezer,
potentially vegan,
storage,
vegetarian
25 May 2012
Food storage: welcome to my freezer
I thought this glorious US holiday weekend called for one thing and one thing only. That's right: pictures of my freezer!
Oh, okay, you can have a beer too. There's beer in the fridge part. Also wine up top. Choices, choices.
So you guys want to see my freezer? BEHOLD.
No, we really, really can't get the ice cream maker in there.
Note that this is only the first layer of stuff. Everything is approximately three deep, and mostly stored in pint containers.
The container idea came from living in Brooklyn and ordering Indian delivery every once in a while. The food came in these exciting little pint containers that perfectly held 2 cups of whatever you might want to put in them. They also were free, and stacked perfectly. So I started washing them out and reusing them. Eventually we went ahead and ordered 100 new, for ultimate freezer organization power. This also means we now have many fewer incidents in which, say, a bag of dried chickpeas suddenly splits in your hand and showers its contents all over the freezer. Good times.
Yes, they're plastic, and that's certainly not optimal, but it works for us at this point in time. The black containers are also reused takeout boxes, but they're made from corn. We feel a little better about using them, but we don't know where to find more!
We stuff all kinds of things into the freezer. Flours, grains, beans, pulses, and some baking supplies go in the freezer because after you've experienced one infestation, you don't want any more, ever. We could probably take these out and store them in the cabinet after a week or so in the freezer--there are a few containers of dried pintos and chickpeas in the pantry--but, well, why bother? This works out fine for now.
You can see my impulse for making ice cream is pretty well under control if that's my attitude.
So. Freezer contents.
I started labeling but had to stop because there is just too much stuff to list in one picture.
Grains, flours, & baking:
short-grain brown rice
long-grain white rice
arborio rice
barley
quinoa
oatmeal
couscous
polenta/coarse cornmeal
wheat flour
white wheat flour
gluten flour
chickpea/gram flour
rice flour
buckwheat flour
bulk yeast
turbinado sugar
Dried beans & pulses:
white beans
black beans
red kidney beans
pinto beans
adzuki beans
mung beans
chickpeas/garbanzo beans
yellow split peas/urad dal
green split peas
puy lentils
red lentils
green lentils
Broths:
chicken
fish
veg
bean (right now it's chickpea broth)
Vegetables:
stockpile
corn
peas
Meat & fish:
bacon
pork loin steaks
roasted chicken
precooked chicken sausage
(shrimp & whitefish filets pop in & out frequently)
Fruit:
dried sour cherries
dried sweet cherries
dried cranberries
dried apricots
backyard plums
strawberry & banana chunks
whole black bananas
Nuts & seeds:
cashews
almonds, slivered & whole
pecans
sesame seeds
(walnuts should be there but aren't)
Prepared food, which is to say, food I made:
chili
lentil soup
carrot soup
mini quiches
several black bean & rice-stuffed peppers
cooked beans in their broth (various)
Store-bought prepared food:
ice cream
a pound cake
half a box of disgusting fish sticks I really need to throw out
(sometimes we have frozen burritos or pizza)
Miscellaneous:
tempeh
ice
coffee
And that's just what's in there right now, for a household of two, one of whom is vegetarian! Imagine if we were serious coupon people, or fishers coming home with six gigantic salmon at a time, or hunters bringing home a deer!
This is why I now own a canner, incidentally. I want the summer tomatoes all year, but can they fit in there? No, they cannot. I want a lot more vegetables in the freezer as well as out, actually. We'll have to see what we can do about that. I mean, the freezer isn't organized, though it may seem so to the naked eye. It's just full of easily stackable containers. If I really got in there and went at it, I could almost certainly preserve a lot more food in the freezer. Hmm. I'm going to have to think about that one.
In the meantime I'm going to have a beer, though. Holiday weekend! Hooray!
Oh, okay, you can have a beer too. There's beer in the fridge part. Also wine up top. Choices, choices.
So you guys want to see my freezer? BEHOLD.
No, we really, really can't get the ice cream maker in there.
Note that this is only the first layer of stuff. Everything is approximately three deep, and mostly stored in pint containers.
The container idea came from living in Brooklyn and ordering Indian delivery every once in a while. The food came in these exciting little pint containers that perfectly held 2 cups of whatever you might want to put in them. They also were free, and stacked perfectly. So I started washing them out and reusing them. Eventually we went ahead and ordered 100 new, for ultimate freezer organization power. This also means we now have many fewer incidents in which, say, a bag of dried chickpeas suddenly splits in your hand and showers its contents all over the freezer. Good times.
Yes, they're plastic, and that's certainly not optimal, but it works for us at this point in time. The black containers are also reused takeout boxes, but they're made from corn. We feel a little better about using them, but we don't know where to find more!
We stuff all kinds of things into the freezer. Flours, grains, beans, pulses, and some baking supplies go in the freezer because after you've experienced one infestation, you don't want any more, ever. We could probably take these out and store them in the cabinet after a week or so in the freezer--there are a few containers of dried pintos and chickpeas in the pantry--but, well, why bother? This works out fine for now.
You can see my impulse for making ice cream is pretty well under control if that's my attitude.
So. Freezer contents.
I started labeling but had to stop because there is just too much stuff to list in one picture.
Grains, flours, & baking:
short-grain brown rice
long-grain white rice
arborio rice
barley
quinoa
oatmeal
couscous
polenta/coarse cornmeal
wheat flour
white wheat flour
gluten flour
chickpea/gram flour
rice flour
buckwheat flour
bulk yeast
turbinado sugar
Dried beans & pulses:
white beans
black beans
red kidney beans
pinto beans
adzuki beans
mung beans
chickpeas/garbanzo beans
yellow split peas/urad dal
green split peas
puy lentils
red lentils
green lentils
Broths:
chicken
fish
veg
bean (right now it's chickpea broth)
Vegetables:
stockpile
corn
peas
Meat & fish:
bacon
pork loin steaks
roasted chicken
precooked chicken sausage
(shrimp & whitefish filets pop in & out frequently)
Fruit:
dried sour cherries
dried sweet cherries
dried cranberries
dried apricots
backyard plums
strawberry & banana chunks
whole black bananas
Nuts & seeds:
cashews
almonds, slivered & whole
pecans
sesame seeds
(walnuts should be there but aren't)
Prepared food, which is to say, food I made:
chili
lentil soup
carrot soup
mini quiches
several black bean & rice-stuffed peppers
cooked beans in their broth (various)
Store-bought prepared food:
ice cream
a pound cake
half a box of disgusting fish sticks I really need to throw out
(sometimes we have frozen burritos or pizza)
Miscellaneous:
tempeh
ice
coffee
And that's just what's in there right now, for a household of two, one of whom is vegetarian! Imagine if we were serious coupon people, or fishers coming home with six gigantic salmon at a time, or hunters bringing home a deer!
This is why I now own a canner, incidentally. I want the summer tomatoes all year, but can they fit in there? No, they cannot. I want a lot more vegetables in the freezer as well as out, actually. We'll have to see what we can do about that. I mean, the freezer isn't organized, though it may seem so to the naked eye. It's just full of easily stackable containers. If I really got in there and went at it, I could almost certainly preserve a lot more food in the freezer. Hmm. I'm going to have to think about that one.
In the meantime I'm going to have a beer, though. Holiday weekend! Hooray!
18 May 2012
Dinner in 15 minutes: chicken sausage with green beans
John and I run a fairly minimal house. We have no tchotchkes on our shelves, no pictures on our walls; only our bookshelves are crowded. Well, our bookshelves and our freezer. Yes: I stuff the freezer with everything imaginable. Dried fruit and nuts, flours, beans and pulses of all kinds, similar varieties of grains, roasted chicken and its broth, soaked and cooked beans and their broth, the vast vegetable stockpile and its resulting broth, leftover soups and stews, yeast, tortellini, dumplings, bacon (one package can last us a year, seriously), tempeh, butter: practically anything that requires cold air for preservation is in our freezer.
Oh, and ice.
This means I can grab something from the freezer to produce nearly instant dinner. In this instance, I grabbed a frozen chicken sausage, threw it in some warm tap water to defrost, and tossed it in a pan with some green beans and spices.
Zoom! Bang! Pow! Dinner is served!
Chicken sausage with green beans
onion/shallot/garlic
olive oil
optional hot pepper
precooked chicken sausage
lots of green beans
red bell pepper
dry vermouth to deglaze
salt, pepper, basil, oregano
The proportions here are flexible. Use what you have; use as much as you like. They're your taste buds.
Saute chopped onion and/or garlic in a little olive oil. If you like hot pepper, chop that up and add it too. While the veg are softening, slice a chicken sausage per person into half-moons. Add sausage to the pan, season with salt, pepper, basil, and oregano, and cook, shaking and stirring occasionally, over medium-high heat. While things are cooking, wash, top and tail, and chop a large handful of green beans per person. After about five minutes, when the sausage is beginning to turn golden on both sides, add the green beans. Toss again and cook while you dice a red pepper; give it maybe three minutes before you dump it in the pan too. Cook another few minutes, deglazing the pan with vermouth as needed. Taste and correct seasonings.
Eat with vigor.
Subscribe to:
Posts (Atom)