Showing posts with label snacks. Show all posts

23 August 2015

Blistered shishito peppers

Blistered shishito peppers

Shishito peppers are one of the highlights of late summer. While they look like a hot pepper, they are generally pretty sweet -- only about one in ten peppers will be spicy. So eating a plate of these is like a delicious, delicious game of chance, where no matter what, you always win.

When we got a pint of shishitos in our CSA share, we knew exactly what to do with them: blister them. One hot pan and five minutes later, we were ready to eat the entire pint in one fell blow.

I imagine these peppers would also be excellent grilled on the barbecue. Toss your peppers with oil, string them onto soaked skewers, and roast, turning to cook each side, until nicely blistered. Then salt and eat. I haven't tried this, though, so if you do, let me know how it goes! For science!

This method will work with shishito or padrón peppers.

Blistered shishito peppers

grapeseed oil or other cooking oil with high smoke point
shishito peppers
plenty of kosher or sea salt

Put a frying pan wide enough to hold all your peppers in a single layer over medium-high to high heat. Let the pan get hot before you start cooking. Test the temperature with a flick of water, just like you would if you were cooking pancakes; when the water sizzles away immediately, you're ready to go.

Add a generous slug of oil to the pan and let it heat up for a moment. Then add your peppers and toss or stir to coat. Let the peppers cook, stirring or flipping occasionally, until they are blistering and turning golden to dark brown in patches on all sides. This should take about five minutes.

When your peppers are done, remove them to a paper towel-lined plate or wire rack and immediately season with a generous amount of salt.

Serve hot. Eat them all. Hooray!

Blistered shishito peppers

Blistered shishitos are great by themselves, but they also work well as part of an antipasto spread. A hard slicing chorizo or other spicy sausage and a chunk of manchego are the perfect match. Marinated olives would be pretty tasty too. Basically anything you'd get at a tapas bar is a good idea.

And of course you are going to want a glass of cold, cold beer on the side. Hot peppers and icy beer are one of the best possible combinations to eat on a hot afternoon.

What are your favorite late summer snacks?

15 July 2015

Radish and dill compound butter

Radish and dill compound butter

Radishes, butter, and salt are one of the most classic food combinations out there.

Usually I've seen instructions to swipe whole radishes through cold butter and dip them into sea salt. This is all well and good if you want a huge mouthful of radish, but it can get a little spicy for me. So instead I thought I'd make a quick compound butter and spread the resulting tasty mess on slices of sourdough baguette. Then I added some fresh dill, because we had a big bunch and it's delicious with crispy radish. Perfect!

This is one of those recipes you can adjust to suit your tastes. Do you like lots of crunch and spice? Add more radish. Do you want all the dill? Add more dill. You're going to be spreading this on bread anyway -- a fairly neutral palette -- so I recommend going for large amounts and strong flavors.

If you want to chill your butter before using -- maybe so you can let a slice of it melt on top of a piece of poached salmon later -- you can shape it into a cylinder by wrapping it in plastic wrap, rolling it to an even thickness with the palm of your hand, and twisting the plastic together at each end. Then just stick the packet in your refrigerator for future application.

And if you want to make this into a schmear instead of a compound butter, you can switch out the butter for cream cheese. This is definitely on my short list of things to make before the dill is all gone.

Radish and dill compound butter

2-3 radishes (3 tbsp grated)
1 1/2 tbsp fresh dill
4 tbsp softened butter
salt and pepper to taste

Shred your radishes on a box grater or microplane. Finely chop your dill.

Mix the shredded radish, dill, and butter together thoroughly. Season with salt and pepper, taste, and adjust.

Spread on the bread of your choice and eat. Otherwise, wrap in plastic wrap and chill for future use.

John and I may have polished off our entire batch, as well as an entire baguette, and called it lunch. Cold rosé is optional.

What are you spreading on bread lately?

09 February 2015

Soft pumpkin cookies

Soft pumpkin cookies

It's still winter, and there are still plenty of winter squash from the last few CSA boxes hanging around on our kitchen counter. So last weekend I roasted a pie pumpkin and a butternut squash, mashed up the flesh, and made a big batch of cookies. What better way to eat as much squash as possible?

These cookies are super soft and fluffy, to the point that they almost seem like little bite-sized pieces of pumpkin bread. Of course, they don't bake as long as a pumpkin bread, and they don't need to be cut like a pumpkin bread, and they're generally more cookielike as a rule, but otherwise, the taste and texture is pretty spot-on. So: pumpkin bread in cookie form.

Note that it is 100% possible to make these cookies with no mixer. I just used a big bowl and a wooden spoon, and everything worked out perfectly.

Soft pumpkin cookies

Soft pumpkin cookies
based on Pumpkin chocolate chip cookies

1 1/2 cups sugar
1 3/4 cup pumpkin or winter squash puree
1/2 cup butter, melted
1/2 tsp vanilla
1 egg
1 tbsp cinnamon
3/4 tsp nutmeg
3/4 tsp ginger
3/8 tsp cloves
1 tbsp baking powder
3/4 tsp baking soda
1/2 tsp salt
2 1/2 cups flour

Preheat your oven to 375F. Melt your butter, either in the microwave or in an oven-safe dish in the actual oven.

In a large mixing bowl, combine your sugar, pumpkin, butter, and vanilla. Add the eggs and beat well.

Mix together your spices, baking powder, baking soda, and salt. Add to the wet mixture and stir to combine.

Add the flour gradually, in 1-cup increments, stirring well after each addition. If you would like to add chunks of delightful things to your cookies, you can fold in 1 cup chocolate chips, dried cranberries, or chopped nuts. We prefer totally plain cookies, however.

Use two spoons to drop 1-tbsp pieces of dough 2 inches apart on a cookie sheet lined with parchment or a silicone mat.

Bake for 12-15 minutes, or until set on top (14 min for me). Let cool on cookie sheet for a few minutes before removing to a wire rack to cool completely.

Makes approximately 30 cookies.

Soft pumpkin cookies

Since they're so soft and moist, these guys are a bit more perishable than standard cookies. I recommend eating them within about three or four days. Fortunately they're delicious enough that this won't really pose much of a problem.

If you happen to be in the cream cheese frosting camp -- or even just the spreads-cream-cheese-on-things camp -- these are an excellent candidate. But they're also really good by themselves, with a cup of coffee or tea.

How are you eating your winter squash post-holidays?

23 January 2015

Top ten snacks at our house

Top ten snacks at our house

I'm so tired. As such, snacks are definitely the order of the day.

Here are some of my favorite snacks to eat when there has been too much life and house and other stuff happening, and all you want to do is sit down on the couch with a trashy novel and a glass of wine. And snacks. There will be snacks.

- Stovetop popcorn, buttered, salted, and minimally seasoned with some paprika and mustard powder on occasion. We should probably break out the nutritional yeast one of these days. A simple caramel corn with nuts and sesame seeds is excellent for a sweet version.

- Pretzel sticks dipped in a mix of half sour cream/labneh/greek yogurt and half prepared horseradish, with a good grind of pepper. Use more or less horseradish depending on your spice preferences. Related: switch out the horseradish for the spicy mustard of your choice. Or just dip your pretzels in cashew cheese if you happen to have the tail end of a batch on hand.

- Cold leftovers out of the fridge. This one is all me; if John eats leftovers, they have to be hot. I am way more likely to eat a piece of cold pizza or some cold pasta fagioli right out of the fridge.

- Quesadillas. This one can cross the line from snack to meal, depending on whether we have beans and rice hanging around. The basic formula is refried beans, cheddar, a light sprinkle of cumin and oregano, and some chopped scallion if there happens to be any in the crisper. Rice bulks it up substantially. Various other veg (such as bell pepper or jalapeno) can make an appearance too. I like to do a streamlined one with mozzarella and red pepper flake. I will also make them with cream cheese on occasion. Quesadillas are cooked in the toaster oven, aligned carefully so they can't bend through the wire rack.

- Raw veg. Carrots, broccoli florets, grape tomatoes, bell pepper, etc. I will dip these in hummus if there is any, but I am actually not especially into hummus, so more often than not there's no dip. I used to use commercial caesar dressing that we'd get with our delivery pizza & caesar salad combo, but we have since stopped ordering from that pizza place. So. Plain veg it usually is.

- On a related note, fruit. Bowls of berries can vanish with astonishing rapidity. Sliced apples or stone fruit are a pretty frequent dessert here.

- Cheesy toast. Decent bread, spicy or dijon mustard, optional chopped veg, cheese of choice (mozzarella or other white cheeses preferred), all layered up and stuck in the toaster oven to brown. This one is also good for lunch.

- I will also totally do an abbreviated ploughman's lunch-type plate with bread or crackers, sliced cheese, mustard, and various pickles. Apples work here too.

- Cream cheese or labneh-related snacks are some of my favorites. First of all, BAGELS BAGELS BAGELS. A good bagel with cream cheese is such a satisfying creation. Crackers with labneh or cottage cheese and some chopped herbs and veg work well too.

- A batch of scones is an excellent plan. Sweet scones are good, but I find that a neutral scone is more versatile. You can make a batch and eat them for the next few days, with your choice of jam, peanut butter, or cheese.

I think the house stuff is actually done this time. Hopefully I will regain some energy and get going in the kitchen again soon.

What snacks do you like to eat when you are too tired to make much of anything?

02 December 2014

Fennel frond, lemon zest, and black pepper cream cheese schmear

Fennel frond, lemon zest, and black pepper cream cheese schmear

Contrary to a variety of expectations, I did NOT pickle the last two heads of fennel that came our way in the CSA box. Instead, I chopped one up and mixed it with a whole lot of other vegetables to roast for Thanksgiving dinner. So good!

However, that left me with a big handful of fennel fronds. What can you do with fennel fronds?

Fennel frond, lemon zest, and black pepper cream cheese schmear

I refrained from simply cramming them all into the half-empty fennel, ginger, and lemon pickle jar, although that was kind of tempting.

Instead, I thought I'd chop them up and see how well they worked in a cream cheese schmear, along with some lemon zest and black pepper. And lo, they worked SUPER WELL.

If you are into the delicate anisey tang of fennel, you should absolutely give this one a try. The fennel and lemon make a refreshing and zingy combination -- an excellent contrast to the creamy creamy cheesy cheese (*cough* *That's a NSFW Foamy the squirrel reference*).

This makes approximately one laden bagel's worth of schmear. Of course, you can always increase any and all of the ingredients at your leisure.

Fennel frond, lemon zest, and black pepper cream cheese schmear

Fennel frond, lemon zest, and black pepper cream cheese schmear

3-4 tbsp cream cheese/tofu cream cheese
2-3 tbsp fennel fronds
zest of 1 lemon
black pepper to taste
optional milk/yogurt to thin

Finely chop your fennel fronds and lemon zest. Mix all ingredients together well, using a fork to blend thoroughly.

To serve, spread on the bagel, cracker, or other toasty bread product of your choice. I had mine on a couple of leftover whole wheat rolls from Thanksgiving. That worked exceptionally well.

Such a great addition to the schmear library. I am definitely going to make this one again, and not just because there is still yet another head of fennel hiding in the crisper.

More schmears for your bagel-topping delight:
- Spicy salsa and bloody mary schmears
- Red onion and dill schmear
- Fresh corn and basil schmear

What are you eating on your bagels lately?

16 July 2014

Refrigerator giardiniera

Refrigerator giardiniera

One of the vegetables we've been getting from our CSA is cauliflower. I love cauliflower, but two heads in two weeks is a little much to work through when there are only two people in the house. So what's the solution?

PICKLES.

When I came across Laurie of Relishing It's Giardiniera, I knew a batch was in my future. All the vegetables in the land, cut into pieces, doused in spicy brine, and kept nice and crispy in the refrigerator? Yes, please!

The vegetable mixture here is super flexible. I just went through the crisper and grabbed everything that sounded like it would make a good pickle. If you want to use a different mix of vegetables, go for it! If I'd had more space, I would have added in some small green beans (tailed but otherwise whole). Laurie added radishes and celery to hers. What do you have? It will probably be delicious.

Re: brine. Most giardinieras seem to include sugar in their brine. I am not at all into sweet pickles, so I decided to leave out the sugar. This was a wise choice for a lovely, vinegary, spicy pickle. However, if you do prefer a sweeter pickle, you can always choose to add a tablespoon or so of sugar. Give it a try and see what you like.

A note on canning: this is a refrigerator pickle, which means it is not processed for long-term storage. While it may be acidic enough to water-bath can, I am not a food safety or canning authority, so I can't provide accurate info about converting this to a canned pickle. Check the Ball Blue Book or another trusted canning resource if you want to make a canned giardiniera.

Refrigerator giardiniera

Refrigerator giardiniera
Based on Relishing It's Giardiniera

Makes 2 pints or 1 quart.

vegetables:
1/4 head cauliflower
1 carrot
1/2 red or yellow pepper, or several baby peppers
1 jalapeno (or half if it's very spicy -- mine was.)
2-3 cloves garlic
1/4 red onion
1/2 tsp thyme
1 tsp oregano
1 tsp peppercorns

brine:
1 1/2 cups white vinegar
3/4 cup water
1 1/2 tsp pickling salt
1 large or 2 small bay leaves

equipment:
2 pint jars or 1 quart jar with lids
canning funnel (semi-optional)
chopstick or flexible spatula

Chop your vegetables into pieces. The size is pretty much up to you. I kept my cauliflower and peppers in larger chunks and sliced everything else, but whatever you like should be fine.

Divide your spices evenly between your clean jars. I used pint jars, so I put 1/4 tsp thyme, 1/2 tsp oregano, and 1/2 tsp peppercorns in each. To keep the spice distribution fairly equal, add half your garlic and jalapeno slices to each jar as well. If you're using a quart jar, none of this applies, of course.

Pack your mixed vegetables into your jars. I did my best to distribute everything equally, but if you feel like cramming everything in willy-nilly, that's fine too.

Next, make your brine. Add all the brine ingredients to a saucepan with a lid. Bring the brine to a boil and cook, covered, until the salt has dissolved.

Remove the bay leaves and add one to each jar. Pour your hot brine into your jars, using the canning funnel if you so desire. Leave 1/4 inch of space at the top. Use a chopstick to release any air bubbles, working your way around the side of each jar. Top up the brine if needed, lid, and refrigerate overnight.

After 12-24 hours, your giardiniera will be ready. Hooray!

Refrigerator giardiniera

I especially love how the red onion tinges everything a beautiful pink.

What can you do with giardiniera?

- If you are a pickle lover, just eat it as a snack, or as a side with a big deli sandwich.
- Scatter handfuls of it into big green mixed salads.
- Use small pieces as garnish for deviled egg halves.
- In fact, chop up a handful and add it to egg salad or potato salad in place of the typical dill pickle.
- Use it as a garnish for a hearty soup like borscht.
- Puree it with a handful of kalamata olives for a very pickley tapenade.

What pickle experiments are you conducting this summer?

23 May 2014

Cashew cheese with dill and red onion

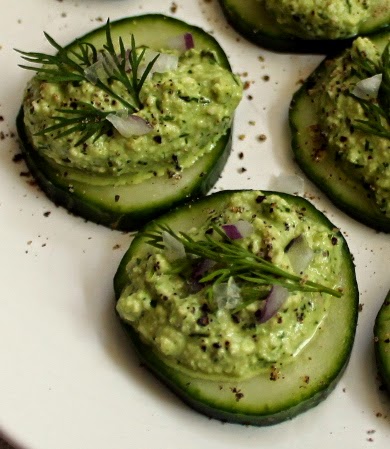
Cucumber cashew cheese bites with dill and red onion

So one thing about making egg salad is that afterward you still have 3/4 of a bunch of fresh dill to eat. This is not a huge problem for me, since I love dill, but it does get a little interesting if you're trying to figure out how to eat ALL of it in a short period of time.

I mixed some dill with cottage cheese and pepper and ate it on toast. I...uh, that's actually all I had done by this point. So when I unearthed a container of cashews from the back of the freezer, they seemed like the best idea ever. Cashew cheese with plenty of fresh spring herbs, coming up!

Cashew cheese is one of my favorite spreads ever. It's super versatile and works well with any number of flavors. This time I threw in plenty of dill and some diced red onion for a delightful fresh and herbal nut cheese. So good!

This makes a small batch of about 2/3 cup of cashew cheese, but you can easily double or triple it for a full party tray of Memorial Day tidbits. No problem!

Cucumber cashew cheese bites with dill and red onion

Cashew cheese with dill and red onion

1/2 cup raw cashews soaked in water for 1+ hours & drained
1/2 cup chopped fresh dill, loosely packed
additional chopped fresh parsley if desired
2-3 tbsp chopped red onion
1/8-1/4 cup water
salt, pepper
squeeze of lemon juice
cucumber slices and extra dill & onion to serve

Start by soaking your cashews. Simply cover them with twice their depth of water and let them sit for an hour or more. I actually let mine go for a couple days in the refrigerator, but that is not necessary at all. In fact, if you soak cashews too long, they can start to turn purple! This is evidently their previously dried juice getting rehydrated, so it's not a cause for alarm, but it can be a little disconcerting.

When you're ready to make your cashew cheese, drain your cashews. In a blender or food processor, combine your herbs, onion, 1/8 cup water, salt, pepper, lemon juice, and finally the cashews. It's a good idea to put the heaviest things (in this case the nuts) on top, for a smooth blending experience.

Blend until well combined. If you have a hard time getting everything to combine well, add a bit more water. I ended up using the full 1/4 cup in my standard blender, but if you're using a high-powered blender or food processor, you may not need to do that.

Taste and correct the seasoning, and you're done. Hooray!

Cashew cheese with dill and red onion

Once you have your batch of cheese ready, it's time to use it. I decided to have mine with cucumber.

Top each cucumber slice with a spoonful of cashew cheese. Garnish with an extra frond of dill, some finely chopped red onion, and a grind or two of pepper. Voila! Fill up a few plates, pour a few glasses of sauvignon blanc, and you're totally ready to party.

Cucumber cashew cheese bites with dill and red onion

Since I was eating my cashew cheese by myself, I did not make a gigantic party tray. Instead, I refrigerated my leftovers and later ate them with a lot of pretzel sticks. So, you know, that is a less fancy but similarly delicious alternative.

Hooray!

What delights are you whipping up for the holiday weekend?

30 January 2014

Easy oven fries

Easy oven fries

If you're planning to eat frozen faux-chicken nuggets or pizza for dinner anytime soon, we may have a lot in common. For instance, did you also wake up with a gigantic headache that didn't abate until nearly 2 pm, regardless of ibuprofen or cups of tea alike? Yeah! Fist bump! Because that's what happened yesterday at our house.

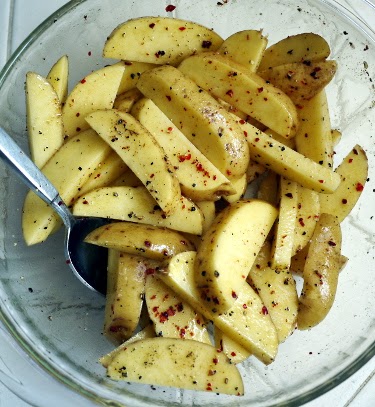
So, to class up our low-effort dinners, both now and in the future, I propose that we should all make these fries. They're super simple: just potatoes, oil, and a few seasonings, all stuck in the oven to turn beautiful and golden. Homemade fries make everything better.

Easy oven fries

Easy oven fries

waxy potatoes of your choice
flavorless oil
salt, pepper
mustard powder
cayenne, paprika, or chili flake

Start by preheating your oven to 375F.

Scrub your potatoes well under cold running water. Slice them into the fry shape of your choice. I usually go for the thicker steak fry shape, which produces some lovely fluffy potato in the center of each fry.

Put your potatoes in a bowl. Add a slug of oil, just enough to coat your potatoes. Season to taste with salt, pepper, a couple good dashes of mustard powder, and as much hot (or mild) pepper as you desire. I used paprika and red New Mexico chile flake. Stir everything together until well coated.

Arrange your fries in a single layer on a baking sheet. Bake for 35 to 45 minutes, flipping your fries about halfway through. Thicker fries will need a bit more time to cook completely. Personally, I like steak fries, as they are tastier and also require less chopping, so mine took closer to 45 minutes to bake.

When your fries are golden brown on both sides and totally tender inside, you are done. Serve them hot, with the ketchup, bbq sauce, or other dipping creation of your choice. The yogurt-dijon mustard sauce I made the other day would be amazing. I'm just saying.

What do you make to bump your everyday dinners up a notch?

26 January 2014

Peanut butter, honey, and banana rice cakes with toasted sesame seeds and crushed almonds

Peanut butter, honey, and banana rice cakes with toasted sesame seeds and crushed almonds

Happy 7th blogiversary to me!

Instead of baking a cake, I had lunch. Seems appropriate.

This is the kind of food I make when I need to eat immediately. A lot of my food fits into that category. It's sort of the theme of the blog, actually. Do you want to eat a plate of something good and interesting, with limited fuss factor? Here you go.

The best thing about these guys is that they're low-effort but high-impact. How basic is a peanut butter and honey sandwich? I ate hundreds of them when I was growing up, both with banana slices and plain. The ingredients are cheap and easily available, and putting them together takes under five minutes. But with a few tweaks to bump up the texture and flavor, you get a far superior end product.

First: rice cakes. They still exist, for one thing, and they're a perfect base for a sandwich filled with peanut butter and honey. You really need a robust crunch to stand up to that soft, sticky, oozing center. Second: just-ripe banana. Fresh fruit with some solid tooth adds a second textural element and a different subtle sweetness. Third: nuts and seeds. These can not only amp up the crunch factor, but add some little pinpoints of heat and aroma, especially if they've just been toasted. The results are crispy, rich, sweet, and savory, and fill you with energy for a surprisingly long time. Yeah!

It's super easy to switch this up to use what you have in the house. Swap out rice cakes for crackers or crisp hot toast, or make a flatbread wrap and crisp the whole thing quickly in the toaster oven. Use sunflower or almond butter in place of the peanut butter. Molasses, agave, or a little swirl of apricot jam (you know, if you're a pb&j person) can work well instead of honey. Apple or pear sliced thinly can sub for the banana, and flaked coconut, chopped dried fruit, or any kind of nut or seed can be a good garnish.

The pantry is your oyster.

Peanut butter, honey, and banana rice cakes with toasted sesame seeds and crushed almonds

Peanut butter, honey, and banana rice cakes with toasted sesame seeds and crushed almonds

rice cakes
peanut butter
honey
banana
sesame seeds
toasted almonds

Start by spreading peanut butter onto a couple of rice cakes. Add a swirl of honey to each.

I like to mix my honey and peanut butter up with the back of a spoon, so I don't get any bites with way too much sugar. It's surprising how much such a simple step improves the taste. Also, it looks pretty.

Peanut butter, honey, and banana rice cakes with toasted sesame seeds and crushed almonds

Slice up a banana and arrange the slices on top of your peanut butter-honey layer.

Now it's time for toppings. I decided to have one rice cake with sesame seeds and one with some finely chopped almonds.

To toast your sesame seeds, place a handful of them in a small dry frying pan. Heat over medium, swirling the pan frequently, for up to five minutes, or until the seeds are just beginning to turn golden brown and smell fragrant and tasty. Be sure to keep an eye on them, since seeds can burn at the drop of a hat. When your sesame seeds are toasted to your liking, remove them from the heat immediately.

Chop a few almonds as finely as you like. Three or four almonds will be plenty for some subtle contrast. My almonds were already roasted, so I didn't need to do anything but chop them up. If you're using raw almonds, you may want to toast them along with your sesame seeds.

Sprinkle your sesame seeds and almond bits over your rice cakes, and you're done.

Peanut butter, honey, and banana rice cakes with toasted sesame seeds and crushed almonds

Eat with the crispy raw fruit or vegetable of your choice. I cut up a fuji apple, sprinkled it with pepper, and had it on the side for even more fruit action.

Happy sandwiching.

What are you making lately for quick yet delicious lunches?

21 November 2013

Salami tidbits

salami tidbits

Thanksgiving is suddenly next week! How did that happen? Clearly it is time to think about huge platters of appetizers. Okay! How about filling salami slices with a plentitude of delightful bits and pieces, making them into convenient bite-sized rolls, and frying them until hot and crispy?

We invented these guys several years ago, while we were living in Brooklyn and had access to the particularly amazing deli & meat counter at the Greene Grape Provisions. So much salami! Of course we had to find more ways for me to eat it than just in sandwiches, although those were well worth it too. This led to an evening of hovering over the stove, eating hot salami rolls right out of the pan. SO GOOD.

These tidbits would be especially good for a party because you can make a whole huge whack of them the day before, shove them in the fridge, and quickly fry them when you want to serve. It only takes about five minutes of last-minute cooking to produce a big platter of delicious bits. Hooray!

You'll want to either get your salami sliced to order at your local deli or buy it in pre-sliced packaged form. The thinness of the slices is key to making a tidbit that is flexible enough to roll, but not too greasy.

The other ingredients are easily interchangeable to your tastes. No mozzarella? Monterey jack, parmesan, or even a smear of cream cheese will be fine. Don't like mushrooms? Leave them out. Don't have bell peppers? Quarter some grape tomatoes instead. It's all good.

(The mushrooms up there were good too--stuff brown mushroom caps with simple pesto, add cheese if you want, and heat quickly under the broiler--but basil is pretty much over at this point, right?)

salami tidbits

Salami tidbits

thinly sliced hard salami, roughly 3-inch diameter
mozzarella
bell peppers (any color but green)
mushrooms
spinach or chard leaves
fresh parsley
good, solid wooden toothpicks (the cheap ones will break)
paper towels for blotting

Start by cutting all your cheese and vegetables into short, thin strips. The actual size will depend on the size of your salami slices. You want the fillings to fit securely inside a roll of salami for the duration.

Assemble your rolls by stacking a bit of each filling ingredient in a line down the middle of a piece of salami. Roll it up (or fold it in from both sides, depending on how full things are) and secure with a toothpick, punching in and out once like you're sewing a stitch. You don't have to go through the entire roll; just secure the loose ends of salami. Repeat until you have as many rolls as you want.

At this point you can cover your tidbits and put them in the refrigerator until right before you want to serve them.

salami tidbits

When you want to serve, heat the frying pan of your choice on medium. Fry your tidbits, shaking the pan occasionally, until they start turning golden brown and crispy on both sides. Since salami has plenty of fat to render, you won't need to add any extra oil. Use a big enough pan, and you can fry all your tidbits at once for a super fast finish.

Remove your finished rolls to a paper towel and blot briefly. Arrange on the plate of your choosing and serve hot.

Now try to leave a few for your guests instead of just eating them all yourself while standing around gossiping in the kitchen.

What kind of appetizers are you planning for your Thanksgiving festivity?

23 September 2013

Banana nut & oat bars!

banana oat nut peanut butter bars

This weekend I took advantage of a new roll of parchment paper and made a batch of soft banana nut bars. Hey, we had bananas dying on top of the fridge and bags of nuts randomly lying around in obscure corners of the freezer--why not combine them into delicious snacky bar form?

These bars are a variation on Clockwork Lemon's soft peanut butter banana oat bars. The main change I made was to switch out the cashews and walnuts--neither of which I could find in the freezer, although they may indeed be hanging out in there somewhere--with almonds and pecans, which I could find. The finished bars were barely sweet, with a subtle nutty crunch hiding under the soft exterior: an ideal breakfast.

I considered adding more fruit, since we had dried cranberries, apricots, and tart cherries hiding in the freezer too, but I decided to try out a batch with no extras to start with. Next time, though, I could totally see myself chopping up a big handful of apricots and chucking them into the batter. The bars could also definitely handle some chocolate chips, especially if you have a taste for the kind of banana bread with huge chunks of chocolate in it.

banana oat nut peanut butter bars

Banana almond pecan peanut butter oat bars

2 ripe bananas
1/2 cup peanut butter
3/4 cup chopped pecans & almonds, your choice of proportion
1/4 cup sweetened coconut
1 tsp vanilla
1/2 tsp cinnamon
1/4 tsp salt
1 cup oats

Preheat your oven to 350F. Line an 8x8 baking pan with parchment paper.

Mash your bananas in a bowl. Add all the other ingredients and mix well. Press the batter evenly into the pan, smoothing the top with a spatula.

Bake for 20-25 minutes, or until slightly browned.

The finished bars will be fairly soft, so give them a few minutes to cool & solidify in the pan. Then remove the whole slab from the pan by lifting the parchment paper.

banana oat nut peanut butter bars

Let cool before slicing into the bar shape of your choice. I cut my batch in half, then cut each half into five pieces. Store wrapped in plastic wrap, or layer with parchment and put in an air-tight container.

These guys are great for a midmorning snack with a big mug of coffee, or as an instant breakfast to grab on your way out the door to the train. Or just bring half the batch to work and leave them in your desk drawer as a balm for the occasional pang of hunger. It's all good.

What do you guys stash away for an emergency snack?

12 September 2013

Whole wheat jalapeno cornbread

whole wheat jalapeno cornbread

Yes, even though I pickled a boatload of jalapeno peppers the other day, we are still supplied with plenty of fresh ones. It's a good thing we like spice. Of course, that's why I planted the jalapenos in the first place, so overall I think things are going pretty well.

Next year I'm definitely going to have to plant a couple different kinds of hot peppers. If only there were more space! Maybe I'll finally get my act together and finally dig out the side bed--currently full of rampant mint, lemon balm, and weeds galore--for an extra-sunny pepper patch. At that point I'll probably have to look into stringing and drying peppers as well as pickling them. I can't wait.

In the meantime, we are throwing fresh jalapenos not only into the pickling vat, but into soups, sauces, pastas, and now, cornbread.

Spicy cornbread is the best possible accompaniment to a huge vat of chili--for instance, this fresh farmer's market chili. Eat it on the side! Crumble it over the top! Ladle some chili on top! Any way you choose, it's all good.

Our backyard jalapenos are sufficiently spicy and vibrant that one can flavor an entire pan of cornbread. If you have milder peppers, you may wish to use more than one. If you aren't as spice-tolerant as we are, you can either use less jalapeno, choose a milder pepper, or give your chopped pepper bits a quick saute to mellow them out before adding them to the batter. It's all good.

whole wheat jalapeno cornbread

Whole wheat jalapeno cornbread

1 1/4 cup cornmeal
3/4 cup whole wheat flour
2 1/2 tsp baking powder
3 tbs sugar
3/4 tsp salt
1-2 jalapenos or other hot peppers
1 egg
3 tbs butter, melted
1 cup milk

Preheat your oven to 425F. Grease and flour an 8x8 square pan or a loaf pan. You could also make this in muffin form if you reduce the cooking time to 8-10 minutes.

Mix your dry ingredients together in a large bowl.

Mince your jalapenos finely. I only used one because our harvest has been pretty hot, but you can always add more if you're working with milder peppers. Or you can choose to go for less if you have a lower spice tolerance. It's all good.

Gently toss your minced jalapeno with a spoonful of your dry mix. You just want to barely coat the pieces. In theory, this will keep all your pepper bits from sinking to the bottom of your cornbread. In actuality, I doubt that it would be very easy for anything to fall very far through a thick cornbread batter like this, but hey.

Add your egg, melted butter, and milk to your bowl of dry ingredients. Mix until well incorporated. Fold your jalapenos in at the very end.

Pour your batter into your prepared pan and bake for 15 minutes, or until a toothpick inserted in the center comes out clean.

Eat with chili, tomato soup, or a full Southern spread with the collards and barbecue of your choice. It's all good.

Are you buried in an overabundant harvest? How are you using it up?

19 August 2013

Yukon gold oven fries

Yukon gold oven fries

Are you ready to turn on the oven yet? I am. Of course, this may have something to do with living in Northern California, where it was actually grey all morning a few days ago. Grey skies!! They're so rare I can't help but get excited. Today we're back to standard super-blue skies and glaring sun, but in the interim, I turned on the oven and baked up some of the best snacks on the planet: Yukon gold oven fries.

Deep frying is not a normal practice at our house, so baking has been my french fry method of choice for quite awhile. The results are a bit more like roasted potatoes in convenient baton form than crusty coated fries, but I'm okay with that. It's a super easy and tasty method, and that's all I need.

Yukon gold oven fries

Yukon gold oven fries

Yukon gold potatoes
olive oil or your choice of sub
red pepper flake
mustard powder
salt, pepper

Preheat your oven to 425F.

Scrub your potatoes well, removing any eyes. Cut then into appropriate steak fry batons. I don't peel my potatoes for fries, but you can feel free to do so. Personally, I think the skins give the fries a bit more structure, and they're certainly delicious. Besides, you can't beat the laziness factor.

Put your potatoes in a mixing bowl and toss them with a few teaspoons of oil and seasoning to taste. I like to use lots of black pepper, several good shakes of salt and red pepper flakes, and just a little ground mustard, but feel free to go as spicy as you like.

Yukon gold oven fries

Arrange your fries in one layer on a baking sheet of your choice. These guys can stick, so if you have parchment paper or a silpat, you may want to break them out for this. I used tinfoil because we were out of parchment, but it's an inferior substitute.

Bake for about 20 minutes, or until your fries are golden brown on the bottom and move easily when you shake the pan. Then flip them over and continue baking until cooked through. The timing is going to depend on the thickness of your fries. I believe mine took about 35 minutes total.

Yukon gold oven fries with pinto bean burger

Eat immediately with ketchup and the burger or sandwich of your choice. You definitely want a dill pickle spear on the side too.

John and I had our fries with a couple of good good things' bbq pinto bean burgers, which we made in a huge batch and froze for instant dinner application a couple weeks ago. That was a Very Good Idea, let's just say. Note Emmycooks' amazing pickled peppers and giant slice of homegrown tomato as well. Together, it was one of the best late summer dinners I could possibly ask for.

Are you guys ready to turn on the oven, or are you still happily submerged in a pile of raw veg and fruit?


12 July 2013

Summer rolls with fresh herbs & peanut-chili sauce

tofu mint summer rolls with Thai peanut sauce

What's next on the it's-too-hot-to-cook menu? I propose the summer roll: seared tofu, slivered crunchy vegetables, and handfuls of fresh herbs rolled in a delicate rice paper wrapper and dipped in a rich, tangy peanut sauce. Obviously the tofu requires some minor stovetop heat (although you can always use raw, or just make rolls minus tofu if you prefer), but everything else is cold.

For vegetable fillings, I went pretty classic. In place of the usual rice noodles, I used shredded cabbage, which provided a nice extra crunch and eliminated a pot of boiling water on the stove. And of course summer rolls need an assortment of herbs, so I grabbed some mint and basil from the garden and a bunch of cilantro from the store.

The classic sauce for Thai summer rolls is peanut. I've been looking for a good recipe for way too long, and now I finally have one. I based it on Minimalist Baker's Thai peanut sauce, with a few key changes. For one thing, we don't have any chili garlic paste hanging around; instead, I used sweet chili sauce and omitted the extra sugar. The result was the best Thai peanut sauce I've ever made.

Summer rolls with tofu, veg, and herbs

firm tofu
peanut oil
cucumber
carrot
red bell pepper
cabbage
fresh cilantro, mint, & basil
rice paper wrappers
peanut sauce to serve

Start by cutting your tofu into long batons and searing them on all sides in a little peanut oil. Let them cool before you assemble your rolls.

summer roll fillings: cucumber, red pepper, carrot, cilantro, mint, basil

Seed your cucumber, peel both it and your carrot, and sliver up all your vegetables. Strip your herbs off their stems; if the leaves are particularly huge, cut them into smaller pieces.

To assemble a summer roll, first soften your rice paper wrapper by soaking it in a shallow dish of water for about 1 minute. I used a pie plate, which was a bit smaller than ideal, but worked nonetheless. Only soak one sheet at a time, or your papers will get too soggy. You want them to be just flexible.

tofu cilantro mint summer roll

Put your rice paper on a work surface and pile your fillings in a line 2/3 of the way down, leaving a bit of space at either side. If you want a lovely decorative herb presentation, you can arrange your herbs in a line another third of the way up the wrapper, but it's also fine to just pile them up with the main filling. I decided to go for the fancy presentation not only because it's pretty, but because we have a cilantro-hater in the house, so I wanted to clearly distinguish between rolls with cilantro and those without.

Roll the bottom edge of your rice paper up over the vegetable and tofu filling. Fold in both sides to seal, and then continue rolling from the bottom up to create a long egg roll shape. Repeat until all your fillings are used up. I made ten rolls with half a block of tofu.

Serve your rolls with peanut sauce. If you have leftovers, cover them with a damp paper towel in a sealed container and they should keep for a couple days.

Thai chili peanut sauce

Thai peanut sauce

2 giant honking spoonfuls natural peanut butter
2 tbsp soy sauce
2+ tbsp Thai sweet chili sauce
juice of 1 lime
1/4 cup hot tap water

Stir the living crap out of your peanut butter before you use it. I'm just saying. Natural peanut butter naturally separates into oils & solids, so you want to be super sure you've gotten the oil well mixed down to the bottom of the jar before you start scooping. Do it! Otherwise you'll be facing a quarter jar of dry peanut paste in a few weeks.

Combine all ingredients but the water in a medium bowl and mix well with a fork. Add half the water and mix again. If you're happy with the consistency, go ahead and serve. If you want to thin it down a bit more, incorporate the rest of the water.

Eat with summer rolls.

Needless to say, there will be more peanut sauce in the future. I would absolutely make up a batch just to dip cucumber slices and carrot sticks. It would be great tossed with cold noodles and crowned with steamed broccoli or ladled over a plateful of seared tofu and vegetables. I'm also having visions of brushing it over eggplant slices and baking until awesome. It's all good.

Hooray!

11 April 2013

Coconut extravaganza!

red lentil curry with avocado

I have a new favorite ingredient and its name is coconut. Coconut oil, coconut milk, actual shreds of sweetened coconut--I want it all. Okay! Let's do it!

My stash of extra virgin coconut oil had been sitting around alone and unloved ever since I used it in my 3-ingredient DIY deodorant. (This has been working just about perfectly for me, incidentally, so if you've been putting off making your own homemade deodorant, go for it!) But now? Now it is no longer alone and unloved. I've started using it as a cooking oil, and is it ever great.

I started out by making Gena's curried lentils, substituting red lentils for the specified yellow, and serving the whole shebang over basmati rice. The coconut oil gives this curry a faint tropical undertone and a richer mouthfeel, making the whole dish much more satisfying.

This was amazing, not to mention practically free. Isn't that a great feeling? I heart practically free food. And it tasted just about perfect, whether with avocado (always a plus) or with a big spoonful of plain yogurt and some sriracha sauce. When you put those two traits together, you know you have a good thing on your hands.

I liked it so much that I made a big pot of very similar red lentil soup with coconut oil and quinoa several days later. That one got the yogurt and sriracha treatment too. So good.

coconut bread

Next, I started drooling over Michelle's beautiful-looking coconut bread. Clearly, I needed to test it out and determine its actual deliciousness level. So I bought a bag of shredded coconut and went to town.

This recipe is based on the original at Smitten Kitchen, but substitutes in coconut milk in place of dairy. I'm thinking this made the loaf a bit heavier overall--but it also made it an especially coconutty delight. COCONUT!

The only change I made was to sub in wheat flour in place of the all-purpose. This is kind of the default at our house, since we almost never have all-purpose flour, but always have whole wheat kicking around. Wheat flour generally gives a slightly more damp and hearty character to baked goods, and that was certainly the case here. I think it worked especially well with all the chewy strands of sweet shredded coconut.

coconut bread with strawberries

Toasted in the toaster oven, cut into cubes, and topped with sliced sugared strawberries, this bread made one of the best desserts ever. Or maybe one of the best breakfasts ever. Either. Both. Yes.

Speaking of strawberries, how about a coconut milk and strawberry smoothie?

I had just about 1/4 cup of coconut milk left after making my coconut bread, so I stuck it in the freezer for a few days. Then, when I scored some windfall white grapefruit, but didn't want to make it into a typical alcoholic beverage--the fact that it was Monday at 11:30 am helped a lot there--I decided it was smoothie time.

coconut milk, strawberry, grapefruit, and yogurt smoothie

White grapefruit, strawberries, frozen coconut milk, and yogurt made a delightfully tart, thick, and filling creation. I also got to avoid the bane of my smoothie existence: frozen bananas. Seriously, frozen bananas are one of the main reasons I don't do smoothies more often (the other reasons are my visceral repulsion as regards the word "smoothie" and my dislike of washing the blender), so discovering the wonders of frozen coconut milk essentially made the heavens open right there.

coconut milk, strawberry, grapefruit, and yogurt smoothie

I put my smoothie in a mason jar. This worked out especially well, because when I discovered I was too full to drink the entire thing, I just put a lid on it and put it in the refrigerator, a la KERF. Then, the next day, I drank it for completely instant and ready-made breakfast. Hooray!

What's next on the coconut agenda? Hmmm...any suggestions?

19 March 2013

Spicy caramel corn with maple, almond, and sesame

Spicy caramel corn with maple, almond, and sesame

We love popcorn. It's easy, fast, and can take on any spicing combination you throw at it. You can make it any time, on the slightest of provocation, and end up with a gigantic steaming bowl of fresh snacky bitlets. Best of all, it's cheap.

That is, it's cheap if you do it right.

Prepackaged microwave popcorn is not only a ripoff, it is DISGUSTING. Do you want your house to reek as much as the office kitchen does after some misguided person makes a bag of fake-buttery microwave popcorn for a midafternoon snack? No. No, you do not. The solution: plain popcorn.

Plain popcorn is easily available in the grocery store. Most of the time you can find bags right next to the microwave popcorn, but if your store has bulk bins, make sure to check them out too. I tend to buy popcorn in bulk and decant into a jar, so there's no danger of loose popcorn spilling from a ripped bag.

So the other night we had just finished dinner but wanted a little extra something. That something turned out to be this maple-coated caramel corn with lots of crunchy sesame seeds. Hey, popcorn is not only an instant snack--it's an instant dessert too! Perfect.

This caramel corn is easiest to make if you have more than one person in the kitchen, so one person can shake the pan of corn while the other swirls the bubbling caramel. However, it's also totally possible to do it entirely yourself. It just takes a bit of timing.

The proportion of caramel to corn (and to nuts and seeds, for that matter) is up to you. I really like a subtle and minimal coating, and I've written this accordingly, but if you want a super-sugary concoction, you can certainly do that as well. Just make more caramel--or less popcorn.

maple, almond, and sesame caramel

Spicy caramel corn with maple, almond, and sesame

1/3 cup popcorn
1/4 cup canola oil
1/8 cup sesame seeds
1/2 cup maple syrup
2 tbsp honey
large dash cayenne pepper
1/8 cup roasted salted almonds
optional pat of butter
optional additional salt

Make the popcorn by the method of your choice, following the directions on the package. We do stovetop popcorn, but an air popper or the microwave bag method are good too. Just make sure to use plain unseasoned corn.

While your popcorn is cooking, start your caramel by toasting your sesame seeds. Put a wide frying pan over medium heat and add a layer of sesame seeds. (If you only have raw almonds, you may wish to chop them up and toast them with the seeds.) Toast, shaking occasionally, for about five minutes, or until your seeds turn just slightly golden brown and start smelling delicious. Watch carefully so they don't burn! When done, tip your seeds into a bowl and set them aside.

Put your pan back over the heat. Add your maple syrup and honey and cook, swirling occasionally to mix, until all your sugar is hot and bubbling. Add in a sprinkle of cayenne pepper, a handful or two of chopped almonds, a pat of butter (if you want butter), and your toasted sesame seeds. Swirl the pan to mix everything together, stirring sparingly with something heatproof as needed. Reduce the heat and let the caramel bubble away gently while you finish up making your popcorn.

When both caramel and popcorn are done, put your popcorn in a large bowl. Pour the caramel over it in two or three batches, stirring between each addition. Spread the resulting caramel corn on a sheet of parchment paper or a silicone mat to cool. (If you want to make popcorn balls, incidentally, now is the time--just make sure to butter your hands first.) For an extra sweet-salty crunch, you may want to sprinkle a bit of salt over the hot corn too.

Spicy caramel corn with maple, almond, and sesame

Give your corn a few minutes to solidify before you attack it. We don't even bother putting ours into a serving bowl, but eat it right off the paper. If you want a little more stability, just put the whole thing on a cookie sheet or cutting board. Voila!

What are your favorite emergency snacks--or emergency desserts--or emergency snack-dessert hybrids?


04 March 2013

Cashew cheese and carrot

Farmer's market yellow heirloom carrot with oregano-shallot cashew cheese and cracked black pepper

Cashew cheese has definitely been on my mind of late. What's not to love about a rich nut puree blended with herbs and vegetables? (Unless you have a cashew allergy, of course.) I decided to take advantage of our giant bush of oregano--the only non-citrus plant that is actually producing right now--and make a batch of cashew cheese with oregano and shallot. Perfect.

At first, I wanted to eat my cashew cheese in rolls, like I did with my raw zucchini rolls this past summer. I decided to use a beautiful yellow carrot instead of the totally out-of-season zucchini. Of course, carrot is quite a bit harder, and I found that my vegetable peeler only wanted to make the thinnest and most breakable of strips. So instead of making rolls, I cut thin slices of carrot and put cashew cheese on top of each. Maybe it's not quite as pretty a presentation (although I honestly find that arguable, with that brilliant yellow carrot color), but it's just as delicious.

I'm having a hard time naming this. Raw carrot and cashew cheese nibblers? Cashew cheese with oregano and shallot atop shaved carrots? Farmer's market yellow heirloom carrot with oregano-shallot cashew cheese and cracked black pepper? Sure, why not?

Farmer's market yellow heirloom carrot with oregano-shallot cashew cheese and cracked black pepper

Farmer's market yellow heirloom carrot with oregano-shallot cashew cheese and cracked black pepper

1 cup cashews, soaked 1 hour or more & drained
leaves from four or five sprigs of fresh oregano
1/4 a large shallot or 1/2 a small one, chopped
1/4 tsp white miso, optional
1/4+ cups water
salt & pepper
a large carrot of your choosing
more fresh oregano and pepper to garnish

First, make the cashew cheese. Combine your cashews, oregano leaves, shallot, miso, water, and a mild sprinkling of salt and pepper in a food processor or blender. Pulse, scraping as needed, until the mixture is thick and well blended, adding a trickle more water if needed. As always, you should use a food processor for this if you have one. I used our blender, which was actually less frustrating than usual. Remove the finished cashew cheese to a container of your choice.

Scrub and peel your carrot. Slice it on the diagonal into oblong disks. Top each piece of carrot with a spoonful of cashew cheese, and garnish with cracked black pepper and an oregano leaf or two. Repeat until you have as many bites of carrot and cashew cheese as you like. Refrigerate any leftover cashew cheese in a sealed container and use it within a week.

Farmer's market yellow heirloom carrot with oregano-shallot cashew cheese and cracked black pepper

These guys would make an amazing plate of hors d'ouvres for a party. Little delicious bites of finger food full of vegetables, nuts, and herbs? They'd certainly give the standard crudites a run for their money.

Hooray! Snacks for all!