
Showing posts with label sauces. Show all posts
19 June 2014
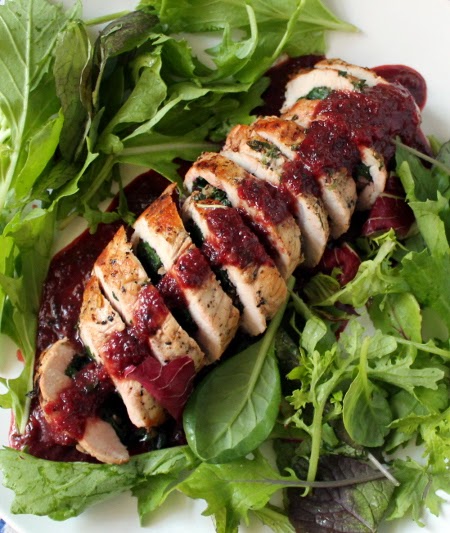
Pork roulade with beet greens and plum-thyme sauce
When you have a backyard full of plums -- especially if you're just not that into jam -- you really have to get creative about using them. So we decided to get fancy. How about a savory plum sauce?
We could have gone for the classic Chinese plum sauce with spring rolls, but we also had a bunch of fresh thyme and that beautiful CSA honey kicking around. So a more French-inspired sauce seemed in order. And what could we serve with this kind of sauce? The obvious answer is pork. How about a roulade?
So. We're essentially going to butterfly a pork chop per person, make a filling of greens and nuts, stuff the chop, and sear until done. Then we'll simmer pureed plums and seasonings to make a sauce. The end result looks complicated, and is amazingly delicious, but it's really not very difficult to cook at all.
This recipe will make enough filling and sauce for two pork chops. Any extra greens are delicious as a side dish.
If you want to feed a crowd and use up a boatload of plums, you can also double the filling and sauce recipes and stuff an entire pork tenderloin. You'll just need to roast it in the oven for a bit after searing, since such a large piece of meat won't cook through with just a sear. And OH MAN would that crowd be impressed when you served it. I'm just saying.
If you don't eat meat, you can still try out the greens and sauce! Cook them both (minus meat juices, of course), roast some potatoes, sear a piece of tofu, and you're all set for a delicious dinner. And I have one more vegetarian-appropriate sauce application to come later this week. Stay tuned!
Pork roulade with beet greens and plum-thyme sauce
Filling:
butter/olive oil
4 cloves garlic
1 bunch beet greens
double handful almonds, raw or roasted
salt & pepper
Roulade:
1 deboned, trimmed pork chop per person OR split it between two less meaty eaters
more salt & pepper
4-6 sprigs fresh thyme per chop
meat mallet or rolling pin
cooking twine or tinfoil to tie
Plum sauce:
butter/olive oil
~ 1 cup chopped fresh plums
1/2 cup water
leaves of 4 sprigs fresh thyme
1 tbsp honey, to taste
2 tbsp dry white wine
yet more salt & pepper
Start by making the roulade filling. Melt a pat of butter in a wide saute pan while you crush and slice a few garlic cloves. Add the garlic to the pan and cook for 2-3 minutes, or until it begins to turn golden.
Wash and chop a bunch of beet greens. You can also sub in chard or spinach here if you prefer (though spinach will cook down more, so you'll need two bunches if you go that direction).
Add the greens to the pan and season with salt and pepper. Cook, stirring occasionally, for about five minutes, or until the greens are wilted. Chop your almonds and add them to the greens. Mix it together, and your filling is done.
Now is the time to start heating your meat pan. Just put a sufficiently large stainless steel or cast iron pan over medium-high heat and let it warm up while you're prepping your meat. A hot pan will ensure a good sear.
Butterfly your pork chops. You can check out this video for a visual. First, put your chop on a cutting board. Using a very sharp knife, cut gradually in from the side opposite the fat cap, dividing the meat in half horizontally as best you can. If you make a mistake and cut through to the board, it's ok! Just back up and make a correct cut over the mistake. You won't even notice any mistakes once you're done. Cut 4/5 of the way through the chop, leaving it connected at the end. Then open it up like a book. Voila! You just butterflied a pork chop.
Lay your butterflied chop flat and cover with a piece of plastic wrap or butcher paper. Use a meat mallet or rolling pin to pound it to an even 1/2-inch thickness.
To stuff your chop, season it liberally with salt and pepper and arrange it nicest side down. Put several spoonfuls of filling down the middle of the chop. You want to use just enough filling to let the meat wrap completely around it; mine is a little overfull here.
Roll up your chop and secure it with butcher twine or a few strips of tinfoil. I used a classic butcher's truss (video), but it's totally fine to improvise. Tuck your sprigs of thyme under the twine in several different spots around the chop.
Sear your roulades quickly on all sides in the prepared pan. It should take about three minutes per side to get a nice golden brown crust. If the roulade sticks, your pan may not be hot enough, or the meat may not be completely seared yet. Turn up the heat or try a few good shakes to release the meat from the pan.
When your roulades are seared, remove them from the pan to a plate and let them rest, covered loosely with foil, for a good five to seven minutes. Resting meat is super important! It will give the hot juices time to reabsorb into the meat, making for a juicy and evenly cooked roulade.
While you're waiting, it's time to make the sauce. Wash and chop your plums. Put them in a blender with the water and liquefy as best you can. There will be bits of plum peel floating around; that's ok.
Pour the liquefied plums into the same pan you used for the roulade and cook over medium-high, stirring to deglaze the crystallized meat juices. You can also add any accumulated juices from the meat plate. Add the thyme, honey, and white wine, season with a scant pinch of salt and a few grinds of pepper, and cook, stirring frequently, for about five minutes, or until the sauce is thickened and reduced to approximately half its volume. Correct the seasonings, and your sauce is done. Hooray!
It's time to serve! Remove the butcher twine and thyme sprigs and slice your roulades into six or eight medallions each. Arrange them on a plate (on extra greens if you have any, or in a puddle of sauce if not) and ladle a few spoonfuls of sauce over the top. Four slices is a perfectly adequate serving, especially with some mashed potatoes and salad on the side; an entire roulade is a huge but very satisfying serving. It's all good.
Now serve it to your amazed guests. Or, you know, yourself.
This is hands down one of the best dinners we've made in months.
PS: Want more roulades? How about a venison roulade?
17 February 2014
Zürcher geschnetzeltes with chicken
I had never heard of Zürcher geschnetzeltes until last week, when someone mentioned it randomly on ravelry. The translation is just "sliced meat Zurich style." That's not very descriptive, so it's a good thing the reality is much more enticing: a rich and fragrant dish of sliced veal and mushrooms in a white wine and cream sauce. SUPER EXCITING. This clearly needed to happen, if only so I could pretend that it's actually winter here in drought-ridden California.
There was just one catch. Our usual grocery store didn't have any veal--and honestly there isn't a lot of red meat happening at our house anyway. So I decided to make this with chicken.
Yes, chicken, arguably the most boring of all meats! And yet, I like chicken, and I thought it would be excellent in a white wine and cream sauce with mushrooms and sage. What better way to avert the biggest problem with chicken--dryness--than to smother it in sauce? With some attention to size and cooking time, it worked out very well.
I made the mistake of not thinking about what I was going to serve this with until it was entirely finished and ready to go. Evidently the traditional Swiss accompaniment is rösti, which would be pretty amazing. A steaming spoonful of egg noodles or hot mashed potatoes would also work well. But I ate mine all by itself, with a little bread to sop up the copious sauce left on the plate, and was still well content.
Since I'm the only meat-eater in the house, I just made enough for me, but you can double or triple at your leisure.
Zürcher geschnetzeltes with chicken
Adapted from traditional Zürcher geschnetzeltes.
1/2 lb chicken, skinned (about 1 chicken breast or 2 thighs)
flour to coat
butter AND olive oil
1/2 yellow onion
2 garlic cloves
10 sage leaves
12-14 large button or brown mushrooms
1/2-2/3 cup of dry white wine (enough to deglaze)
2/3 cup cream
salt, pepper, paprika
Start by slicing a chicken breast (or whatever cut you like--deboned thighs would certainly be easier to keep moist here!) into pieces about 3/4-inch thick. Toss to coat in a couple tablespoons of flour, tapping off any excess.
Heat a wide, heavy-bottomed saute pan on high. Add a pat of butter and a small slug of olive oil. When the butter foams, add your chicken pieces in one layer. Sear quickly for about three to five minutes per side. While you're waiting, cut your onion into thin half-moons and your garlic into slices. Slice your sage leaves into thin strips, reserving a few leaves for garnish.
When your chicken has a beautiful golden-brown crust on both sides, remove to a plate. Don't worry about the meat being fully cooked at this point! You just want a nice sear.
Turn the heat down a touch, add another bit of butter and olive oil to your pan, and throw in your onion, garlic, and sage. Saute for about five minutes, or until the onion has begun to soften.
Cut your mushrooms into wide slices and add them to the pan with a pinch of salt. Cook, stirring occasionally, for about five minutes. Then add your wine to the pan, stirring to deglaze. Finally, add your pieces of chicken and their juices, as well as some salt, pepper, and paprika.
Mix everything together and cook until your chicken is done, being careful not to overcook. Mine was ready in about five minutes, but the timing is going to depend on exactly how big your pieces are. Cut a thick piece in half to check.
At the last minute, add your cream to the pan. Stir together and cook for another minute, or until warmed through and just beginning to bubble.
Voila! A beautiful dish of tender chicken and mushrooms in a savory cream sauce! Serve over the noodle, potato, or grain of your choice, or just fill up a bowl and eat it by itself.
You clearly want a green vegetable of some type on the side if you can possibly swing it. My first choice would be a big pile of simple steamed spinach with butter and salt. I wouldn't say no to a big spoonful of baby peas, either. And a big crispy salad is always a nice contrast. It's all good--just get something green in your face.
This was rich enough that I couldn't eat it all at once, and thus I can report that it's also excellent eaten cold out of the fridge the next morning. Hooray, leftovers for breakfast!
What thick, hearty stovetop dinners are warming you up this winter?
10 January 2014
Lamb burgers with yogurt and dijon mustard sauce
Well. The beginning of 2014 has turned out to be unexpectedly challenging so far. I for one am feeling pretty tired and ready for some serious comfort food. It's time for burgers.
At our house, burgers are usually Jenna of good good things' BBQ pinto bean burgers. You should absolutely give these a try, if you haven't already. SO GOOD. I made up a huge batch to freeze several months ago, and was that ever a good idea. The only problem was that we ate them all, and I haven't made up another batch yet.
So this time, exhausted and in need of immediate protein infusion, I went for a lamb burger.
Lamb is absolutely my burger meat of choice. Beef has that tallowy mouthfeel; pork is too much fat all at once; chicken is boring and easy to overcook. Lamb, in contrast, is delicious and strong, juicy and intense, and it matches super well with all the seasonings I like best (read: practically all of them). Ginger and lemongrass, soy sauce with hot chili pepper and garlic, feta and artichoke, bell pepper and onion piperade--any combination is delicious.
I grabbed a red onion and a bell pepper, ripped up a piece of bread, and went to work. Burgers!
For garnish, I decided to make up a micro-batch of a really easy, really delicious sauce. It's the easiest thing on the planet: plain yogurt with dijon mustard. This stuff is the best possible idea as long as you like both yogurt and mustard. Mixing them together creates a spicy, tangy sauce that is far more than the sum of its parts, and takes literally seconds to make. Perfect.
The mighty lamb burger
1/4 of a red onion
1/4 of a red bell pepper
1/2-2/3 cup breadcrumbs
1/2 lb ground lamb
salt, pepper
Start by chopping your vegetables as finely as possible. Finer bits will adhere better to the finished burgers. You can, as mentioned, add more things to your lamb burgers. Some garlic would be nice, as would a big handful of fresh parsley, but this time I kept it simple.
If you don't have any breadcrumbs around, chop up a piece of bread too. No problem! Also no trips to the store to buy something as cheap and easy to make as breadcrumbs.
Note that breadcrumbs are mandatory in a good burger. They keep it moist and tender, eliminating the "solid meat hockey puck" issue. Do not make these without breadcrumbs.
Mix everything together in a big bowl with your hands. Yeah!!
Form the meat mixture into reasonable burger-sized patties. I made three from this amount, but you could definitely make four slightly smaller patties if you wanted to. Freeze any burgers you don't want to cook immediately with a square of parchment paper in between them. Then you can just defrost and cook them in times of future burger emergency.
Fry your lamb burgers over high heat for about four minutes on the first side. Flip, reduce the heat, cover, and continue to cook on medium to medium-low for another four or so minutes. The time is going to depend on how hot your stove runs, so check for doneness and cook longer if necessary. Just imagine you're making a grilled cheese sandwich and you should be good.
Serve on a delightful toasted bun with the condiments, cheese, and vegetables of your choice. I used the aforementioned yogurt and mustard sauce plus a whole lot of crispy romaine lettuce. Fries are not mandatory, but they're certainly recommended.
Yogurt and dijon mustard sauce
plain full-fat yogurt
dijon mustard (or probably any good spicy mustard)
This is the easiest sauce ever. Simply mix together roughly equal amounts of yogurt and mustard until smooth. Taste and decide whether you want to spice it up with more mustard or tang it up with more yogurt.
Serve on a lamb burger, as a dipping sauce for fries, or use to garnish cooked vegetables. I tried this with roasted carrot, and it was excellent. Steamed broccoli is on the to-try list as well.
Together, these guys made a plate of comfort food at its finest. What hearty dishes are you cooking in the depths of winter?
Labels:
condiments,
dairy,
easy,
fast,
meat,
recipes,
sandwiches,
sauces
01 October 2013
Clean-out-the-fridge pasta with super secret cream cheese
It's almost fall! Even here in CA the weather is beginning to actually turn. The high today was only 72F! I know this seems like nothing to those of you who live in, say, Wisconsin, but when it's ALL SUN 79F FOREVER, you get to appreciate even the smallest shifts in temperature. I can wear long sleeves! I can wear long sleeves AND a jacket! Oh man. It's the greatest.
But guess what? We aren't going to be spending October, jewel of fall, in California. We're going to Portland for the month.
You know what that means. ACTUAL WEATHER.
For once it's going to be actually cool and grey enough on my birthday. It's going to rain. I'm going to wear not only a jacket, but a waterproof one with a hood and sleeves. There will be real in-season pumpkin and apples and pears, and I'll go to the coffeeshop with my laptop (I am still working the whole month, of course) and do my writing or marketing or consulting with a cup of hot cider and a furled umbrella on the floor next to me.
But in the meantime, we've been trying to eat everything in the fridge. So the other day I grabbed some tomatoes from the pile still on the kitchen windowsill. A rifle through the crisper revealed some wilting hot red peppers, a scraggly handful of parsley, a lonely carrot, and half a zucchini. There's always pasta in the cabinet. And what did I spy in the drawer? A quarter of a package of cream cheese! Perfect.
Adding cream cheese to a basic tomato and veg pasta sauce is one of my favorite tricks ever for quick creamy goodness. So fast! So easy! No making a roux or hoarding half a pint of heavy cream! It's just a couple big spoonfuls of soft cheese, dissolving beautifully to turn the tomato sauce a glorious salmon pink. NOM.
Clean-out-the-fridge pasta with super secret cream cheese
pasta (we used rigatoni)
olive oil
onion
garlic
hot peppers, red or otherwise
carrot
tomato
zucchini
oregano, basil, marjoram
salt, pepper
cream cheese/neufchatel/sub of choice
parsley to garnish
Put a pot of water on to boil for the pasta and cook it at an appropriate moment.
In a large saute pan, warm a slug of olive oil. Toss in some chopped onion, stir, and cook to soften while you smash and mince your garlic, finely chop as many hot peppers as you like and scrub and shred a carrot. When the onion has started to turn a bit glassy, toss your garlic, peppers, and carrot into the pan. Season with oregano, basil, marjoram if you want some, and a couple good pinches of salt. Then stir the whole shebang together and cook.
If you still have fresh summer tomatoes, now is the time to cook them and eat them. Core them, chop them up, and add them to the pan when your onions are fully softened. You can also use tomato puree or sauce if tomato season is over at your house; it's all good. Stir everything up, add a touch more salt, and cook those tomatoes down.
While you're waiting, slice up some zucchini. When your tomato has reduced sufficiently, add your zucchini. Cook for maybe another five minutes, or until your zucchini is tender and any extraneous juices have evaporated. Correct the seasonings and you're almost done.
Take the pan off the heat and add as much cream cheese or reasonable substitute as you like, cut into chunks. Bury the bits in the hot sauce and leave them for a minute, so they melt, before you stir to mix. If you happen to have some other creamy and easily meltable cheese around--goat cheese, for example--you can use that instead. Or use both! ALL DAIRY ALL THE TIME.
Drain your finished pasta and add it to the sauce. Stir everything together and serve, scattered with bits of parsley.
Eat it all with health and vigor, and a green salad on the side. Hooray! We have delicious food, and the refrigerator is that much closer to cleaned out!
Now the real question is: who wants to meet up in Portland?
Labels:
cheap,
dairy,
easy,
fast,
pasta,
potentially vegan,
recipes,
sauces,
vegetables,
vegetarian
12 February 2013
Cilantro tzatziki
I have a new obsession and its name is tzatziki. Cucumbers! Yogurt! Garlic! YES.
I had yogurt sauces on the brain after the chole palak incident the other day. Sure, yogurt on curry is good--but wouldn't a sauce full of garlic and herbs be better? So when I found Erin's recipe for tzatziki at The Speckled Palate, I nearly ran straight to the store for cucumbers and herbs.
Tzatziki is usually made with dill. However, I had a big bunch of cilantro hanging around, so I decided to sub that in and see how it went. This was a very good idea, especially because all the dill I had was dried. If you love cilantro, give it a try! Of course, if you hate cilantro, the classic version with fresh dill is classic for a reason.
Let's talk for a minute about different dairy options. The original recipe called for half Greek yogurt and half sour cream. Honestly, I tend to use either plain runny yogurt or thick labneh for all my tart dairy needs, and frequently make my own labneh from the yogurt so as not to let multiple containers go bad on me. Making labneh is easy; all you have to do is drain plain full-fat yogurt in a fine-mesh sieve. I use a couple of little nylon sieves I found at Goodwill ages ago. However, if you want to use Greek yogurt and sour cream, go right ahead. Just know that I got amazing results using plain runny yogurt and home-drained labneh.
Cilantro tzatziki
a cucumber or two
1-2 cloves garlic
a big handful of fresh cilantro
3/4 cup plain yogurt
3/4 cup sour cream or labneh
1 tbsp white vinegar
2 tbsp olive oil
salt & pepper to taste
Finely chop your cucumber. I'd recommend staying away from the waxed bulbous supermarket monstrosities in favor of thin-skinned Armenian, English, or Asian varieties. I used one big English cucumber; if your cucumbers are smaller, use two or three.
To leach some juice from your chopped cucumber, toss it with a little salt and let is sit in a sieve for at least ten or fifteen minutes. This will ensure that your tzatziki stays thick and delightful instead of getting runny from extra water content.
Finely mince a clove or two of garlic; pick and chop a big handful of cilantro leaves. In a large bowl, mix them with your dairy products, salt, pepper, olive oil, and vinegar.
After your cucumber has drained a bit, add it to the bowl and mix again. Voila! You now have a beautiful batch of chunky tzatziki.
What can you do with tzatziki? I threw several big spoonfuls of mine over poached salmon on a bed of spinach salad, which was delightful, but there are clearly a million other alternatives. With lamb kofte! With lentil kofte! Over falafel sandwiches! On a giant salad! With french fries! (I REALLY want to throw some of this batch in the blender to smooth it out and then use it on all the fries in the land. That may happen soon.) Otherwise, I've mostly been eating it in big spoonfuls on pieces of sourdough toast, for crunchy, garlicky, vegetable-packed results that are well worth the miniscule effort.
If you do want to poach some salmon or other fish to have as a full dinner-sized excuse for eating all the tzatziki, here you go:
Poached salmon
salmon filet
water
bay leaf
If you want to remove your salmon skin, do that first. Otherwise, just put your salmon in a high-sided pan and cover with water. Add a bay leaf. Bring the whole business to a boil, and then reduce the heat to a gentle simmer. Cook until the salmon is opaque and can just flake at the touch of a fork. This should take somewhere in the neighborhood of five minutes, depending on the thickness of your filet. Drain your salmon and eat it with tzatziki and spinach salad (or, you know, salt, pepper, & lemon).
And because it's just about Valentine's Day, be sure to share your garlic breath with the one you love! SO ROMANTIC.
24 August 2012
Tempeh reuben!
I still have a good chunk of my crock of sauerkraut hanging out in the refrigerator, so today I thought I'd bust it out and make myself a tempeh reuben.
I don't think I've ever eaten a reuben sandwich I liked before! Clearly fresh sauerkraut makes all the difference. Homemade Russian dressing helps too. Also a delicious tempeh marinade. Also a pickle on the side.
I based my reuben on The V Word's tempeh reuben recipe, complete with homemade dressing. Yay!
Tempeh reuben
Tempeh reubens are pretty easy to make. Here's the general game plan:
1. Marinate tempeh.
2. Sear tempeh.
3. Make dressing.
4. Toast bread.
5. Assemble delightful sandwich.
6. Eat.
I marinated my tempeh in a mix of olive oil, apple cider vinegar, dijon mustard, sriracha sauce, crushed garlic, liquid smoke, and vegetable broth, with a bay leaf thrown in for good measure. You can play with the proportions to see what you like. Be careful with both the soy sauce and liquid smoke--too much of either can be a disaster. Just start slowly and things should be fine.
Cut your tempeh into appropriate sandwichy slabs and marinate it for at least an hour before cooking.
When you're ready to cook, put a frying pan over medium-high heat and add in your tempeh. Sear on both sides, adjusting the heat as needed. I like to add a ladleful of my marinade most of the way through cooking, so the tempeh can absorb even more flavor.
While you're standing around, make your dressing. I followed the exact method from the link, although I did use the non-vegan versions of the ingredients. It turns out that mayo spiked with ketchup, worcestershire sauce, sriracha, and horseradish is pretty good! Who would have thought? (Probably a lot of people who like mayo more than I do.)
When your tempeh is closing in on done, toast yourself some rye bread.
It's time to assemble! Spread your toasted bread with as much dressing as you desire. Add tempeh and sauerkraut. Sandwich everything together, making a marginal attempt to keep all the ingredients from falling all over the place.
Now eat it.
The sauerkraut and sauce are really the highlight of this sandwich. Every time I got a kick of spicy horseradish or tangy kraut, I wanted more. I could have put three times the amount of sauerkraut on this sandwich, and that would have made it three times as good. I'm very happy I followed my instinct to slosh on about twice as much sauce as I would on any other sandwich.
The reuben is substantially different from most sandwiches I eat on a regular basis. Most sandwiches I eat have no mayo anywhere near them, unless they happen to be egg salad sandwiches. Most sandwiches I eat are filled with fresh vegetables instead of fermented. Most sandwiches I eat don't make me want to have an additional bowl of sauerkraut with horseradish sauce for dessert.
So it took me a minute to really get into this sandwich, but once I did, I liked it quite a bit.
Hooray for palate expansion!
18 April 2012
Eggs Jeannette with sugar snap pea and radish salad
We've been watching Jacques Pepin's newest PBS show for the past few months, getting more and more excited about making all the delicious things.
Jacques Pepin is far more worth watching than practically any other chef currently on the air. He is very clearly invested in not just cooking, but teaching people how to cook. His food is simple and changes with what he has on hand, and he lets his audience know that that's fine. In fact, that's one of his signature lines. The whole message is that food and cooking should not be this overly hyped, worrisome, and fetishized thing, with methods requiring such terms as "best" and "perfect," but a normal, joyful activity you do every day with your family. Damn straight.
So for dinner I made Eggs Jeannette. These are more or less a variation on deviled eggs: hard-boiled eggs stuffed with a yolk-based mixture. However, the comparison fades when you whack all the stuffed eggs into a pan of hot oil and sear them off until the filling has turned brown. You finish by enveloping the eggs in a rich dijon and egg yolk vinaigrette.
I made these pretty much as-is from the show tie-in cookbook, Essential Pepin. The main thing I changed was to use yogurt instead of milk to thin and enrich the filling (see the aforementioned problem with milk dying a swift and glorious death in our refrigerator).
Eggs Jeannette
4 eggs
plain yogurt or milk
a couple garlic cloves
parsley
salt, pepper
dijon mustard
red wine vinegar
water
olive oil
chives or parsley for garnish
Start by hard-boiling four eggs. We thought this was plenty for the two of us as a main course; you can clearly make more if you want to. It's also fine to boil the eggs a day or two in advance. They're just hard-boiled eggs. What's the worst that could happen?
Everyone has their own method of hard-boiling eggs. Mine goes like this: put your eggs in an adequate saucepan and cover with cold water. Bring the whole business to a boil. When the water boils, reduce the heat to a fast simmer (lid on) and start timing. Cook for eight minutes before immediately removing the pan from the heat. Pour out the hot water and run the entire pan under cold water--outside as well as inside--to stop any residual heat conduction and entirely halt the cooking process. Then fill the pan--eggs still inside--2/3 with cold water, add a couple handfuls of ice cubes, and let the eggs cool. This produces perfectly done hard-boiled eggs, with a beautifully set white and a yolk with a bare dimple of dampness at the center, every time.
To assemble the eggs, cut each one in half and gently remove the hardened yolks, being careful not to rip the whites. Mix the yolks with chopped parsley, finely minced garlic, and salt and pepper to taste, as well as a tablespoon or two of yogurt or milk. You can totally play this by ear with no problem. If you want to chop and add other vegetables to the yolk mix, that's obviously a good idea--I might try finely chopped mushrooms or spinach in the future.
Fill each egg half with a spoonful of yolk mixture, leveled off so it's flush with the white, and set aside. You should have a couple spoonfuls of yolk mixture left over. Using a fork, mix this with a spoonful of dijon mustard, another spoonful of red wine vinegar, salt and pepper to taste, a little water, and about 1/4 cup olive oil to make a creamy egg-based vinaigrette.
Heat a frying pan on medium-high and swiftly sear your eggs in a little oil, flat side down, until the yolk mixture has just turned golden brown around the edges. This should take maybe two minutes, depending on your stove. Deposit eggs on plates, add a generous amount of dressing--a traditional French chef would "nap" the eggs by serving them cut side down and totally covering them with sauce--and garnish as desired. Voila!
Obviously, a dish of eggs with an egg-based vinaigrette requires a highly contrasting fresh vegetable of some kind. I had some of the first sugar snap peas of the year plus a bunch of radishes. Clearly it was time for a raw pea and radish salad.
Sugar snap pea and radish salad
sugar snap peas
radishes
lemon zest and juice
red wine vinegar
chives
salt, pepper
olive oil
Wash your peas and radishes. The proportion here is up to you; I used about two or three times the volume of peas as radishes.
To prep the peas, snap the stem ends and pull them down across the shorter side of the pod to string. This lets you avoid any stringy fibrous business in your teeth later on. Then cut the pea pods into two or three reasonably sized pieces. Top and tail your radishes and cut them into the thinnest possible slices. If you want to add any other vegetables, go ahead and wash and chop them too. Put all your vegetables into a reasonably sized bowl.
Next, make your dressing. I just mixed up a standard red wine vinaigrette with fresh lemon juice and zest. So. Start by peeling a strip or two of zest off a quarter of a lemon and cutting it into thin julienne. Then, in a small bowl or measuring cup, mix the lemon's juice and its zest, a teaspoon of red wine vinegar, several good grinds of salt and pepper, and a handful of chopped chives. Add about 1/4 cup of olive oil in a thin stream while mixing the whole business with your fork. Taste and correct any seasonings.
Toss your vegetables with as much dressing as you like, and serve.
While we just ate our salad as-is, it would be really great on a bed of greens. In fact, everything in this meal would be great on a bed of greens. Spinach, arugula, or a mesclun mix would all be good combinations.
Note the multiple vinaigrettes in one meal. This may seem ridiculous on first glance, but we didn't think so. In fact, since the two dressings were so different--one heavy, mustardy, and eggy, and the other light and lemony--they actually balanced each other out pretty well. Of course, the massive amount of fresh raw vegetables didn't hurt either.
06 October 2009
02 October 2009
Greenest dinner in the land
The basil wasn't the only thing in the box, though: we also got a huge bunch of kale. So we decided to make it into pesto too. This isn't as strange an idea as it might appear--several alternative-green pestos are floating around the blogs this season. I hadn't seen any with kale, though. An experiment was clearly in order.
We tossed our classic pesto with cooked gnocchi, but saved the kale pesto in the refrigerator. This results in a lavish use of pesto on the slightest of impulse.
olive oil
garlic
fresh basil
salt, pepper
In this instance, we reduced pesto down to its most necessary ingredients. That meant we eliminated both grating cheese and pine nuts, resulting in the most basily, garlicky pesto in the land.
Warm a couple spoonfuls of olive oil in a saute pan. It's best to go light on the olive oil here; you can always add more at the puree stage if needed.
Peel and coarsely chop a bunch of garlic. You can use as much garlic as you like; we used a little more than a full head. I'm serious. Garlic is so great.
Cook the garlic slowly in the olive oil, stirring occasionally, until it is soft and you can smell the fumes all the way outside in the stairwell. This should take maybe 5-10 minutes, depending on heat level. In the meantime, wash a bunch of basil and rip it all off its stems.
Now all you have to do is mix, season, and puree. Put your garlic, oil, and basil in a food processor or appropriate container, salt and pepper it, and puree to your desired consistency. We used the immersion blender, which was entirely acceptable.
Now eat it! Toss with gnocchi or pasta, put a spoonful in your soup, spread it on a roasted red pepper sandwich. We clearly had gnocchi. Pesto gnocchi can stand either plain or with some grated cheese, but demands lots of crispy toast to mop up the extra sauce. It was the greatest.
olive oil
garlic
kale
salt, pepper
Follow almost exactly the same process as for classic pesto. The only difference: since kale is a heavy winter green, you're going to need to blanch it for about five minutes, then drain it. After that you can proceed to puree.
This batch tasted almost identical to our basil batch, probably in part because we pureed it in the same container. However, even without the basil, what you'll get is a beautiful greens and garlic slurry that is more or less interchangeable.
I used about 2/3 of a bunch of kale for this batch; it filled a large pickle jar. Yay, pesto in the refrigerator! This means I have developed a new favorite breakfast: pesto toast.
Pesto toast
Spread pesto on a slice of sourdough or other good bread. Add a layer of chopped tomatoes (or leave plain), then cover with grated parmesan or romano cheese. Toast in the toaster oven until the cheese is melted and beginning to turn golden. Eat it and feel satisfied with your life.
We also had a bunch of extra kale, so we decided to make it into kale chips for maximum green effect.
Kale chips
Wash, destem, and chop whatever kale you haven't turned into pesto. Toss it with a little olive oil and salt, then arrange the pieces in one layer on a rack. Set the rack on a cookie sheet and bake at 225F for about twenty minutes, or until your kale is crisp. This works best with a rounder-leafed variety of kale, to eliminate any prickly bits, but we used a more ruffled kale and it turned out fine.
Now sit down to eat the greenest dinner on the planet.
Labels:
easy,
fast,
pasta,
sauces,
vegan,
vegetables,
vegetarian
11 December 2008
What to do with the rest of the cabbage
It was especially good because I made the cream sauce with smoked gouda. There is nothing like smoked cheese for making an entire dish of gratin, dauphinoise, or just pasta taste like it's spent a week inhaling a pan of wet hickory. Oh yes.
This requires a couple more dishes than some food, but I think it's worth it.
Baked mac and gouda with greens.
milk or cream
butter
flour
garlic, shallot
salt, pepper
maybe some cayenne
smoked gouda and/or other cheese
winter greens: cabbage, kale, mustard greens, etc.
chunky pasta
We're going to make cream sauce and pasta, then layer the sauced pasta with greens and bake it. Obviously, if you have some other cheese/vegan/etc sauce you want to use, it should be fine here.
Pasta: boil and drain pasta at a logical point in the sauce proceedings. I used penne; most chunky pasta should work fine.
Sauce: melt a chunk of butter in a deep, whiskable saucepan. I think we were actually out of butter at this point, so I subbed olive oil, proving that it is in fact possible to make white sauce (i.e. bechamel. yes! YOU WIN.) with olive oil.
I wanted some garlic and shallot, so I decided to cook them in the oil, then make the sauce on top of it. I just threw them into the pan to soften in the oil. It's definitely possible to do this with butter too, but it's slightly difficult to keep it from browning before you add the flour; use pretty low heat if you do this. You can also soften the garlic/etc in another small pan, then add it to the sauce later. If you like cayenne in your mac and cheese, add it to cook with the garlic and shallot.
When the garlic and shallot have softened, and/or the butter is melted, add about the same amount of flour as butter/oil. I used wheat flour and just took it in handfuls out of the bag. Whisk over medium heat for three or four minutes, blending the four and butter thoroughly. When they begin to turn golden and look toasty, add your milk. I never measure when I do this, seriously, but I used something like two cups of skim milk. You can use any kind of milk. Skim milk is the hardest to thicken; whole milk is the easiest if you don't want to shell out for cream.
Whisk fairly regularly as the milk warms up. After a bit, it should start to thicken. The timing here depends almost entirely on the fat content of your milk: the less fat it has, the longer thickening will take. Occasionally I find that skim milk doesn't want to thicken much at all. If this happens, don't worry too much: when you add the cheese, it always provides enough fat to get the sauce stable.
Grate a bunch of smoked gouda. I had about a three inch square piece, which was fine. The flavor of smoked cheese is generally pretty strong, so you can escape with using less. Or you can mix it with different bits of cheese you have left over in the refrigerator. I added some sharp cheddar so we'd have enough cheese for crispy bits on top.
Add your grated cheese gradually to the sauce (or just grate it intermittently into the pot), whisking after every round. Leave a couple handfuls aside for the aforementioned crispy bits. Pepper the sauce vigorously. It's done.
Assembly: preheat the oven to 350F. Dump your drained pasta into the sauce pan and stir to mix, coating all the pieces with sauce. Wash and devein your dark greens. I used four or five savoy cabbage and two purple kale leaves; you can clearly use more if you want. Cut the greens into smallish squares, so you won't get awkward long pieces in the finished product.
Bake until the dish is hot through and golden brown on top. 15 minutes should do it.
Eat it. Ding ding ding! I find that mac and cheese likes red wine for some reason.
You are now tired and must go to bed.
Labels:
easy,
pasta,
recipes,
sauces,
soporific,
vegetables,
vegetarian
12 September 2008
Tabbouleh with dill tahini sauce
Ok, so I strongly wanted to use the Vcon dill-tahini sauce recipe for something. For one thing, dill is my favorite underused fresh herb. It makes egg salad totally perfect; it's what makes the Shaker soup my favorite soup from the 12 Months of Monastery Soups cookbook: tomato, sour cream, and a ton of dill. I don't even like salmon, let alone gravlax, but I love dill.
So I wanted to try this sauce. In the further interest of getting rid of everything in the kitchen, I went into the freezer and stared at all the bags and jars of grain.
Tabbouleh with dill tahini sauce
salad:
bulgur wheat
water
cucumber
tomatoes
sauce:
1/2 c tahini
1/2 c water or less for thicker sauce
a clove of garlic, smashed and minced
juice of a lemon
2 tbs olive oil
1 tps vinegar (they say balsamic; I had white wine)
1/2 tsp paprika
1/4 tsp salt
fresh dill and lots of it, chopped
Making bulgur wheat was pretty different than I expected. I used the Vcon method: steaming. All you do is rinse a cup of bulgur, put it in a pot, pour a cup and a half of boiling water over it, and clap on a lid. Then you wait. After ten minutes, the bulgur is cooked. I really didn't expect it to act so much like couscous: the actual food you can make with the hot tab of the water cooler at work. My batch of bulgur turned out a little watery, but I imagine if you are less lazy than me you can pour extra water off, or put the pan over low heat for a few minutes to let it evaporate.
While your bulgur is steaming, prep vegetables and make sauce. The vegetables are easy: chop tomatoes and cucumbers into bite-sized chunks. You can use any kind of tomato as long as it's fresh; I used cherry tomatoes, which I cut in halves. I also peeled my cucumber, since it was starting to get a little old and tough. In general, I would peel any gigantic waxed supermarket cucumbers, but leave others unpeeled. Use lots of vegetables for nice crunchy fresh salad.
Sauce: mix together all the sauce ingredients. I found this sauce to be a bit too watery for my tastes, especially with the wet bulgur, so I'd add less water next time, maybe 1/3 or even 1/4 cup. Use as much dill as you can stand to strip from a market bunch. Dill: it's awesome, and it's also the herb that makes this tabbouleh cohere, as opposed to the usual parsley. Put some effort in and use a lot. Pulse the business together with a food processor or stick blender if you are dissatisfied with its texture.
You can serve this a couple different ways. I prefer to mix all the ingredients up together, so the sauce can soak into the grain really well. You can also plate a serving of grain, strew vegetables over the top, and pour the sauce decoratively over everything. If you're feeling fancy, this is the way to go.
The leftover lunching was excellent.
01 August 2008
Another case of burly pasta
Here's one:
Pasta of ultimate burl part III: the reckoning
garlic
olive oil
artichoke hearts
chickpeas
red pepper
tvp
tomato puree/chunks/whatever
water/broth/dry vermouth
salt, pepper, paprika, oregano, basil
pasta (linguine)
Smash and peel a bunch of garlic, maybe six or eight cloves. Chop them up and throw them in a wide saute pan with some olive oil, stirring to get the oil distributed. Chop up a red pepper and add it as well, then let the business cook together slowly for maybe five minutes, or until it's softened. Then open, drain, and add a can of unmarinated artichoke hearts. I guess you can use the marinated kind if you really want; they would certainly be a stronger flavor here. You could also use frozen artichoke hearts if you have them. I don't think I've ever had frozen artichoke hearts, but it would be fine: just let them cook a little longer to get everything not just defrosted but actually cooking.
Stir the business up, letting anything that needs defrosting defrost, while you find the next thing: tomato puree. Add as much tomato as you want to the pan; I used half a 24-oz can. Probably you'd need more if you were using reducible tomatoes. Season with salt and pepper, plus some basil, oregano, and paprika or even cayenne. I only used a little of each, since things like artichoke hearts and red pepper have a fairly strong taste already. Add some tvp as well; I used probably 2/3 cup. Stir the business up, adding maybe a cup of water for a thinner consistency, and let everything cook together for at least ten minutes.
At this point, if you haven't cooked the pasta already, start it. The sauce can pretty much burble on indefinitely, as long as you add some extra water to evaporate off and keep things from burning. I used linguine, since that's what we had, but short, chunky pasta would be better.
When everything is done, drain the pasta and toss it with the sauce.
At this point you can sit down and eat, or you can add cheese, then sit down and eat. We had all kinds of cheese hanging around, all of which seemed like good choices. So I made three little test batches before I decided which one to use.
Parmesan: As long as you use actual quality parmesan you grate off the block, parmesan definitely wins.
Put it in a bowl and eat it.
Labels:
cheap,
easy,
fast,
pasta,
potentially vegan,
sauces,
vegetarian
14 May 2008
What looks like a mess, but a delicious mess?
These were accidentally millet And quinoa burgers because I forgot that I'd mixed them up in the same jar and never gotten back to separating them grain by grain. Gracious me, how could such a thing occur? So I thought I was making just lentil and millet burgers until I opened the pot of grain and saw all the little curly businesses curling about.
This also means that I didn't rinse the quinoa, since I wasn't aware I was using it. This did not appear to make a difference. I imagine that's because I was amalgamating the grain so entirely with lentil and spice and etc. If you make quinoa to eat by itself, the result is probably as bitter as you continually hear.
Lentil millet quinoa burgers of delicious doom
cup of dried lentils
cup of mixed quinoa/millet
water
a yellow onion
olive oil
a hot pepper (serrano)
paprika, cayenne, oregano, basil, marjoram, sage, thyme
fresh parsley
salt and pepper
I started by soaking my lentils for a couple hours, but you don't really need to if you don't mind longer cooking time. Cover them in at least twice their amount of water, more if unsoaked. Bring to a boil; cover; simmer until tender. I used green lentils, but whatever should be fine. Keep in mind that red lentils will disintegrate, though, and add appropriate water accordingly.
At the same time, cover a cup of grain in twice its amount of water. Bring to a boil; cover; simmer until tender. Since I mixed things accidentally, I have no idea what proportions I used of quinoa to millet. You could clearly sub in any proportion you want.
While those two pots are cooking (or the next day, if you are like me and end up shoving your pots in the refrigerator after they're done), chop a yellow onion into fairly small pieces. Put them in a saute pan with some olive oil. Cook slowly, over lowish heat, until good and soft and melty. While they're cooking down, finely mince a hot pepper and add it to the pan. Also start adding dried herbs and spices. Since this mix is going to flavor your entire batch of burgers, be liberal. I used: lots of paprika, medium amounts of oregano, basil, and marjoram, and a little cayenne, sage, and thyme. Let these all cook and meld together for maybe a half hour.
When things are done, preheat the oven to about 325F. Drain lentils and dump them into the grains. Dump in the onion and spice business. If you have any fresh parsley around, chop up a bunch and add that too. Then salt and pepper to taste. I used two or three big pinches of salt, and about the same of pepper.
At this point your mix will look a lot like my picture up there: messy, a little red from the paprika, and sticky. It's time to make burgers.
If you happen to have such things as silpats lying around, you may want to bust them out. If not, be prepared to be careful while turning the burgers later: they're a little sticky and crumbly.
Ok. Get out some cookie sheets. Form burgers and stick them on the sheets in nice rows. You can use wet hands to form nice pretty burgers, or you can just whack down big ladlefuls onto the sheets, then flatten them a little with a spatula. Guess which one I did! Also, guess whether I own anything remotely resembling a silpat!
I got 16 burgers from this amount of ingredients. Hooray freezer food!
Stick burgers into the oven and bake for about 15 minutes. Then go check to see if they're solid enough to turn. If so, carefully turn them all over. Also rotate the sheets to different racks. Check again in ten minutes or so. The burgers are done when they're fully set and browned a little all over.
Eat them!
Then, when you end up putting 12 of your 16 burgers in the freezer and eating them for dinner a week later, you can baste said burgers with barbecue sauce before sticking them in the oven. I highly approve of this method.
30 April 2008
More ugly delicious food: chili enchiladas
So the multiuse chili in the freezer was an exceptionally good idea. We came home from NYC fairly exhausted, but of course had to run out immediately for prescriptions and perishable foodstuffs. "Perishable foodstuffs" included tortillas, cheddar cheese, and green onion, all for purposes of immediate chili enchiladas.
CHILI ENCHILADAS OH MY GOD
enough leftover chili for a pan of enchiladas (maybe 3 cups)
at least 8 tortillas
cheddar/other appropriate cheese
green onions
whatever else sounds good in your enchiladas, such as rice or beans
First, preheat the oven to 350F. Defrost/warm up leftover chili in a wide frying pan. If it's especially chunky, you may want to purée it. Ours was already puréed from before. Thin it with a little water if it's too thick, or if you don't think you'll have enough sauce for a pan of enchiladas.
While chili is defrosting, grate or thinly slice a bunch of cheese. Also chop up several green onions. Our green onions were particularly awesome and thin and tiny and fresh. Spring greens!
Get out a reasonable casserole dish; ladle several scoops of chili into it; spread everything around to cover the bottom. Make sure all of your ingredients are close at hand. Now start making enchiladas. First, put a tortilla face down into the chili pan, holding it by one edge. Leave it for a few seconds to warm and coat with sauce. Then take it out of the pan and lay it sauce side up in your hand. Fill with cheese and green onion and whatever else you want. The fillings can be kind of scanty and still produce a delicious result, so don't worry if you're running out of stuff. Then roll up the tortilla and put it into the casserole dish. Repeat until you've filled up the entire dish with totally delicious enchiladas.
You should still have a little sauce left over after this business. Pour it all over the rolled tortillas. If there is more cheese, strew it over the pan as well.
Bake for about a half hour, or until cheese is browned and everything is clearly hot through.
Eat. Go to bed. Sleep heavily. Bring the leftovers to work tomorrow.
CHILI ENCHILADAS OH MY GOD
enough leftover chili for a pan of enchiladas (maybe 3 cups)
at least 8 tortillas
cheddar/other appropriate cheese
green onions
whatever else sounds good in your enchiladas, such as rice or beans
First, preheat the oven to 350F. Defrost/warm up leftover chili in a wide frying pan. If it's especially chunky, you may want to purée it. Ours was already puréed from before. Thin it with a little water if it's too thick, or if you don't think you'll have enough sauce for a pan of enchiladas.
While chili is defrosting, grate or thinly slice a bunch of cheese. Also chop up several green onions. Our green onions were particularly awesome and thin and tiny and fresh. Spring greens!
You should still have a little sauce left over after this business. Pour it all over the rolled tortillas. If there is more cheese, strew it over the pan as well.
Eat. Go to bed. Sleep heavily. Bring the leftovers to work tomorrow.
21 April 2008
Secret roasty saucy chili
Clearly you could spend the rest of your life making all different kinds of chili. Chili chili chili.
Here is one kind:
Chili with roasty business
First, ROAST:
olive or flavorless oil w/ cayenne
a butternut squash
most of a head of garlic
Infuse the oil with cayenne: put some oil and some cayenne in a little frying pan and swirl it around over low heat. You don't want to cook them, just to warm them up together. (If you're feeling lazy, it would probably be fine not to even bother with this, and just use oil and cayenne to season the roast straight.)
Peel a butternut squash with a vegetable peeler. Cut off the top and bottom, seed with a spoon, and cut the flesh into little pieces. Throw all the bits into a pan appropriate for roasting. (You could also use other kinds of squash, or a couple sweet potatoes: all delicious.) Then tackle the garlic: smash the cloves with the flat of a knife, peel them, tear them up a bit if you think they're too big, and throw them into the pan.
Pour the infused oil (or just some oil and some cayenne) over the squash and garlic. Mix. Bake at 400F, stirring every once in a while, for about a half hour, until squash is cooked through and starting to come up with dark crispy bits.
This would be delicious just as is. I would eat it. Maybe I would put it on top of some mashed potatoes, add some chopped toasted pecans, and/or crispy sage, and have multiple textures to contend with!
Ok ok. In this circumstance we used the roasty business in chili.
CHILI:
onion, carrot and celery
olive oil/other acceptable oil
green pepper, or other colors if you feel like it
a hot pepper or two
chili powder, paprika, cumin, marjoram, salt, pepper
tomatillos
roasty squash and garlic business
tomato puree/sauce of some type
cooked black beans
cooked red beans
veg broth
water
tvp
a bay leaf
a deep pot
an afternoon.
OK!
Get out your big pot. Peel and chop an onion, a couple carrots, and a couple stalks of celery. Well, don't peel the celery, but destring it if you want. Actually, we didn't have any celery at all, but I would have used it had we had it! YES. Anyway. Dice everything up finely and throw it in the pot with some oil. Put it over medium heat and soften it all up with your first batch of spices: lots of chili powder and cumin, some paprika, and only a little marjoram. MIREPOIX.
While mirepoix is going, chop up a hot pepper or two, a green pepper, and a couple of tomatillos. Add them and soften them too. In general, subscribe to a "chop it; chuck it in" policy.
When all the vegetables are reasonably softened, it's time for liquid. Broth: add several cups, either liquid or frozen. If frozen, get some vegetables on top of the frozen chunk so it defrosts more quickly. You could also use water if you don't have any broth. Tomato stuff: add a full big can (or less if your pot isn't that big). Salt reasonably; pepper; bay leaf. At this point my pot was about half full.
Being the business to a simmer. Now add beans (with broth if you've just cooked the beans and have lots of bean broth). I used a whole pot of red beans with broth plus a half-batch chunk of frozen preboiled black beans. Also add several shakes of tvp. Also add the done roasty squash and garlic.
Add some water to get the whole business liquidy enough to cook down a while. Correct the seasonings with more chili powder and cumin, plus whatever else tastes necessary. If you want to add any cooking alcohol at this time, I suggest tequila.
Bring the business back to a simmer, lower the heat, put on the lid, and leave it for at least an hour. Leave it for more than an hour. Leave it for as long as you can stand it. When you are starving and everything smells perfect, make some toast and go for it.
I had my first bowl of chili in the traditional rustic chunky way, but John wanted to try puréeing it. So we busted out the stick blender and puréed it. The result: not exactly what my brain interprets as chili, but still very very good. Essentially, it became a super-savory deep chili-tomato sauce. So you can clearly eat it as is, with your copious toast as mentioned. I would probably make a bunch of croutons for it in the future. But! We can clearly do all kinds of things with a chili sauce business of this type:
- Use it as sauce for a pan of cheese-green onion enchiladas.
- Pour it over some hot split biscuits for biscuits and chili, with some chard or other solid greens.
- Make a corn bread, corn fritters, or a corn pudding or souffle, and use it as sauce for that.
- Or bake with chunks of cornbread and cheese into a swirly bread pudding thing.
- Mix it with a spoonful of sour cream and eat it with lots of chips or vegetables.
- Whip it into some mashed potatoes for half-soporific half-spicy late sleepy dinner.
- Make a batch of savory silver-dollar pancakes with lots of chopped greens, smear with chili, and eat.
- Make the most severe chili cheese fries and/or dog of your career.
Invite other people over to eat chili with you, or put leftovers into every piece of tupperware you own and fill up the freezer. We chose the second option. When we come home from New York in a week, there will be a freezer full of chili waiting for us.
Oh yeah, we're going to New York!
We're going RIGHT NOW.
Here is one kind:
Chili with roasty business
First, ROAST:
olive or flavorless oil w/ cayenne
a butternut squash
most of a head of garlic
Infuse the oil with cayenne: put some oil and some cayenne in a little frying pan and swirl it around over low heat. You don't want to cook them, just to warm them up together. (If you're feeling lazy, it would probably be fine not to even bother with this, and just use oil and cayenne to season the roast straight.)
Pour the infused oil (or just some oil and some cayenne) over the squash and garlic. Mix. Bake at 400F, stirring every once in a while, for about a half hour, until squash is cooked through and starting to come up with dark crispy bits.
This would be delicious just as is. I would eat it. Maybe I would put it on top of some mashed potatoes, add some chopped toasted pecans, and/or crispy sage, and have multiple textures to contend with!
CHILI:
onion, carrot and celery
olive oil/other acceptable oil
green pepper, or other colors if you feel like it
a hot pepper or two
chili powder, paprika, cumin, marjoram, salt, pepper
tomatillos
roasty squash and garlic business
tomato puree/sauce of some type
cooked black beans
cooked red beans
veg broth
water
tvp
a bay leaf
a deep pot
an afternoon.
OK!
Get out your big pot. Peel and chop an onion, a couple carrots, and a couple stalks of celery. Well, don't peel the celery, but destring it if you want. Actually, we didn't have any celery at all, but I would have used it had we had it! YES. Anyway. Dice everything up finely and throw it in the pot with some oil. Put it over medium heat and soften it all up with your first batch of spices: lots of chili powder and cumin, some paprika, and only a little marjoram. MIREPOIX.
While mirepoix is going, chop up a hot pepper or two, a green pepper, and a couple of tomatillos. Add them and soften them too. In general, subscribe to a "chop it; chuck it in" policy.
When all the vegetables are reasonably softened, it's time for liquid. Broth: add several cups, either liquid or frozen. If frozen, get some vegetables on top of the frozen chunk so it defrosts more quickly. You could also use water if you don't have any broth. Tomato stuff: add a full big can (or less if your pot isn't that big). Salt reasonably; pepper; bay leaf. At this point my pot was about half full.
Being the business to a simmer. Now add beans (with broth if you've just cooked the beans and have lots of bean broth). I used a whole pot of red beans with broth plus a half-batch chunk of frozen preboiled black beans. Also add several shakes of tvp. Also add the done roasty squash and garlic.
Bring the business back to a simmer, lower the heat, put on the lid, and leave it for at least an hour. Leave it for more than an hour. Leave it for as long as you can stand it. When you are starving and everything smells perfect, make some toast and go for it.
- Use it as sauce for a pan of cheese-green onion enchiladas.
- Pour it over some hot split biscuits for biscuits and chili, with some chard or other solid greens.
- Make a corn bread, corn fritters, or a corn pudding or souffle, and use it as sauce for that.
- Or bake with chunks of cornbread and cheese into a swirly bread pudding thing.
- Mix it with a spoonful of sour cream and eat it with lots of chips or vegetables.
- Whip it into some mashed potatoes for half-soporific half-spicy late sleepy dinner.
- Make a batch of savory silver-dollar pancakes with lots of chopped greens, smear with chili, and eat.
- Make the most severe chili cheese fries and/or dog of your career.
Invite other people over to eat chili with you, or put leftovers into every piece of tupperware you own and fill up the freezer. We chose the second option. When we come home from New York in a week, there will be a freezer full of chili waiting for us.
Oh yeah, we're going to New York!
We're going RIGHT NOW.
Labels:
cheap,
easy,
potentially vegan,
recipes,
sauces,
soporific,
soups,
vegetables,
vegetarian
17 March 2008
Not exactly cauliflower cheese
Most of the people I know hate, hate, hate cooked (read: boiled) cauliflower. I think even my mother hates it, which is saying something. Boiled cauliflower is just boring. Nothing picks it up: not buttering, salting, or even thoroughly spicing with cayenne. Altering it doesn't work very well either: mashed cauliflower doesn't taste like mashed potato, but like itself, only mushier and more watery. Even cauliflower pureed into a soup doesn't work that well: it's ok, but nothing spectacular. So lots of people finally resort to disguising their bland little florets under a thick coat of sauce: cauliflower cheese.
Cauliflower cheese is Okay. I certainly like a good cheese sauce, but the business under the sauce remains just as limp and watery as any boiled cauliflower.
Solution: roasting. So, you could just roast your cauliflower and serve it in cheese sauce. It would be crisp and savory and good under the rich sauce, but why not do more? Why not make it your whole dinner?
For this version, you make three components, then combine them. That makes it sound like a difficult undertaking, which is not the case. Each piece is very easy on its own, and you don't even have to pay much attention to two of the three. Plus, everything can be totally done in fifteen or twenty minutes if you arrange it right.
Very different cauliflower cheese
cauliflower
olive oil
pasta
butter
flour
milk
cheese
green beans
salt, pepper
General plan: roast cauliflower, boil pasta water, make sauce, combine.
For the cauliflower, do exactly what we've done for all previous roasty cauliflower business. Preheat the oven to 450F. Chop at least half a head of cauliflower into small florets. Stick them in a baking dish, add a little olive oil, and mix to coat. Sprinkle with salt, make sure the florets are in one layer, and throw the whole thing in the oven. Check and stir intermittently as you make the sauce.
Pasta: probably something like penne or orecchiette would be best for a creamy cheese sauce like this. I had vermicelli, which was a little odd for thick cream sauce, but tasted good anyway. Fill a big pan with water, salt, cover, and bring to a boil.
Sauce: while the water is starting to heat, make a cream sauce. Start with a roux: melt a chunk of butter, maybe a tablespoon or so, over medium heat. When it's melted and bubbling, add a palmful of flour. White flour is easiest, but wheat works too. Get out the whisk and beat it all together, then cook, continually whisking for about five minutes. You have to cook the roux for at least a few minutes, or the cheese sauce will end up tasting like flour. Don't do it!
After the five minutes, add milk. I used half a pint for two servings in this case. Any type of milk is fine (well, probably not buttermilk) but higher fatted milks will make a faster, thicker sauce. You can also use cream if you have any lying around, and/or want to be completely decadent and end up glutted later. Beat continually with the whisk until the sauce starts to thicken.
Here's what it'll look like when thickened:
When sometime around here you notice that the pasta water is boiling, dump in the pasta and let it cook for ten minutes or however long it needs. At the midway point, drop in some chopped green beans, or maybe peas if you want. Drain at the appropriate time.
Meanwhile, grate cheese into the sauce. For classic cauliflower cheese you want cheddar, and lots of it. This would be really good with a sharp grating cheese like parmesan, though, especially if you added peas. Anyway, add as much cheese as you want, whisking continually to incorporate. The sauce will gradually get thicker and thicker; if it ever gets too thick, you can beat in some water. Add a little salt and a lot of fresh black pepper. Cheese sauce demands as much pepper as you can throw at it.
At this point the sauce is done, and hopefully the pasta and etc as well. How about the cauliflower? Is it golden brown and delicious? Ok then.
My preferred assembly: dump the drained pasta and beans into the sauce. Stir to coat completely. Serve onto plates and top with lots of cauliflower bits. You could also mix the roasted cauliflower with the pasta and etc, and pour the sauce over all: this would come a lot closer to the classic cauliflower cheese. In either case, dust with good salt and more black pepper, then eat.
Variations:
- gruyere sauce with a little nutmeg, peas, and some bacon or prosciutto.
- gruyere sauce with roasted slivered almonds.
- smoked gouda sauce with ham, or just by itself.
- parmesan or asiago sauce with red pepper and garlic (roasted with the cauliflower).
- rice instead of pasta, with lots of soupy sauce, for the most sleep-inducing food ever.
- or mashed potatoes instead of rice: no, THIS one is the most sleep-inducing idea ever. Forget any greens and just whip the sauce and cauliflower into a big plate of mashed potatoes.
- seasoning the cauliflower before roasting: a good whack of cayenne can turn them into super spice bombs to find accidentally in the (cheddar, parmesan) cheese.
- or marinating the cauli in white wine or vermouth for an hour beforehand, for super savory bombs (in parmesan or gruyere) instead.
A big mess of dark greens would go well here.
Now I'm really hungry.
Cauliflower cheese is Okay. I certainly like a good cheese sauce, but the business under the sauce remains just as limp and watery as any boiled cauliflower.
Solution: roasting. So, you could just roast your cauliflower and serve it in cheese sauce. It would be crisp and savory and good under the rich sauce, but why not do more? Why not make it your whole dinner?
For this version, you make three components, then combine them. That makes it sound like a difficult undertaking, which is not the case. Each piece is very easy on its own, and you don't even have to pay much attention to two of the three. Plus, everything can be totally done in fifteen or twenty minutes if you arrange it right.
cauliflower
olive oil
pasta
butter
flour
milk
cheese
green beans
salt, pepper
General plan: roast cauliflower, boil pasta water, make sauce, combine.
For the cauliflower, do exactly what we've done for all previous roasty cauliflower business. Preheat the oven to 450F. Chop at least half a head of cauliflower into small florets. Stick them in a baking dish, add a little olive oil, and mix to coat. Sprinkle with salt, make sure the florets are in one layer, and throw the whole thing in the oven. Check and stir intermittently as you make the sauce.
Pasta: probably something like penne or orecchiette would be best for a creamy cheese sauce like this. I had vermicelli, which was a little odd for thick cream sauce, but tasted good anyway. Fill a big pan with water, salt, cover, and bring to a boil.
Sauce: while the water is starting to heat, make a cream sauce. Start with a roux: melt a chunk of butter, maybe a tablespoon or so, over medium heat. When it's melted and bubbling, add a palmful of flour. White flour is easiest, but wheat works too. Get out the whisk and beat it all together, then cook, continually whisking for about five minutes. You have to cook the roux for at least a few minutes, or the cheese sauce will end up tasting like flour. Don't do it!
After the five minutes, add milk. I used half a pint for two servings in this case. Any type of milk is fine (well, probably not buttermilk) but higher fatted milks will make a faster, thicker sauce. You can also use cream if you have any lying around, and/or want to be completely decadent and end up glutted later. Beat continually with the whisk until the sauce starts to thicken.
Here's what it'll look like when thickened:
Meanwhile, grate cheese into the sauce. For classic cauliflower cheese you want cheddar, and lots of it. This would be really good with a sharp grating cheese like parmesan, though, especially if you added peas. Anyway, add as much cheese as you want, whisking continually to incorporate. The sauce will gradually get thicker and thicker; if it ever gets too thick, you can beat in some water. Add a little salt and a lot of fresh black pepper. Cheese sauce demands as much pepper as you can throw at it.
At this point the sauce is done, and hopefully the pasta and etc as well. How about the cauliflower? Is it golden brown and delicious? Ok then.
My preferred assembly: dump the drained pasta and beans into the sauce. Stir to coat completely. Serve onto plates and top with lots of cauliflower bits. You could also mix the roasted cauliflower with the pasta and etc, and pour the sauce over all: this would come a lot closer to the classic cauliflower cheese. In either case, dust with good salt and more black pepper, then eat.
Variations:
- gruyere sauce with a little nutmeg, peas, and some bacon or prosciutto.
- gruyere sauce with roasted slivered almonds.
- smoked gouda sauce with ham, or just by itself.
- parmesan or asiago sauce with red pepper and garlic (roasted with the cauliflower).
- rice instead of pasta, with lots of soupy sauce, for the most sleep-inducing food ever.
- or mashed potatoes instead of rice: no, THIS one is the most sleep-inducing idea ever. Forget any greens and just whip the sauce and cauliflower into a big plate of mashed potatoes.
- seasoning the cauliflower before roasting: a good whack of cayenne can turn them into super spice bombs to find accidentally in the (cheddar, parmesan) cheese.
- or marinating the cauli in white wine or vermouth for an hour beforehand, for super savory bombs (in parmesan or gruyere) instead.
A big mess of dark greens would go well here.
Now I'm really hungry.
Labels:
cheap,
dairy,
easy,
pasta,
recipes,
sauces,
soporific,
vegetables,
vegetarian
01 February 2008
I win peanut eggplant goodness
So after the previous eggplant peanut business, I was left a little unsatisfied. I wanted a more stewy, curry-oriented eggplant. Ok, we can do that.
I am not really intuitive at non-Indian curries, so I didn't want to completely make things up. So after failing to find any sort of tasty peanutty coconut milky curry in my of my cookbooks, I went and looked on The Internet. I decided to base my curry on this satay sauce: clearly easy yet delicious, and easily modifiable to get rid of things like vegetable oil. Then I could just steam the eggplant and zucchini, and mix it all together to whack over a grain of some type.
Eggplant and zucchini with satay sauce and soba
a couple little eggplants, or one big one
a couple or three zucchini
other vegetables that sound delicious, like red pepper
peanut butter
olive oil
garlic
water
coconut milk
a lime
red curry paste
a hot pepper, serrano this time
salt
molasses
soba noodles
First make sauce. Peel and mince a couple cloves of garlic and a hot pepper; cook them slowly in some olive oil. When they are nice and soft, add several big spoonfuls of peanut butter, a can of coconut milk, some water, the juice of a lime, a little red curry paste, a big pinch of salt, and half a spoonful of molasses. Turn up the heat and stir to melt the peanut butter. This whole business will be pretty light-colored at first; it will darken as it simmers down.
So. Bring the pot to a boil, lower to simmer, and let cook. Keep an eye on it and stir it fairly often. It will bubble ferociously, then eventually reduce into a thick peanut sauce.
While the sauce is becoming delicious, prep the eggplant and zucchini. I actually peeled them, if you can believe it. You don't have to, but you can. It won't make much of a difference to the zucchini, but will make the eggplant a little more tender and melty. Chop eggplant and zucchini into big half-moon chunks. At this point you have a choice of how to cook them. I steamed them by just sticking a steamer basket over the sauce: I cooked the eggplant for five minutes, added the zucchini, and cooked another five. You could also cook them by simmering in the sauce itself if you wanted to. You could also roast them in the oven or on the barbecue if you wanted the sauce to be more of an actual sauce and less of a stewy curry.
When everything is done, toss the cooked vegetables into the sauce. Stir it all up to coat well and rewarm if necessary. Serve over soba.
EAT VORACIOUSLY.
The food has been really good this week. Maybe it's been such a bad week that the food is the only good thing in it. Well. That is ok. It is the weekend.
Labels:
easy,
recipes,
sauces,
vegan,
vegetables,
vegetarian
Subscribe to:
Posts (Atom)