Showing posts with label farmer's market. Show all posts

15 March 2015

$1.85 at the farmer's market

$1.85 at the farmer's market

If you're careful, $1.85 at our farmer's market can get you this. Three zucchini, six pea pods, one tiny carrot, and an armful of assorted peppers from the $.65/lb sort-outs bin: $1.20. A small bag of broccolini, no price sign to be found: $.65.

What will I do with all of these?

Most of the peppers will get washed, trimmed judiciously (there's a reason they were in the sort-outs bin), and put into a quick brine to pickle. The few in good enough shape to keep for a few days will go into all kinds of things: quesadillas, salads, scrambled eggs, tomato sauce.

The zucchini will probably get sauteed with olive oil and garlic and thrown over some pasta, maybe with a handful of toasted breadcrumbs on top.

I could eat the peas raw with some hummus, slice them at an angle and throw them into a green salad, or cook them with the zucchini for pasta purposes.

The broccolini will likely get a simple saute, either with butter and garlic or a good squirt of sriracha sauce and some chopped almonds. To be eaten next to a piece of fish or some spicy seared tofu.

The carrot will get eaten one way or another.

What kind of vegetables are popping up at your farmer's market this spring?

04 August 2013

Food budgeting at the farmer's market

farmer's market heirloom tomato extravaganza

Ah, the farmer's market! Endless tables full of gleaming fruit, vendors calling out their new & exciting wares, fresh samples beckoning from booth to booth, a fabulous array of perfectly ripe vegetables, and a smear of fresh peach on every child's cheek.

And money. Lots of money.

Grocery shopping at the farmer's market is great in many ways. You get to support local agriculture, meet the people who grow your food, and get the freshest, most perfectly seasonal produce. But if you aren't paying attention, it's all too easy to give up an arm and a leg in exchange for your booty. How can you shop at the farmer's market without breaking the bank?

Well, I went to the farmer's market today, and got this fairly gigantic haul of peppers, tomatoes, cucumbers, carrots, mesclun mix (heavy on the spinach), apples, plums, nectarines, mushrooms, and a lonely Chinese eggplant.

How much do you think I spent?

my $14.10 farmer's market haul

$14.10.

Yes. You do not need to spend your entire grocery budget to bring home a huge pile of delicious fruit and vegetables. All you need to do is consider your purchases wisely.

Top 10 ways to save money at the farmer's market

farmer's market Indian eggplant

Shop carefully

This is the number one way to keep from overspending. Before you leave the house, decide how much you want to spend, and only bring that much cash with you. Do a quick circuit of the market to compare prices before you buy anything. If something you wanted is too expensive that day, see if you can find a more affordable alternative. Don't buy anything without knowing its price--if there's no sign, ask. Always make sure you get the right change.

Just pay attention, and you'll be fine.

Shop whole

At many farmer's markets, a number of booths sell pre-prepared food interspersed with the farmstand produce. However, the prices are often astoundingly high--so leave those tacos, dips, and dumplings behind. By buying whole ingredients and cooking them at home, you can keep those extra dollars firmly in your pocket.

farmer's market hot pepper bunches

Shop in bulk

If you preserve your own sauces, jams, or pickles, you'll want to look for bulk deals. Some farmers will have standard specials on canning flats. Otherwise, you may want to ask in advance about buying in quantity. Nearly everyone will be happy to offer a discount on particularly large purchases.

Shop with a friend

What if you can't use all of a bulk buy yourself? If you go to the market with a friend, you can take advantage of bulk deals without anything going to waste. Go ahead and buy that 5 pounds of stone fruit and a half flat of strawberries--just split them up before you go home. Voila: you get to savor all the best fruits of summer at a fraction of the cost.

farmer's market peaches and nectarines

Shop ripe

Look for the ripest produce to find the best deals. Many of the booths at my local market feature specials on the ripest fruit and vegetables, to get them sold before they go off. Ripe nectarines for $1 per pound? Yes, please.

Shop ordinary

Exotic fruit and vegetables are generally very shiny and tempting, but they come at a cost. Yes, those beautiful black raspberries may be calling your name--but since they're such a rare find, they're also incredibly expensive. Go find a pint of red raspberries--or, cheaper yet, strawberries--and save yourself a couple dollars.

farmer's market sort-outs bin

Shop irregular

Some farmers will fill a bin or two with less pretty produce that they're willing to let go at a super-cheap price. Apples with hail scars, bruised jam apricots, or broken carrots can be had for half the standard price, or even less. My local market has a sort-outs bin that regularly features a wide range of vegetables and fruit, from cucumbers and eggplant to apples and hot peppers, all for $.65 per pound. You can be sure I bring a bag of their slightly dented produce home every single week.

Shop seasonal

Obviously, the farmer's market is the best place to get what's currently in season in your region--and seasonal vegetables are often overabundant. Zucchini and other summer squash are a prime example here: every booth has them, and in huge quantity. So what do the farmers do? They lower prices, both to compete with others and to get their mountains of produce sold before they go bad. Now you can get your veg on for a fraction of the price!

Similarly, the first and last fruits of the season are often quite a bit more expensive than their mid-season counterparts. If you know which produce is at the height of its season, you can choose it over the brand-new, highly hyped newcomers, and save some money in the process.

farmer's market mission figs

Shop plants

If you have a green thumb, check out nursery booths for the edible plants of your choice. Herbs in particular are great, since they're expensive to buy fresh, but easy to grow in a window box or small pot. If you have actual garden space, you can go whole hog and get a selection of your most loved vegetables. Right now it's time to start thinking about fall planting, so before you buy, consider what cold-weather vegetables you may want to eat in a few months. Keep in mind that smaller starts are cheaper than larger ones, but they take more nurturing to get a delicious harvest.

Shop late

As the farmer's market winds down, many booths will begin dropping their prices so as not to haul half a truckload of unsold produce home, where it could potentially rot before the next market. If you show up at the market half an hour before closing, you can score some amazing deals. The trade-off is that some specialty items might be all gone--but if cheap, high-quality produce is your goal, this is a reliable way to get it.

Now grab your bags and go get your own haul!

What do you do to keep a firm hand on your farmer's market spending?

24 July 2013

Summer raspberries for breakfast

summer raspberries

Look what was at the farmer's market the other day! ALL THE RASPBERRIES.

I bought three pints and hauled them all home virtuously intact. Then, of course, I washed them, put them in a bowl, and served us the best summer weekend breakfast ever.

best summer breakfast: raspberries, bread, and cheese

So we had a pint and a half of raspberries still warm from the sun, a loaf of Acme Bread's amazing herbslab, and a chunk of Petunia sheep's milk gouda from Garden Variety Cheese.

It was totally decadent and entirely worth it.

What amazing summer produce are you eating?

08 April 2013

Baby leek and potato gratin

baby spring leeks

Spring means ramp season across much of the US, and the foodbloggers are starting to sit up and take notice. Ramp chimichurri, ramp pasta, ramp foraging and preserving guides--it's all ramps all the time.

Guess what I have never once seen in California? That's right: ramps.

Instead, when I went to the farmer's market last weekend, guess what I found?

baby spring leeks

That's right: it's the new season's first baby leeks. So tiny! So delightful! They aren't ramps, but they're still beautiful new fragrant alliums barely as thick as my index finger--and at $1.75 a bunch, I'll definitely take them.

And then I'll smother them in cream sauce and bake them into a fragrant potato gratin. Sure! Why not?

This recipe requires three main components: sauce, vegetables, and breadcrumb crust. If you are working by yourself, you may want to get the vegetables prepped in advance, but you can also cut them up afterward as long as you remember to watch the sauce and stir it occasionally. If you're working with someone else, you can do the veg and sauce at the same time. The breadcrumbs can go last with no problem.

All the leftover leek greens went immediately into a batch of vegetable broth destined for the freezer. Because it's great to make veg broth on the fly and everything, but sometimes you just want to whack a chunk of premade broth into a pot and walk away.

Baby leek and potato gratin

butter
flour
half and half/cream
milk
nutmeg, pepper
gruyere
leeks
potatoes
breadcrumbs
olive oil
dijon mustard

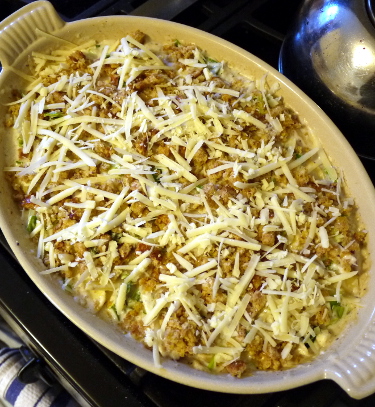
For the sauce, start by melting half a stick of butter over medium heat in a saucepan of your choice. (We used the gratin dish, so as to avoid an extra dirty pot, but I wouldn't recommend it.) Add 4 tablespoons of flour and whisk together, cooking for about three minutes, to make a roux. Add a pint of cream or half and half and continue to cook, whisking frequently, for a good five minutes or so. The sauce will thicken as it cooks. You can add a bit of milk to thin it down if you think it needs it.

Season your thickened sauce with a tiny bit of nutmeg and a copious amount of ground black pepper. Gradually whisk in several large handfuls of grated gruyere cheese. If you want to use another cheese, feel free; just keep in mind that any highly flavored cheeses are going to dominate the finished product.

sauce mornay

Congratulations! You are now the proud owner of a pan of sauce mornay!

Okay. The vegetables mostly require a lot of cleaning and chopping. I used five little leeks and five boiling potatoes. Trim the roots and the ends of the tough greens off your leeks, split them in half, and wash them really well under cold running water. Slice them into inch-long chunks.

Scrub your potatoes well, removing any eyes. You can peel them if you like; I don't bother. Cut them in half, rest each half on its cut side, and slice into the thinnest slices you can manage. If you're prepping potatoes in advance, make sure to put them into a bowl of cold water; otherwise they can oxidize and turn to black mush in an astonishingly short period of time. Then just drain and pat them with a paper towel before assembling the gratin.

baby leek and potato gratin

When your sauce and veg are ready, mix them together and pour them into a gratin dish or casserole of your choice. I also splashed a bit of milk over the top of mine, since the sauce was pretty thick and I wanted to make sure the potatoes had enough liquid to absorb.

Now it's time for the crust. This is easy. Just mix a cup or so of breadcrumbs with a sprinkling of olive oil, a couple spoonfuls of dijon mustard, and a bit of pepper. We usually end up cubing pieces of fresh bread for our crumbs, but whatever you have should work. Mix everything together, making sure you have enough oil to coat the bread. Then spread your breadcrumb mixture over the top of your gratin dish. If you have extra grated cheese, scatter it on last. Otherwise, the breadcrumbs work well by themselves.

baby leek and potato gratin

Now put the whole thing in the oven and bake at 350F for about forty minutes, or until your potatoes are tender to the point of a knife and your breadcrumbs are golden and sizzling.

Hooray! Beautiful, golden, fragrant gratin!

baby leek and potato gratin with green salad

We ate our gratin as dinner, with big mesclun and grape tomato salads. Then I ate the leftovers for breakfast the next day, after a short encrispening in the toaster oven. I didn't put a fried egg on top, but I was tempted. That would be pretty perfect, especially with another big bed of greens.

The tomatoes were also at the farmer's market, incidentally, as were a vast array of heirloom tomato plants. I got two. Soon they will be in my garden. SOON.

Which alliums are popping up at your market? What are you making with them?

04 March 2013

Cashew cheese and carrot

Farmer's market yellow heirloom carrot with oregano-shallot cashew cheese and cracked black pepper

Cashew cheese has definitely been on my mind of late. What's not to love about a rich nut puree blended with herbs and vegetables? (Unless you have a cashew allergy, of course.) I decided to take advantage of our giant bush of oregano--the only non-citrus plant that is actually producing right now--and make a batch of cashew cheese with oregano and shallot. Perfect.

At first, I wanted to eat my cashew cheese in rolls, like I did with my raw zucchini rolls this past summer. I decided to use a beautiful yellow carrot instead of the totally out-of-season zucchini. Of course, carrot is quite a bit harder, and I found that my vegetable peeler only wanted to make the thinnest and most breakable of strips. So instead of making rolls, I cut thin slices of carrot and put cashew cheese on top of each. Maybe it's not quite as pretty a presentation (although I honestly find that arguable, with that brilliant yellow carrot color), but it's just as delicious.

I'm having a hard time naming this. Raw carrot and cashew cheese nibblers? Cashew cheese with oregano and shallot atop shaved carrots? Farmer's market yellow heirloom carrot with oregano-shallot cashew cheese and cracked black pepper? Sure, why not?

Farmer's market yellow heirloom carrot with oregano-shallot cashew cheese and cracked black pepper

Farmer's market yellow heirloom carrot with oregano-shallot cashew cheese and cracked black pepper

1 cup cashews, soaked 1 hour or more & drained
leaves from four or five sprigs of fresh oregano
1/4 a large shallot or 1/2 a small one, chopped
1/4 tsp white miso, optional
1/4+ cups water
salt & pepper
a large carrot of your choosing
more fresh oregano and pepper to garnish

First, make the cashew cheese. Combine your cashews, oregano leaves, shallot, miso, water, and a mild sprinkling of salt and pepper in a food processor or blender. Pulse, scraping as needed, until the mixture is thick and well blended, adding a trickle more water if needed. As always, you should use a food processor for this if you have one. I used our blender, which was actually less frustrating than usual. Remove the finished cashew cheese to a container of your choice.

Scrub and peel your carrot. Slice it on the diagonal into oblong disks. Top each piece of carrot with a spoonful of cashew cheese, and garnish with cracked black pepper and an oregano leaf or two. Repeat until you have as many bites of carrot and cashew cheese as you like. Refrigerate any leftover cashew cheese in a sealed container and use it within a week.

Farmer's market yellow heirloom carrot with oregano-shallot cashew cheese and cracked black pepper

These guys would make an amazing plate of hors d'ouvres for a party. Little delicious bites of finger food full of vegetables, nuts, and herbs? They'd certainly give the standard crudites a run for their money.

Hooray! Snacks for all!


25 July 2012

Garlic dill pickles!

homemade garlic dill pickles

There was an entire box of cucumbers in the sort-out bins at the farmer's market this weekend. What better opportunity for pickle-making?

Ok, if I grew my own cucumbers and was suddenly drowning in all the harvest, that would be a better opportunity, yes, but I didn't do that this year. Although I suppose I could start some vines and go ahead--we still have a good two months of serious heat to go. Hey, why not? I did it last year at about this time.

Anyway. Pickles!

farmer's market cucumbers

Obviously these are not pickling cucumbers. Oh well; let's see what kind of results I get.

I used the garlic dill pickle recipe from Food in Jars.

These were very easy. I soaked my cucumbers in water for several hours, dried them, and cut them into fat chunks. I stuffed the pieces into four sterilized regular-mouth pint jars with dill seed, red pepper flakes, peppercorns, and a couple cloves of garlic each. I made a half recipe of brine by boiling vinegar, water, and pickling salt, and poured it over the cucumbers, filling to 1/2 inch headspace. I wiped the rims, lidded and ringed the jars with sterilized equipage, stuck them in a rack, and processed them in the boiling water canner for 10 minutes. Then I let them cool overnight on a cooling rack on the kitchen counter.

I'm having kind of a hard time not just popping open a jar and eating a few of these, but you're supposed to let canned pickles age for at least a couple weeks, so. I will be good!

homemade garlic dill pickles

It became obvious a few days later, when I was sitting around thinking about how I should make a batch of dilly beans, that I should have made both recipes at once and concentrated the canning heat and vinegar brine into one two-hour session. Oh well--now I have a better plan for next time.

Hooray! Pickles!

18 July 2012

Fresh from the farmer's market

farmer's market fruit and vegetable haul

Corn and mushrooms and tomatoes and berries and arugula and peppers and carrots and zucchini and eggplant and lettuce and nectarines and plums! YEAH.

Clearly there is no better way to use some of the summer's peak produce than to whack them all together on a plate.

Here we have a delightful dish of herbed couscous and pan-fried spicy white beans with arugula salad and chopped raw heirloom tomato over the top. Fantastic!

white beans, herbed couscous, arugula, and tomato

Herbed couscous is easy. Cover instant dry couscous with boiling water from the teapot. You want maybe an inch of water above the couscous layer. Cover with a tea towel (or pan lid, or whatever) and let steam for about five minutes. In the meantime, chop up a selection of whatever herbs you like and have on hand. I used parsley and basil. When the couscous has absorbed all the water, fluff with a fork. Mix in your chopped herbs, a drizzle of olive oil, and salt and pepper to taste. Voila!

I make something approximating these white beans all the time. Sometimes the beans stay whole--especially if I've kept them a touch undercooked, like a responsible cooker of beans--but more often they end up melting into a delightful mess.

Soften a chopped onion and/or several cloves of garlic in a little olive oil, adding chopped hot pepper to taste. Season with your choice of herb; I like marjoram, oregano, and basil. If you want to add some more vegetables--bell peppers or mushrooms, for instance--go for it. When all your vegetables are tender, add cooked, drained white beans and fry to your preferred color & texture, deglazing with white vermouth if needed. Correct seasonings & you're done.

Eat your delightful mess of white beans with couscous, copious arugula, and an entire chopped fresh tomato. Hooray!

02 July 2012

CORN FOR ALL

fresh farmer's market corn

There was corn at the farmer's market! CORN CORN CORN CORN CORN. Let's eat it!

Personally, although I love fresh corn, I don't like to gnaw it off the cob. This means that we don't normally do the plain boiled corn that so many people heart so hard. Instead, for our first foray into sweet summer corn, I decided to just saute the kernels with a little bit of green onion. Straightforward and perfect.

Simple sauteed corn with green onion

fresh corn
olive oil
green onion
salt & pepper

Husk your corn and cut it off the cob. It's easiest to slice the corn off the cob if you hold your knife at an angle, so you're using more than an inch of the blade, and slide it back and forth as you move it down the side of the cob. I used two ears of corn for two people.

Trim and chop your green onion. I used one gigantic green onion from the garden, but you may want to use two. The green onions are by far the biggest success in this year's garden, incidentally.

When you're all ready, warm a little olive oil in a saute pan. Toss in your green onion, reserving a handful or two of the most delicate greens. Saute for two to three minutes, or until just wilted. Add the corn and season with salt and pepper. Continue to saute for another few minutes, or until the corn is done to your liking.

Add your reserved green onion greens at the last second. Stir to mix, correct seasonings, and serve. Voila!

We ate our corn in tacos with flame-toasted corn tortillas, refried beans, and curtido de repollo. Then we ate the leftovers fork-first out of the pan. Delicious.

tacos with refried beans, corn with green onion, and curtido de repollo

If you want to get richer (and possibly even more delicious), you can make rajas poblanas--roasted poblano peppers with corn and cream. For our second foray into summer corn cooking, I followed this recipe from Not Just Baked, with some minor changes.

First, I halved the recipe, since I was only feeding myself. This meant I used three poblanos and one ear of corn. I think you could use any proportion you like, however.

Second, I wasn't using a grill, so I decided to just add my corn to the onion-poblano-cream business raw. This worked out admirably, but I'm sure the results would be even more delicious with roasted corn.

rajas poblanas

Rajas poblanas

poblano peppers
fresh corn
olive oil
onion
garlic
cream

Start by roasting your poblanos, preferably over open flame. A grill is obviously ideal, but a gas burner works well too, as does a broiler. Use tongs (preferably with an insulated handle) to position your poblanos and char the skin evenly all over. When each poblano is roasted, put it in a container and lid it; this will keep in the heat and steam off the skin. I use a big plastic bowl with a lid, but even a paper bag can give good results.

If you happen to be using a grill, you can grill the corn too.

roasting poblano pepper

While your poblanos are steaming, chop up an onion and a couple cloves of garlic. Heat a slug of oil in a wide saute pan on low. Slowly caramelize the onion in the oil, stirring frequently. This can take a good twenty minutes; add the garlic in the last few minutes of cooking. Use the waiting time to prep your finished poblanos and corn.

After your poblanos have had at least five minutes to steam, open the container and flake off the skin with your fingers. This works best in a bowl of water. Remove the stems and seeds and slice or tear the roasted poblano flesh into long strips. Husk your corn and slice the kernels off each cob.

When the onions are completely soft and just golden-brown, mix in your poblanos and corn to the pan. Pour in cream to barely cover; I used one cup.

Heat everything to a low simmer and cook gently, stirring occasionally and making sure not to burn, for about a half hour. The cream will reduce gradually to create a delightful sauce.

burrito with rajas poblanas

When your rajas poblanas are done, you can eat them whatever way you see fit. I made burritos with rajas and refried beans. Any leftovers are excellent in early morning breakfast quesadillas. You guys eat early morning breakfast quesadillas, right?

Needless to say, we'll be cramming more and more corn in our gaping maws for the foreseeable future. There should be corn until the end of August, and maybe into September if we're lucky. Excellent.

22 May 2012

Farmer's market fruit extravaganza

Breakfast time!

farmer's market strawberries and oatmeal with yogurt

I had farmer's market strawberries and oatmeal with yogurt, chopped dried apricots, and a handful of random chopped almonds and cashews.

Snack time!

farmer's market cherries and apricots

I had a bowl of farmer's market cherries and apricots.

Dinnertime!

farmer's market strawberries and quesadillas

I had farmer's market strawberries and a couple of quesadillas with refried beans, spinach, garlic-sauteed summer squash, and cheddar.

Dessert time!

farmer's market cherries

Note to self: get more fruit next week, okay?

15 May 2012

Mutant kiwi: hooray!

farmer's market double kiwi

So here's what you get when you buy kiwi at the farmer's market in California.

DOUBLE KIWI.

farmer's market double kiwi

In some cases you even get triple kiwi.

You know how stores select for the most nonthreatening, standardized, perfectly identical produce? This experience makes that even more obvious.

farmer's market double kiwi

And why? I mean, yeah, it's probably because they don't nest well in standard shipping crates...but come on! Double and triple kiwi look extra gorgeous when you slice them up.

(Yes, I did just eat the equivalent of six kiwis. Why do you ask?)

farmer's market double kiwi

30 April 2012

Carrot and white bean soup

carrot and white bean soup with cilantro and sambal oelek

This is one of those standard meals at our house, one that's super easy and delicious and not really notable...until you start eating it. Why would I need to take pictures of carrot and white bean soup? We make carrot and white bean soup over and over! It's totally normal! AND YET. Both John and I started eating and couldn't stop, and I was super excited to see what we had a good three servings left over to freeze for later.

What made this so good? Well, I think one element was definitely the great farmer's market carrots. These sweet spring babies are a far cry from anything you'd find languishing in the grocery store produce department. What else? I had soaked and boiled the beans from dry a week or so ago, and had thrown them in the freezer for applications exactly like this one. I used a good farmer's market onion. I made vegetable broth from scratch. I deglazed the pan with dry vermouth. And I ate my serving with a bunch of greek yogurt, sambal oelek, and chopped cilantro stirred in, although John had his plain. Anything else?

carrot and white bean soup with cilantro and sambal oelek

Carrot and white bean soup.

butter/olive oil
an onion
a couple cloves garlic
two stalks celery
six big carrots
salt, pepper, oregano, marjoram, red pepper flake
dry vermouth
about 2 cups cooked white beans
3 cups veg or bean broth
an immersion blender
garnish: plain yogurt, cilantro, sambal oelek/other hot pepper sauce

If you don't have homemade broth, put some on to cook first. Just fill a pan with a selection of vegetable odds and ends, cover with water, bring to a boil, and let simmer for about fifteen minutes while you're doing the actual soup prep. Drain out the veg before you use the broth in your soup. Easy.

Start by chopping up your onion and garlic and softening them in olive oil or butter over medium heat. I used a big chunk of butter and just a little oil to raise the smoke point. While those are softening, finely dice a couple ribs of celery. Add them to the pan as you finish chopping. Then scrub all your carrots under the faucet, trim them, and dice them up. Add those to the pot as well. Season with salt, pepper, oregano, marjoram and red pepper flake to your taste. You may want to overseason a bit since the white beans will provide one big neutral palette later.

Stir everything up and let cook for a good five minutes. Then add maybe half a cup of dry vermouth, stir, and deglaze any bits stuck to the bottom of the pot. Bring this mixture up to a simmer before you add the beans and broth.

Since I had precooked beans frozen in a block of broth, I just tossed the entire thing into the pot and let it melt. If you're using canned white beans, drain them before adding them, and just use all vegetable broth. I poured maybe two or three cups of my hot, freshly made veg broth over the top of the bean block to speed up this process (and to have enough liquid to make soup, of course). Bring the entire shebang to a boil, lower the heat to simmer, and let cook for maybe five to ten minutes, or until everything is cooked through and the ratio of liquids to solids is appropriate to your tastes.

carrot and white bean soup with cilantro and sambal oelek

Now take the pot off the heat, give it a minute or two to cool, and puree it with an immersion blender. You can, of course, eat your soup unblended if you prefer; we just like thick pureed soups, and the beans give this one an excellent smooth texture.

At this point you can put the pan back on the heat to reduce and thicken a bit more, or you can just go ahead and eat it.

carrot and white bean soup with cilantro and sambal oelek

The finished product is super-carroty, with thickness and protein from the beans--a full meal in a bowl. It's great by itself with just a little sprinkle of pepper or chopped green onions. However, I think it's even better with a big spoonful of plain yogurt, a handful of chopped cilantro leaves, and spice to taste. I used a small spoonful of sambal oelek; you can use whatever you want.

Eat by itself, or with a hunk of sourdough, green salad, or tasty sandwich of your choice. Yay, soup!


13 March 2012

Curtido de repollo: Salvadorean cabbage slaw

Curtido de repollo: Salvadorean cabbage slawThis weekend was food project weekend. Usually this consists of making a huge pot of something or other that can be not just eaten immediately but also distributed into appropriate containers and strategically frozen for future lazy meals. So, not to totally break the mold, we made and ate (some of) a huge pot of chili.

However, I also shredded an entire green cabbage to try out a batch of curtido de repollo. This is the Salvadorean cabbage slaw traditionally eaten with pupusas, among other things. "Curtido de repollo" just translates as "seasoned cabbage." Of course, here the cabbage is largely seasoned with vinegar and salt, so, you know, it's pickled. And I think I speak for everyone when I say PICKLES!! Make some!

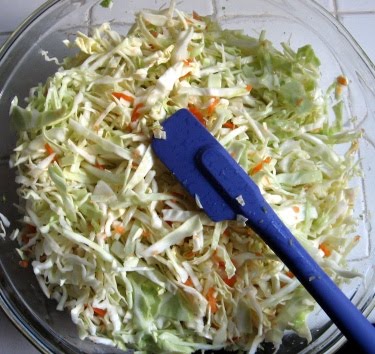
Curtido de repollo is super easy to make. All you really need is a decent knife, a big bowl, and the patience to let the cabbage sit around and pickle. In addition, it's exceptionally cheap; my cabbage cost 39 cents a pound, my carrots came from the farmer's market sort-outs bin, and I got my hot peppers for pennies at the local ethnic market. And have you seen the sheer amount of vegetable you get when you shred a cabbage? Even with shrinkage, we now have enough slaw to last at least a week.

I looked at a selection of different recipes, then decided to make a slight variation on Nathan's Comida's curtido de repollo.

Curtido de repollo: Salvadorean cabbage slawCurtido de repollo

1 small green cabbage
a carrot or two
half a small yellow onion
1.5 cups white vinegar
1 cup water
2 serrano peppers, or whatever works for your spice tolerance
1 tbsp salt

Core and shred your cabbage. Scrub and grate one large carrot or a handful of smaller ones. Finely mince half a small onion. Put all the vegetables in a bowl large enough to hold them. I'd recommend glass, as vinegar reacts with metal.

In a blender, liquefy your serrano peppers with the white vinegar, water, and salt. If you want a less spicy slaw, I'd either cut the pepper amount to one serrano or use jalapeños instead. You could also just cut out the peppers entirely, in which case you can eliminate the blender step and just add everything directly to the cabbage bowl.

Pour the pickling liquid over your vegetables and stir well. Watch out for pepper fumes--serranos are hot.

Now let the slaw sit for three hours before eating. This is by far the most difficult part of the whole process, as the raw cabbage coasted in spicy vinegar etc. is already pretty delicious.

The brine won't cover all the cabbage at first; this is fine. Just stir occasionally to make sure the brine gets in contact with everything. As the cabbage pickles, it'll become limp and exude some juice. Eventually the brine will come just about to the top of the mass of slaw.

After three hours, your curtido de repollo will be ready. Eat it!

chili with curtido de repolloSo far we have eaten this in big handfuls on top of bowls of the aforementioned chili. I also had a few quesadillas stuffed with slaw for breakfast. Both of these were excellent ideas.

Other combinations:
- Obviously, you should make some pupusas and eat them with slaw stuffed inside.
- Make tacos and slather slaw over their tops. Any filling will obviously be delicious.
- Grill some sort of sausage (meat, vegan, whatever), put it in a bun, and cover it with slaw.
- Pulled pork sandwiches obviously want lots of slaw both in the sandwich and on the side.
- Make an omelet and stuff it with handfuls of slaw, for a variation on the kimchi omelet.
- Make an unsweetened pancake batter, drop in a bunch of slaw, and cook up a bunch of delicious savory pancakes.

I plan on shredding more cabbage into the brine as we eat our way through it, if that seems appropriate. I'm going to try red cabbage, so the whole business turns bright pink.

Now I really want some fish tacos.

30 December 2011

Post-holiday roundup

homemade bbq spice and homemade pickling spiceWell. This christmas I got food poisoning and spent most of the day either in bed or face down on the floor, so I have zero delicious holiday food to discuss. How about we talk about some of the presents I gave instead?

Like everyone else on the internet, I wanted to give some handmade gifts this year. I had been half-planning to give out little bottles of homemade schnapps, but since 90% of the people to whom I give presents live at least 500 miles away, and the post office doesn't ship alcohol, that was out. So instead I went to the bulk bins and grabbed everything I needed to make some homemade pickling spice and barbecue rub.

The only ingredient that wasn't in the bulk bins was celery salt. Well, then! I made a batch of that as well. It's a good thing the farmer's market around here regularly features gigantic leafy heads of celery. The end product turned out so well I considered giving it away too. Then I realized that I hadn't had brunch with anyone in so long that I didn't know who else actually drank bloody marys, so I decided to just use it for my own.

I had initially wanted to package these in little spice jars, but ended up going with plastic bags instead. This was due to both 1. shipping costs and 2. the high likelihood of glass jars breaking in the flurry of holiday mail. It's ok though! Festive ribbon totally saves the day, right?

homemade bbq spice and homemade pickling spiceI have to say, there was an awful lot of ribbon all over the place this season. It was by far the most Martha Stewarty I have been in years.

30 November 2011

Carrot pickles!

homemade carrot picklesAfter my experiments this fall, my only real question is why I didn't try pickling sooner.

After the success of my refrigerator dills, I decided to branch out. Clearly, one of the key items on the thanksgiving (or maybe pre-thanksgiving) table is always the dish of pickles and olives. So I not only made another batch of dills, but also decided to try out these carrot pickles.

Let's just say that the garden next year will definitely contain more pickle components. Hey, it's winter (or "winter"--but it's foggy today in the south bay, and though that is normal for SF, it is highly abnormal in the valley, and definitely sends a clear message that it's going to be 50F for a while). Winter is the traditional time to get out the graph paper and the seed catalogs to plot out exactly what you want to grow next year. In short, jalapeños and carrots are on the list, and I wouldn't put it past me to plant a cascade of beets for good measure.

homemade carrot pickle ingredientsAfter acquiring a bunch of farmer's market purple carrots, half a red onion, and a jalapeño, I went to work.

The pickle-making process is super simple. I scrubbed the carrots, peeled the onion, and sliced them and the jalapeño into pieces. I made the brine by boiling a cup of water and two cups of vinegar with a quarter cup of canola oil, and seasoned the business with cumin, oregano, salt, and pepper. When the salt was dissolved, I added the chopped veg and cooked everything together for a little over five minutes. Then I decanted everything into a clean quart jar that I'd preheated with hot tap water.

Since I'd made my pickles with the lid on the pan, eliminating most of the evaporation, I ended up with a lot of extra brine. Okay then! I grabbed another couple carrots, scrubbed them, cut them into sticks, put them in another preheated jar, and poured on the additional brine. This way we had both cooked and raw (or only brine-warmed) carrot pickles to try.

homemade carrot picklesAt this point I lidded my jars, let them cool, and stuck them in the fridge. By thanksgiving, three days later, they'd matured into the most perfect instance of spicy pickle I could possibly imagine. Even though we also had a massive tableful of additional dinner, we ate about 1/3 of the quart jar in one go.

A couple things to think about:
- Yes, that is a layer of oil at the top of the jar. I think this is fine; just shake the jar to distribute the oil before opening.
- My brine turned bright pink. This is pretty clearly because I used purple carrots. Yay pink pickles!
- Since these pickles are made with onion and jalapeño, they get hotter over time. Be careful!
- Since these pickles are made with onion and jalapeño, you don't just get pickled carrot--you also get pickled onion and jalapeño.

chicken sandwich with carrot and jalapeno picklesIn fact, after we roasted our post-thanksgiving chicken (what? you don't roast a post-thanksgiving chicken??), and I was looking for something delicious to put on my resulting sandwiches, guess what I found? That's right: my lovely jars of pickles. I didn't use the pickled carrots on the sandwich, though. Instead, I fished out a few of the jalapeño rings and red onions.

On an english muffin with dijon mustard and freshly roasted chicken, they were perhaps the best choice ever.

chicken sandwich with carrot and jalapeno pickle