Showing posts with label potentially vegan. Show all posts

29 July 2015

First garden green beans of the year

First garden green beans of the year

I planted a truly massive amount of green bush beans this year. We had the garden space, and can basically never get enough beans, so why not? Besides, after the moles killed multiple jalapeƱo plants and a tomato plant, I figured that more plants equaled a better chance of actually getting a crop.

Now the beans are the most successful plants in the garden, with no attrition by mole at all. I'm picking huge double handfuls every other day, so as to keep up a steady supply for the whole growing season. Later I'll let one or two plants go, so the beans mature in their pods and can be used for seed next year. Hooray!

First garden green beans of the year: Green beans with butter and garlic

For my first foray into homegrown green bean cooking, I went super simple. What better way is there to eat beans than sauteed with butter and garlic?

Green beans with butter and garlic
Serves one. Multiply as needed.

1-2 big handfuls green beans
1-2 cloves garlic
1 pat butter/slug olive oil
salt and pepper to taste

Wash your green beans, trim them, and cut them into bite-sized pieces. Crush and mince your garlic.

Melt your butter or oil in a frying pan over medium to medium-high heat. Add your garlic and cook for about a minute before adding your beans. Season with several good pinches of salt. Cook, stirring occasionally, for about 5 minutes. If you like, you can add a splash of water to the pan and let the beans cook in the steam.

When the beans are done to your taste, season with pepper. Taste and add more salt as necessary. Eat immediately.

First garden green beans of the year: Green beans with zucchini and dill

Of course, beans can also get a little fancier. This is especially the case if you also need to get through a CSA box of vegetables every week. In this case, I more or less just added some delightful extras to the basic green bean and garlic recipe. It's still super easy and still delicious.

Green beans with zucchini and dill
Serves one. Multiply as needed.

1 big handful green beans
2 cloves garlic
1 small or 1/2 large zucchini
1 pat butter/slug olive oil
salt and pepper to taste
2-3 tbsp chopped fresh dill (or basil, tarragon, parsley, etc)
wedge of lemon

Wash your green beans, trim them, and cut them into bite-sized pieces. Crush and mince your garlic. Chop your zucchini into thin rounds or half-moons.

Melt your butter or oil in a frying pan over medium to medium-high heat. Add your garlic and cook for about a minute before adding your beans. Season with several good pinches of salt. Cook, stirring occasionally, for about 3 minutes. Add water to steam your beans if you like.

Add the zucchini and continue cooking for another 2-3 minutes, or until all the vegetables are done to your taste. Season with pepper and correct salt.

Serve topped with plenty of fresh dill and a squeeze of lemon juice. If you're having your beans alongside a seared piece of fish, put any extra dill and lemon on the fish.

Beans! They are the best.

Who's gardening this year? What are you harvesting now?

27 July 2015

Summer garden tuna salad

Summer garden tuna salad

The CSA box demands that we eat as many vegetables as humanly possible all summer long. This is simultaneously great and a problem.

Salads are the obvious solution, but an all-veg salad is usually not a sufficient lunch. Unless you want to make another entire dish, some sort of protein is necessary. I chose eggs -- we still have abundant CSA eggs -- and tuna, and decided to wake up the flavors with sriracha sauce, garlic, and fresh basil, scallion, and parsley. For some extra textural interest, I used a mix of cooked and raw vegetables. Altogether, this worked out super well.

If you aren't a tuna person, you can always leave it out and up the hard-boiled eggs to two, or sub in the cooked and drained beans of your choice. I'd probably go for white beans first, but any kind you like that maintains reasonable structural integrity should be fine. If you want to use other fish, maybe try fork-mashed sardines or a smoked fish of your choice. And of course, you can make this completely vegan by switching out both tuna and egg for beans. It's all good.

Some lime or lemon zest wouldn't be unwelcome, either.

Summer garden tuna salad

Summer garden tuna salad
makes 2 meal-sized servings

1 egg
1 cup broccoli florets in bite-size pieces
1 cup green beans in bite-size pieces
3/4 cup shredded/julienned cucumber
3/4 cup shredded/julienned zucchini (I used gold bar squash)
1 clove garlic, minced and pulverized thoroughly
1-2 scallions or a large handful of their greens, finely chopped
large handful basil leaves, finely chopped
large handful parsley, finely chopped
1 5-oz can tuna, drained
1+ tbsp olive oil
several good squirts sriracha or other hot pepper sauce to taste
salt, pepper
any other veg you think sounds good in this circumstance
salad greens to serve

Put your raw egg in a small pot of water and set it on to boil. Cook for 9 minutes at a simmer. Scoop the egg out of the water and put it in an ice bath.

While your water is still hot, add your broccoli and green beans. Bring the pot back to a boil and cook for 3 minutes, or until the vegetables are done to your liking. Drain, shock briefly in cold water, and drain again.

While you're waiting for the egg and cooked veg to cool enough to use, cut up your cucumber, zucchini, garlic, scallions, basil, and parsley. Add them to a mixing bowl along with your tuna, olive oil, sriracha, salt, and pepper.

When the egg is cool, peel and dice it. Add your egg, broccoli, and beans to the bowl. Mix thoroughly. Taste and adjust seasonings.

Serve on a bed of salad greens of your choice, with an extra drizzle of olive oil and a little more salt and pepper.

A spoonful or two of leftover salad, combined with mozzarella cheese and another dash of sriracha, makes a good quick quesadilla filling. The cucumber makes it a little drippy, but it's still delicious.

How are you eating your fresh summer vegetables?

06 July 2015

Fresh apricot sauce with honey and black pepper

Fresh apricot sauce with honey and black pepper

OKAY. We have just finished hosting John's mom and our niece for a full week of running around the SF bay area and points beyond. Much fun was had by all. The only problem is that I now have roughly 500 posts in my foodblog feed to get through as quickly as possible. Yay?

We didn't do that much cooking in the past week, considering the holiday etc., but one standout was this delightful apricot sauce. It was totally appropriate for multiple occasions. First, we seared some pork chops and served them with the apricot sauce, plus brown rice and garlic chard. This was lovely. But the sauce was even better on our last night, when we made a big batch of waffles for celebratory breakfast for dinner. Apricot sauce, waffles, and butter: yes please.

Of course, at this point I also must point out that our niece's favorite way to eat her waffles -- with peanut butter and maple syrup -- was excellent too. But you don't need me to teach you how to put peanut butter and maple syrup on waffles!

This sauce is very easy to make. Just a quick poach plus a little blending is all it takes to make your own delightful apricot concoction. This also creates what is possibly the most vibrantly orange sauce ever.

If you're planning to use this sauce with meat or other savory devices, I'd recommend adding a touch of something herbal. Rosemary would be ideal. You could either put a branch in the poaching liquid to let the flavor infuse into the fruit, or gently cook the pureed sauce with your rosemary for overall sauce infusion. Either way, you'd end up with something just a touch more complex and applicable to savory dishes.

This makes approximately 1.5 cups of apricot sauce, depending on the size of your apricots.

Fresh apricot sauce with honey and black pepper

Fresh apricot sauce with honey and black pepper

6-7 apricots
water to poach
2-3 tbsp honey (adjust to taste, depending on the apricots' sweetness)
10-12 grinds black pepper
stick blender or other appropriate blending device

Put a medium pot of water on to simmer. Halve and pit your apricots. When the water comes up to temperature, add your apricot halves and poach gently for about two to three minutes, or until the apricots float to the surface. They should be lovely and tender.

In a bowl or other container, combine your apricots, honey, and pepper. Puree thoroughly using the stick blender. If your sauce is too thick, you can thin it with a spoonful or two of poaching liquid.

Serve your finished apricot sauce with the delights of your choice. I choose waffles.

How are you eating your fresh summer stone fruit?

14 May 2015

Strawberry banana chia smoothie

Strawberry banana chia smoothie
Strawberry banana: perhaps not the most creative smoothie combination of all time. But hey! It's still tasty and easy, and it's certainly strawberry season right now. Why not?

Besides, the chia seeds make up for it.

I've been experimenting with chia seeds for a few months. They're excellent as a simple oatmeal topping or made into a pudding such as Gena's basic chia pudding. But I think my favorite way to eat chia seeds is to soak them and use them to thicken smoothies.

It's easy to adjust the amounts of seeds and liquid to make a thicker or thinner smoothie. This time, since I was using the classic smoothie thickener, banana, I kept the amount of chia seeds fairly low -- 1 tbsp of seeds for 1/2 cup total of milk and yogurt. It would definitely be possible to double the amount of seeds, eliminate the banana, and add in a bunch of different fruits and vegetables, though. Experiment and see what you like!

I strongly prefer smoothies made with fresh banana to those made with frozen. However! If you happen to have a freezer full of smoothie-destined bananas, you could absolutely use them here. You may need to add some extra liquid or switch out the yogurt for milk to adjust for your desired texture, but otherwise, you should be good to go.

If you make this in a regular-mouth mason jar, you can screw it onto a standard blender base and blend in the jar itself. Fewer dishes = yes please. This also means you can always put a lid on your jar and save the leftovers for later. Super easy.

Strawberry banana chia smoothie

1/4 cup milk or non-dairy milk of choice
1 tbsp chia seeds
1/4 cup plain yogurt or non-dairy sub of choice (or more milk)
4-5 strawberries, chunked
1 fresh banana, sliced
1 tsp flaxseed meal, optional

At least two hours before you want your smoothie, mix your milk and chia seeds together in your jar of choice. Refrigerate. Stir to mix twice at rough 10-minute intervals. This will keep your seeds from sticking together in one big lump at the bottom of your jar. Then just leave the jar in the fridge for 2 hours or more. I leave mine overnight.

In the morning, your chia seeds will be ready to go. Add your yogurt, strawberries, banana, and flaxseed meal to the jar (or put everything in a standard blender). Blend until fully pureed.

Drink it! Breakfast!

Do you eat chia seeds? What's your favorite thing to make with them?

PS: I have a sprained ankle. WHY. (It's because the moles dug a hole right in front of the back door. Jerks.)

08 May 2015

Carrot pinto bean chipotle soup

Carrot pinto bean chipotle soup

Because there's no reason to stop eating soup just because it's May.

I am doing nineteen things at once lately, so soup is actually one of the better choices I could make. It's super easy to make, delicious, cheap, and stores well in the freezer for future nights when I don't want to do anything but collapse into bed. Put some soup in a bowl, throw some lettuce on a plate (or into the soup), and you have a full dinner.

This particular soup is lovely and spicy and delightful. I will eat plenty.

Carrot pinto bean chipotle soup

olive oil or butter
1 onion
6 carrots
2 stalks celery
2 cloves garlic
1 boiling potato
2 cups cooked pinto beans
4 cups veg or bean broth
salt, pepper, bay leaf, cumin, oregano
1-2+ chipotles in adobo & sauce
optional garnish: green onion, cilantro, yogurt, etc.

Warm your oil or butter in a large soup pot while you peel (or scrub) and dice your onion, carrots, and celery. Add the vegetables and a pinch of salt to the pot, stir, and cook over medium-high heat for about 5 minutes, or until softened and beginning to brown.

Mince your garlic and dice your potato. Add these to the pot and continue to cook for another minute or two. Then add your beans and broth, season to taste with salt, pepper, cumin, and oregano, throw in a bay leaf, and bring the whole business to a boil. Reduce the heat to simmer, cover, and cook for about 15 minutes, or until all your vegetables are cooked through.

At this point you'll want to pull the pot off the heat, remove the bay leaf, and puree the soup to your desired texture with an immersion blender. I like a completely smooth soup, but it's fine to leave yours a bit chunky if you prefer.

Check out the texture of your soup. If it's too thick, add some water or broth. If it's too thin, put it back on the heat and simmer to reduce to your desired texture.

When you're happy with your soup's texture, taste and correct any seasonings. Then, off the heat, stir in as much finely chopped chipotle pepper in adobo as you desire. The amount can vary quite a bit depending on your spice tolerance, so it's a good idea to start off slowly and taste as you go. We like spice, so I used about 2 tablespoons of chopped chipotle and sauce.

Serve your soup with your choice of garnish. Chopped green onion works exceptionally well here, as does cilantro or fresh oregano. If you happen to be making this at the height of corn season, a handful of kernels fresh off the cob would be an excellent idea. You may also want to have some toasted corn tortillas or chips available for dipping.

What's your favorite thing to eat after a busy day?

14 April 2015

Winter squash polenta with chipotle pinto beans

Winter squash polenta with chipotle pinto beans

I've been thinking about the combination of squash and beans for a few weeks now. Black beans and sweet potato are a natural match in things like enchiladas and black bean-broccoli stuffed sweet potatoes, so why not try a variation with winter squash?

This is just a basic soft polenta with a big whack of delicious, vibrant winter squash puree added in. I still had some previously roasted CSA squash puree in the freezer, so this was the perfect way to finish it up. Of course, there are still two squash on our counter. Those need to get eaten soon too!

Polenta does take a bit of time to make, but it's such a delicious result that I think it's well worth it. The overall result is smooth and comforting, with a subtle sweetness (not to mention a BRIGHT ORANGENESS) from the squash and a hint of contrasting black pepper. And the combination with spicy beans? Yes. The experiment worked.

Wilted dark greens with garlic would be an excellent addition if you want more vegetables. Cilantro would be a great garnish here too.

Winter squash polenta with chipotle pinto beans: polenta and water mix

Winter squash polenta

3 tbsp butter or olive oil
1/2 medium yellow onion
3 cups veg broth, water, or a mix
1 cup polenta and 1 cup water, combined
~2 cups winter squash puree
salt and pepper to taste

Melt your butter or oil in a 3-quart or bigger pan on medium heat while you dice your onion finely. Add the onion to the pan and cook, stirring occasionally, for about five minutes, or until nice and fragrant and translucent.

Add your water or broth and bring the pan to the boil. I used 2 cups of vegetable stock and 1 of plain water, which worked perfectly.

If you haven't mixed up your raw polenta and water, now is the time to do so. Give it a few good stirs to break up any lumps. Then gradually add your polenta and water mix to the pot, stirring each addition in well.

When all your polenta has been added, it's time to settle in for the long haul. Reduce the heat to low and cook, stirring frequently, for about 25 minutes. Many polenta recipes will have you stir for the entire cooking time, but I don't think this is necessary, especially if you are also cooking some tasty pinto beans at the same time. Just keep an eye on your polenta and stir it frequently.

Your polenta will be cooked when it's thick and is pulling away from the sides of the pan as you cook. Taste it to make sure. Then add your squash puree, season well with salt and pepper to taste (start with 1/2 tsp of each), stir it all up, and cook for another five minutes, or until hot through and tasty.

Chipotle pinto beans

butter or oil
1 yellow onion, chopped
3-4 cloves garlic, minced
cumin, oregano, salt to taste
~2 cups cooked pinto beans
2 chipotle peppers in adobo sauce, finely minced
adobo sauce to taste
green onion to garnish

This is more or less a non-mashed version of basic refried beans. Saute onion and garlic in oil or butter until softened. Season with cumin, oregano, and salt. Add pinto beans and a bit of their broth (if homemade) and cook, stirring, for five or ten minutes, until everything is hot through and the beans are at your preferred degree of dryness. Correct seasonings and take the pan off the heat. Finally, stir in your chipotles, plus a couple spoonfuls of the adobo sauce to taste. (Chop the rest of the can of chipotles in adobo and freeze in an ice cube tray for future applications.)

Serve your beans over a big scoop of polenta and garnish with chopped green onion. Oh man, it's so good.

Fried winter squash polenta squares with fried egg

I spread the leftover polenta evenly into a casserole dish, pressed some parchment paper over the top, and left it to solidify a bit overnight. The next morning, I fried up a couple of squares in a little butter, then topped them with a fried egg. Plain romaine on the side.

This was an excellent plan and I highly recommend that you try it, either with neat squares of polenta or a couple of rough handfuls shaped into patties. Runny egg yolk with crispy polenta is definitely worth a few minutes of effort.

How are you eating the last of your winter storage vegetables?

02 April 2015

Sugar snap pea and chive schmear

Sugar snap pea and chive schmear

There were sugar snap peas at the farmer's market! Yay!

I had to make the most of them by eating a few raw. They were very nice that way, either by themselves or dipped into hummus. But it was clear that they would be even nicer mixed into some cream cheese and spread on pieces of hot toast.

I left my peas raw, because SPRING, but this would also work with steamed or blanched peas. Do what works for you.

Also, if you happen to be into the classic pea and fresh mint combination, you might want to give that a try instead of the chives. Double trouble!

Sugar snap pea and chive schmear

Sugar snap pea and chive schmear

~10 raw sugar snap peas
~8 chives
3-4 tbsp cream cheese/tofu cream cheese
salt & pepper to taste
a spoonful of optional milk/yogurt to thin

Break the stem of each pea and pull down to strip off the string that goes down the side of the pod. Discard the waste. Chop your peas and chives into fine slices.

Add all the ingredients to a medium bowl and mix thoroughly with a fork. This will take a bit of effort, since cream cheese can be pretty thick and unmashable. A splash of milk or plain yogurt will help thin it down if necessary.

Spread on the toasted bagel or other bread product of your choice. I used wheat bread, because there were no bagels currently in the house, and it was good.

How are you eating your fresh spring peas?

23 March 2015

Rƶsti with sweet potato

Rƶsti with sweet potato

We've talked about rƶsti a few times before. This Swiss concoction is essentially a big pan-fried shredded potato cake, not unlike hash browns. We like to eat it for big weekend brunches, with plenty of coffee and possibly an egg or two. It's easy, impressive, delicious, and cheap. What's not to love?

This weekend I decided to switch it up and try adding sweet potato to rƶsti. Since sweet potatoes are significantly harder and less fluffy than the standard white boiling potato -- not to mention sweeter -- I decided against a 1:1 switch. Instead, I used about 1/3 sweet potatoes and 2/3 mixed yukon gold and red. This turned out to be a good ratio: we got some nice sweet potato flavor and color, but preserved the general texture of a classic rƶsti.

Now, of course, we are thinking about more things to shred and add to rƶsti. Carrot? Zucchini? Beets could be really excellent if you wanted to top your rƶsti with a classic sour cream and smoked salmon combination. Fennel might be interesting there as well. And a mixed-veg rƶsti would certainly be a good way to use up broccoli stems and the odd heads of kohlrabi that come in our CSA box. I'm definitely going to keep this in mind for next fall.

Rƶsti with sweet potato

Rƶsti with sweet potato

6-8 medium boiling potatoes
1 sweet potato
4-6 green onions
salt, pepper
oil or butter to cook (not olive oil -- the smoke point is too low.)

Start out by peeling your potatoes and sweet potato. Shred them with a box grater or food processor, using the largest size shred.

Squeeze the liquid out of your potatoes. We just take big handfuls and squeeze them out over the sink before depositing them into a mixing bowl. You can also use a dish towel or paper towel if you prefer. This step is critical to ensure that your rƶsti cooks well, so don't skip it!

Slice up your green onions and add them to the bowl. Add a generous seasoning of salt and pepper. Mix everything together.

Heat a 10-inch frying pan or skillet of your choice over medium-high to high heat. I think a well-seasoned cast iron pan is your best bet here, followed by nonstick. When your pan is hot, add a generous tablespoon of oil, butter, or a mix of the two. Swirl the pan to coat well.

Add your potato mixture to the pan, pressing with a spatula to get it reasonably even. Cook for 8-10 minutes, or until lovely and golden brown on the first side, adjusting the heat down a bit if necessary. You'll be able to see the color coming up around the edges. The potatoes should also come free of the pan in one big solid cake when shaken back and forth a few times.

Next, flip your rƶsti. To do this, you'll need some intact oven mitts and a wooden (or otherwise unmeltable) cutting board big enough to cover your pan. Wearing the oven mitts, put the cutting board on top of the pan. Grab the pan and board at opposite sides and flip the entire contraption over onto your counter. Remove the pan to the stove, add a bit more oil if needed, and slide the flipped rƶsti back into the pan, uncooked side down. You did it!

Cook another 8-10 minutes, or until the second side is just as beautiful as the first. Slide the finished rƶsti onto your cutting board, cut it into wedges, and serve.

Just about anything that sounds good with potato should be good with rƶsti. I had mine with plain yogurt and pickled peppers. John had his with ketchup. If you are a proponent of fried eggs with runny yolks, this is an excellent place to apply them.

How do you like to eat your brunch-hour potatoes?

15 March 2015

$1.85 at the farmer's market

$1.85 at the farmer's market

If you're careful, $1.85 at our farmer's market can get you this. Three zucchini, six pea pods, one tiny carrot, and an armful of assorted peppers from the $.65/lb sort-outs bin: $1.20. A small bag of broccolini, no price sign to be found: $.65.

What will I do with all of these?

Most of the peppers will get washed, trimmed judiciously (there's a reason they were in the sort-outs bin), and put into a quick brine to pickle. The few in good enough shape to keep for a few days will go into all kinds of things: quesadillas, salads, scrambled eggs, tomato sauce.

The zucchini will probably get sauteed with olive oil and garlic and thrown over some pasta, maybe with a handful of toasted breadcrumbs on top.

I could eat the peas raw with some hummus, slice them at an angle and throw them into a green salad, or cook them with the zucchini for pasta purposes.

The broccolini will likely get a simple saute, either with butter and garlic or a good squirt of sriracha sauce and some chopped almonds. To be eaten next to a piece of fish or some spicy seared tofu.

The carrot will get eaten one way or another.

What kind of vegetables are popping up at your farmer's market this spring?

08 March 2015

Oatmeal with flax, yogurt, jam, and chia seed

Oatmeal with flax, yogurt, jam, and chia seed

Okay! Things have clearly been busy at our house. Everything we eat lately seems to be something I've written about before. Pasta fagioli, salads with nice homemade dressing, enchiladas, quesadillas: yes, yes, yes and yes. (Although now I am noticing just how old these posts are and thinking about writing them up again anyway.)

These are our house standards, and we love them. It's really nice to have a variety of autopilot dishes under your belt, so during those weeks when you have to commute an hour and twenty minutes (one way) to a conference that starts at 8 am, you can still eat actual food.

I got home Friday night post-conference at roughly 7:45, and John seared me a piece of fish with lemon and parsley, chopped up some romaine for salad, and poured me a glass of wine. It was an excellent plan. Later I fell asleep with my glasses on and laptop open.

This morning I had oatmeal. Want to see some oatmeal?

Oatmeal with flax, yogurt, jam, and chia seed

Oatmeal with flax, yogurt, jam, and chia seed

rolled oats
flaxseed meal
water
salt
yogurt, jam, and chia seed to top

Put as many oats as you want to eat into a small pot, along with a teaspoon or two of flaxseed meal and a generous several shakes of salt. Cover with water to about one finger's width above the oats. Cook over medium-high to high heat for five minutes, or until the oats are done to your preferred consistency, stirring occasionally. A longer boil will mean thicker oatmeal.

Put your finished oatmeal in a bowl and top with yogurt, jam (mine was apricot), and chia seed, or switch it up and add whatever you like.

What are some of your favorite things to eat over and over, frequently when you're too busy to think of new things to make?

22 December 2014

Emergency pasta with broccoli

Emergency pasta with broccoli

And this weekend our fridge died.

We are having the best possible holiday season around here, let me tell you.

The repair guy is coming this afternoon. We'll see if we need a new fridge. In the meantime, our landlord brought us a couple of tiny dorm fridges.

Remember our freezer full of stuff? Yeah. Me too. It's not full of stuff anymore. At least we tend to keep a lot of nonperishables in there along with the serious frozen food. It means we didn't actually lose the entire contents, and we have plenty of rice and lentils and flour and yeast and what have you.

The other high point is that in a largely vegetarian household, the refrigerator isn't ever stuffed with a $400 standing rib roast or anything like that. Instead, we have lots of vegetables, tortillas, butter, cheese, and eggs, most of which are just fine in an ice-filled cooler overnight.

We'll also get to start over and build a new freezer & fridge in a more organized and less completely bonkers fashion. But that's about it for the good there.

So this weekend was just exhausting. Then we had to cook.

If you've ever thought you can't make dinner with a single pot of boiling water, think again, because we just did.

Emergency pasta with broccoli

1/2 lb chunky pasta
1 small or 1/2 large head broccoli
salt, pepper, red pepper flake
olive oil
fresh parsley
parmesan or another hard grating cheese

Salt a pot of water and put it on to boil. When your water boils, drop in your pasta.

While you're waiting, chop your broccoli into medium florets. Peel the stem and cut that up too.

When your pasta is about 2/3 of the way done, add your broccoli to the pot. Stir to mix and continue to cook for the remaining 1/3 time. Taste a piece of pasta and one of broccoli for doneness. Drain well.

In a mixing bowl, combine your drained pasta and broccoli with salt, pepper, red pepper flake, olive oil, chopped fresh parsley, and grated parmesan to taste. Toss well.

Serve immediately. If you have some extra parmesan or parsley, throw that on top. We had a few chopped almonds lying around, so I added those too.

Don't take any pictures because you are too tired. Go to bed and sleep the sleep of the person who still needs to work tomorrow even though it is officially holiday week.

09 December 2014

Chai nog and coffee nog

Chai nog and coffee nog

It's December! Time to break out the nog!

I tend to veer away from the traditional "nog + brandy + rum" concoctions as long as it's not actually Christmas Eve. Instead, nog has become a tasty treat with which to spike my usual dose of hot caffeine action.

Now, I am not one for making very fussy coffee drinks at home. There is no espresso machine in our house, and no milk foamer, and we don't really want to acquire them. So that means these drinks are super simple: just a cup of strong, spicy chai or serious coffee, with a creamy nog addition. They're really easy and really delicious.

Any nog of your choice should work well here. Dairy eggnog, soy nog, homemade almond and date nog -- any and all are good.

Even without any alcohol, the sweetness and thickness of nog makes these drinks perfect for a dessert nightcap. Just use a decaf spiced chai or coffee and you should be all ready for a fragrant, spiced trip to sleeptown.

And if you do want to add a slug of brandy, go for it!

Chai nog

Brew 1 cup strong chai of your choosing. I use a standard tea bag and let it infuse for at least 5 minutes for serious flavor. Top up your cup with eggnog. If you like nutmeg, a little sprinkle is a good garnish.

Coffee nog

Brew yourself a cup of strong coffee. Top up your cup with eggnog.

Drink and be happy!

What festive holiday drinks are you drinking this season?

02 December 2014

Fennel frond, lemon zest, and black pepper cream cheese schmear

Fennel frond, lemon zest, and black pepper cream cheese schmear

Contrary to a variety of expectations, I did NOT pickle the last two heads of fennel that came our way in the CSA box. Instead, I chopped one up and mixed it with a whole lot of other vegetables to roast for Thanksgiving dinner. So good!

However, that left me with a big handful of fennel fronds. What can you do with fennel fronds?

Fennel frond, lemon zest, and black pepper cream cheese schmear

I refrained from simply cramming them all into the half-empty fennel, ginger, and lemon pickle jar, although that was kind of tempting.

Instead, I thought I'd chop them up and see how well they worked in a cream cheese schmear, along with some lemon zest and black pepper. And lo, they worked SUPER WELL.

If you are into the delicate anisey tang of fennel, you should absolutely give this one a try. The fennel and lemon make a refreshing and zingy combination -- an excellent contrast to the creamy creamy cheesy cheese (*cough* *That's a NSFW Foamy the squirrel reference*).

This makes approximately one laden bagel's worth of schmear. Of course, you can always increase any and all of the ingredients at your leisure.

Fennel frond, lemon zest, and black pepper cream cheese schmear

Fennel frond, lemon zest, and black pepper cream cheese schmear

3-4 tbsp cream cheese/tofu cream cheese
2-3 tbsp fennel fronds
zest of 1 lemon
black pepper to taste
optional milk/yogurt to thin

Finely chop your fennel fronds and lemon zest. Mix all ingredients together well, using a fork to blend thoroughly.

To serve, spread on the bagel, cracker, or other toasty bread product of your choice. I had mine on a couple of leftover whole wheat rolls from Thanksgiving. That worked exceptionally well.

Such a great addition to the schmear library. I am definitely going to make this one again, and not just because there is still yet another head of fennel hiding in the crisper.

More schmears for your bagel-topping delight:
- Spicy salsa and bloody mary schmears
- Red onion and dill schmear
- Fresh corn and basil schmear

What are you eating on your bagels lately?

03 November 2014

Spicy tuna pasta salad with green beans, tomato, and romaine

Spicy tuna pasta salad with green beans, tomato, and romaine

A few weeks ago I found cans of tuna for practically the lowest price ever -- 66 cents each -- and grabbed a stack for future nearly-instant lunch endeavours. You know, like this one. Mixed with pasta and an assortment of garden veg, it was delicious, yet incredibly cheap. Definitely a win all around.

For veg, I looked at what was left of the garden. I know I'm not the only one who still has a windowsill full of slowly ripening green (and orangish, and actually red in some cases) tomatoes. This sounded like an excellent way to eat one. With a handful of the last beans -- a mix of plain green bush beans and scarlet runners -- I had a good mix of vegetables to spike my salad.

And why not serve the whole shebang on a bed of salad greens? Who doesn't like a little salad on salad action? You have to love the texture contrast of chewy tuna and pasta with super crispy, crunchy romaine. Even a soft butter lettuce would be great here, though. It just depends on what you have in the crisper.

In fact, practically any element of this salad can be switched out for something else. Butter lettuce is not the only option -- so are hard-boiled eggs, roasted beets, grated carrots, handfuls of sprouts, tiny broccoli florets, chickpeas, white beans, rice or quinoa, and as many or as few herbs as you happen to have on hand. Use what you have and make what you love.

Spicy tuna pasta salad with green beans, tomato, and romaine

Spicy tuna pasta salad with green beans, tomato, and romaine

chunky pasta of your choice
1 can tuna
1 clove garlic
the tail end of a bunch of cilantro or parsley
handful of green beans (cooked or raw; mine were raw)
1 small to medium tomato
olive oil, touch of vinegar, dijon or brown mustard
salt & pepper
sriracha sauce if you like it hot
romaine lettuce or your choice of greens, washed & dried

Start by putting on a pot of salted water and cooking your pasta. While it's cooking, prep the rest of your salad ingredients.

Drain your tuna and deposit it into a mixing bowl. Mince your garlic and herbs finely, slice your green beans into pieces (bite-sized if cooked, and very thin if raw), and dice your tomato; add all of these to the bowl. If you want to add any other vegetables, beans, eggs, herbs, etc., cut them up and add them too.

Dress your salad with a few glugs of olive oil. Season with vinegar, mustard, salt, pepper, and sriracha sauce to taste. When your pasta is done, drain it and add it to the bowl. Mix, taste, and correct the seasonings.

To serve, scatter a few handfuls of chopped romaine over your plate. Top with as much tuna pasta salad as you like. Garnish with some extra cilantro or a grind of pepper. Voila!

Everyone loves salad with even more salad on top.

What easy lunches and dinners are you making this fall?

25 September 2014

Tomato & cream cheese schmears: spicy salsa & bloody mary

Tomato & cream cheese schmears: spicy salsa & bloody mary

When you're canning tomato sauce, as I obviously have been, sometimes you end up with a little bit of sauce left over.

What to do with a bare tablespoon or two of tomato sauce? I propose a cream cheese schmear. In fact, I propose two tomato-based schmears: spicy salsa and bloody mary. Tomato schmears for everyone! It's a perfect plan for the end of the tomato harvest.

I made the salsa schmear with tomato sauce and the bloody mary schmear with fresh raw tomato. The tomato sauce had the texture advantage, since it mixed in smoothly and created a thicker schmear. The raw tomato added some water content, which made it tougher to mix in and created a looser final product, but it definitely had the flavor advantage, because peak harvest tomatoes are just that good. Both of these schmears would work well with either tomato sauce or raw tomato; you just have to decide what your priorities are.

These schmears are also ideal if you have not only tomatoes but a few homemade pickles in your kitchen. For instance, do you have a jar of pickled jalapeƱos? Dice up a few rings and use them in the spicy salsa schmear. Otherwise, fresh jalapeƱos certainly provide a serious kick.

For the bloody mary schmear, a handful of dilly beans adds a delightful and appropriate tang. I used some refrigerator green bean pickles that I'd thrown into a batch of Emmycooks's spicy pickled peppers, but traditionally canned dilly beans should work just as well.

The intensity of each schmear is really up to you. Do you like a subtle schmear with only a hint of spice? Or do you like a big, in-your-face schmear packed with vegetables and herbs? Add as much or as little of each ingredient as you like for your own perfect concoction.

Hooray for homemade schmears! Don't go to the bagel shop! These are better.

Each schmear will generously cover one bagel.

Tomato & cream cheese schmears: spicy salsa & bloody mary

Spicy salsa schmear

3-4 tbsp cream cheese/tofu cream cheese
1-2 tbsp tomato sauce (or sub finely diced fresh tomato)
1 tsp finely diced jalapeƱo, or more to taste (raw or pickled)
1-2 tbsp chopped fresh cilantro
1-2 tbsp chopped green onion
1 pinch each of ground oregano and cumin
several good grinds of pepper
optional fresh corn
optional milk/yogurt to thin as needed (or pickled jalapeƱo brine?)

Mix everything together well and serve on the bagel or bread product of your choice. Garnish with green onion or cilantro if you so desire.

I made the spicy salsa schmear with the aforementioned leftover tomato sauce. You can see that this was done with sauce from the immersion blender batch, since there are a few flecks of tomato skin in the mix. You can also see the thicker texture; check out those knife marks! Stir in a spoonful of milk or yogurt to thin if necessary.

Tomato & cream cheese schmears: spicy salsa & bloody mary

Bloody mary schmear

3-4 tbsp cream cheese/tofu cream cheese
1-2 tbsp finely diced tomato
3 finely diced dilly beans
1 large pinch celery salt
2 dashes worcestershire sauce/tiny dash of soy sauce
hot sauce to taste - 2-3 drops or more
several good grinds of pepper
optional milk/yogurt to thin as needed (or use the dilly bean brine)

Mix everything together thoroughly with a fork. Be aware that the juicy tomato may take a minute to absorb fully into the schmear. But the end result is well worth a few minutes of stirring!

The finished texture will likely be loose enough not to require any thinning. If you find it too thin, stir in a bit more cream cheese.

Spread your schmear on a toasted bagel. Garnish with additional chopped dilly beans or a few celery leaves if you happen to have them.

Hooray for homemade schmears!

Previously on the schmear show:
- Christmas morning red onion & dill schmear
- Fresh summer corn & basil schmear
- The anti-bagel: parsley, green onion, & arugula schmear

What are you eating on your bagels lately? What's your favorite homemade schmear?

10 June 2014

Apricot crisp with oat crumble topping

Apricot crisp with oat crumble topping

Someone in our neighborhood had an epic apricot harvest, and this is the result, at least at our house. Hello, fruit!

It's a standard thing around here to get overwhelmed by your burgeoning fruit trees. When that happens, you spend an hour or two picking fruit and put the results in a bag in your front yard with a big FREE sign. Then everyone walking past gets to bring home a bounty of fresh fruit. We do this all the time with our annual pineapple guava deluge. It's great: the glut of fruit gets used instead of rotting away on your back lawn.

This time I came across a big tray of apricots, picked out a bagful, and brought them home for delightful baking escapades. Crumble for all!

A huge variety of other fruit would work well here. Strawberry and rhubarb are excellent and seasonal. Cherries, plums, peaches, nectarines, or a mixture of any of the above would be delicious. In the fall, apples or pears would work beautifully. And you can always add a handful of blackberries, blueberries, or raspberries to punctuate a panful of stone fruit. Delightful.

Apricot crisp with oat crumble topping

Apricot crisp with oat crumble topping

Fruit:
10 apricots, or about 2 cups sliced fruit
1 tbsp sugar
1/4 tsp cinnamon

Crumble:
1/2 cup rolled oats
1/4 cup flour of your choice
2 tbsp sugar
4 tbsp butter/oil

Start by prepping your apricots. Wash them, halve them, remove their pits, trim off any bruises or other issues, and slice them. I ended up cutting each half apricot into five or six pieces, but you can quarter them or even leave the halves as-is if you prefer. It's all good.

Butter an 8x8 inch pan. Tip in your prepared fruit, sprinkle it with sugar and cinnamon, and stir to mix. Flatten your apricots into an even layer.

For the crumble, mix together your oats, flour, and sugar in a bowl. Add the butter, cut into chunks, and rub it into the dry ingredients with your fingertips.

Spread your crumble mixture evenly over your fruit. Dot with additional butter if you feel like it (and have more butter lying around).

Bake at 350F for 45 minutes or until lovely and bubbling around the edges and browned on top.

Apricot crisp with oat crumble topping

This crisp is best eaten hot, right out of the oven. The apricots melt into an intensely flavored jam, while the crumble provides a perfect nutty contrast. You're going to want to have some good seed-specked vanilla ice cream with it, too.

What are you doing with your new summer fruit?

09 June 2014

Classic potato leek soup for the win

potato leek soup

It's supposed to be 85F out today, so why don't we talk about soup? That sounds totally rational, right?

We got a huge bunch of amazing leeks in our latest CSA box. And yes, we could have made so many different things from leeks. Leek gratin! Simple leek and cream sauce for pasta! Tiny leek quiches! All of those sound really good, actually. But we decided to go for the most traditional leek dish of all, and made a huge vat of potato leek soup.

This soup is excellent because it lets you use 100% of the leek to make a delicious, exciting, filling dish. The greens go into a very leeky vegetable broth while the whites melt down into delicious oniony shreds. It's super satisfying if you want to prevent food waste. And the soup itself is not only DELICIOUS but so, so cheap to make. Such a good idea.

This is almost a classic potato leek soup, with a few tiny twists. First, I made my soup subtly spicy with jalapeƱo, red pepper flake, and smoked paprika. Second, I added more veg, because what on earth does one do with a handful of turnips? Well, one probably roasts them, but I have yet to do that. The turnip is actually a really nice addition here, since it adds a touch of spice and some interesting vegetable complexity to the finished product.

I didn't take any pictures of the leek-prepping process, but Elise at Simply Recipes has a great post on how to clean leeks if you want some more detailed info. Or watch Jacques Pepin prep leeks! That's always fun.

potato leek soup

Potato leek soup

3 leeks with greens
additional veg scraps for broth
lots of water
butter/oil of choice
1-2 carrots
1-2 sticks celery
1 small turnip (optional, depending on whether it came in your CSA box)
1 jalapeƱo (optional, depending on your spice preference)
~5 potatoes
salt, pepper, bay leaf, red pepper flake, smoked paprika, thyme, sage, marjoram
milk, cream, or plain yogurt of your choice
fresh parsley to garnish

Start by trimming your leeks. Cut off the darkest greens one at a time, keeping the core of lighter green leaves intact. Rinse your trimmings well in cold water. Then add them to a 3-quart or larger pot along with a few handfuls of mixed vegetable scraps (from the stockpile) and a bay leaf. Cover the whole business with lots of water, bring it to a boil, reduce the heat, cover, and let simmer while you're making the rest of your soup. Your broth will be done after about 15 minutes of simmering. Strain out the solids and have it ready to use.

Of course, if you have vegetable stock already made, you can use that instead and freeze your leek greens for future broth application.

Next, clean your leeks. Keeping the root end intact, slice down the stalk toward the greens to split the leek in half. Rotate 90 degrees and slice again to create four quarters of leek. Wash extremely well under cold water. Be diligent here, because leeks are almost uniformly FILTHY and need real attention. Then trim off the root ends and slice your leeks into 1-inch pieces.

Melt some butter in a large soup pot over medium heat. Add your leeks, stir, and let cook for 5 minutes or so while you prep all the rest of your soup veg.

Scrub and chop your carrots. Rinse and chop your celery. If you have a turnip hanging around, scrub or peel it (depending on age) and cube it up. If you like spice, dice a hot pepper of your choice. Put all of these into your soup pot, add a sprinkling of salt, and cook, stirring occasionally, until softened.

You can add other sturdy vegetables too if you have them hanging around. If you want to add greens, you'll need to reserve them and wilt them in quickly at the end of cooking. One of the greatest things about a soup like this is that it can take practically anything you throw at it.

Next up: potatoes. I used yukon gold, but any boiling potato should be good here. Scrub your potatoes well and dice them into half-inch cubes. Add them to your softened aromatic veg. Season with pepper, red pepper flake, smoked paprika, thyme, sage, and marjoram, stir everything together, and cook for another five minutes or so.

Now is the time to add your strained broth. You'll want to add at least four cups or so, or enough to cover all your vegetables by a finger's width; top it up with water if necessary. Bring to a boil, cover, reduce heat, and simmer until your potatoes are cooked through. This should take about 20 minutes, depending on the size of your potato pieces.

When your potatoes are tender, pull the pot off the heat and puree your soup to the texture of your choice using an immersion blender. Then return the pot to the heat, taste and correct the seasonings, and continue to simmer gently until your soup has reduced to your desired texture.

Add the milk, cream, or yogurt of your choice off the heat, or even to individual bowls. I kept the main body of the soup creamless since I wanted to freeze it; if you do this, which I definitely recommend for future ultra-fast and delicious meals, you can just add your dairy at the end of a simple reheat. Super easy.

Hooray! It's soup! Garnish each bowl with parsley and serve a giant crispy salad on the side.

What ridiculously inappropriate food are you eating lately?

03 April 2014

Spaghetti with all-the-veg sauce


AKA: "what to do with that eggplant you found in your crisper."

On the surface, this looks like a very ordinary plate of spaghetti--but when you get past the surface, you find all the vegetables in the land.

The real story is that I LOVE eggplant. Eggplant! And I love tomato sauces stuffed with not only eggplant, but nearly every other vegetable I can get my hands on. Onion and garlic are obvious choices; bell peppers of all colors are a natural match with tomato; carrots enhance the flavor while providing their own interesting little note of sweetness. So the other night I wanted to put all of these vegetables into a punchy, spicy, and still comforting tomato sauce, and to eat it over a giant plate of as much pasta as I could possibly eat.

There was only one problem: the pasta I wanted (and had lying around) was spaghetti. A chunky sauce really, really does not work with a long, thin pasta. What to do?

Obviously, the answer was the stick blender. A pureed sauce with all the veg in the land? Perfect for coating a massive pile of long, thin pasta. So I broke out half the crisper and got to work.


Spaghetti with all-the-veg sauce

onion
garlic
olive oil
carrot
eggplant
red bell pepper
tomato puree/sauce/etc
salt, pepper, red pepper flake, oregano, basil
fresh parsley to garnish
spaghetti, vermicelli, or other long pasta
immersion blender!

The amounts here are all variable depending on what vegetables you have on hand. Use what you love.

Start by warming some olive oil in a wide saute pan. Add a chopped yellow onion and let it soften while you mince a handful of garlic cloves and peel and cube an eggplant. Peeling is important since we want the eggplant to really meld in here. I used an entire long, thin eggplant, but you can use as much as you like.

Add your garlic and eggplant to your pan along with a pinch of salt. Stir together and cook for a good ten minutes, or until your eggplant has turned golden brown and begun to collapse. If things start to stick to the pan, shy away from adding extra oil; eggplant will drink it up as fast as it can, and you'll end up with super-greasy sauce. Instead, a splash of water can help loosen things up.

Scrub and chop a carrot or two and dice up a red pepper. Add these to the pan, season with red pepper flake, oregano, and basil to taste, and mix it all together. Give the carrot and red pepper about five minutes to soften before you add your tomato.

Season with a bit more salt, bring to a simmer, and let cook for another ten minutes or so, or until your eggplant is completely cooked through. If your sauce starts to get too thick, add a little water. Otherwise, just stir things up occasionally.

While you're waiting, cook your pasta. Try to time it so it'll be done at approximately the same time as your sauce.

When your sauce is ready, turn off the heat and puree it with your immersion blender. Taste and correct seasonings, being sure to add some black pepper. Drain your finished pasta, add it to the sauce, and mix well. Keep warm over the lowest heat setting while you wash the pasta pot; this will give your pasta a chance to absorb some of the flavors of the sauce. Stir in a handful of fresh parsley, and you are done.


Serve yourself a gigantic serving of pasta, garnish with even more parsley, and eat with gusto. I had a very simple salad of butter lettuce on the side, for even more vegetable goodness.

How are you eating your spaghetti lately? Does anyone else love eggplant enough to melt one in its entirety into a vat of pasta sauce? I obviously do.

24 March 2014

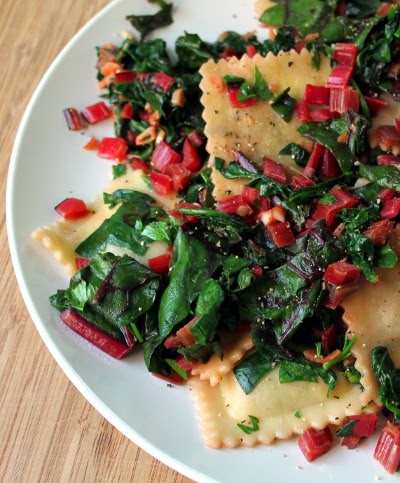
Ravioli with super garlic butter greens

ravioli with garlic-sauteed chard and beet greens

It's spring! I don't know about you, but I want as many vegetables as I can possibly get my hands on. So I went to the farmer's market and came home with two bunches of kale, one of chard, a big bag of spinach, and a bunch of beets with beautiful tops. All the greens in the land!

And what's the best way to make greens the star of the show? Keep them simple and abundant. So I chopped up some chard, spinach and beet greens, sauteed them quickly with garlic, and finished them with butter and parsley.

It's almost ridiculously easy to make a mess of greens into a full meal. A poached or fried egg on top would be classic, as would a sliced and browned sausage or a slab of seared marinated tempeh. But I wanted pasta, so I decided I would mix my greens with a bag of local ravioli that I'd stashed in the freezer for just such an occasion. Such a perfect combination with a huge pile of garlicky, butter-drenched greens.

This is a particularly quick and easy way to stuff your face with all the freshest and best spring vegetables. It took about fifteen minutes for me to go from zero to lunch. Perfect.

ravioli with garlic-sauteed chard and beet greens

Ravioli with garlic-sauteed greens

frozen ravioli or other pasta
garlic
butter or olive oil
mixed spring greens (chard, beet, & spinach, or your choice of others)
salt, pepper, maybe a few red pepper flakes if you want them
fresh parsley

Start by putting a pot of water on to boil for your pasta. Let it heat while you start your veg, and cook your ravioli at an appropriate point in the proceedings. Obviously, although ravioli is great, you can also switch it out for any kind of pasta you like.

Smash and chop as many cloves of garlic as you like. I used five or six for about two servings of pasta, because that's how I roll.

Saute your garlic in butter or olive oil in a wide saute pan over medium to medium-low heat. While it's cooking, wash, trim, and chop up all your greens. Since I was using chard and beet greens, I cut off their stems and chopped them separately from the leaves. Use as many greens as you can possibly cram into your pan, because they will wilt and reduce in size dramatically. I probably used around four or five cups.

When your garlic has started to turn slightly golden, add your chopped stems to the pan, along with a pinch of salt. Turn the heat up slightly and saute for about five minutes, or until the stems have softened. Then add all your greens to the pan. You may need to do this in a couple batches, letting the first batch start to wilt before adding the second. Saute gently for about five more minutes, or until all your greens have wilted into a vivid green (and possibly also pink) mass.

By this point your pasta should be done, so drain it and add it to the greens. Season with salt and pepper and mix together gently. Then turn off the heat and add a pat of butter or a few drips of olive oil to the pan. Stir a few times to let the butter melt and distribute it evenly. Done!

ravioli with garlic-sauteed chard and beet greens

Serve your ravioli in massive piles and garnish them with fresh parsley and a grind or two of pepper. If you want to add any more garnishes, go for it. Parmesan cheese, chopped toasted almonds, or even some crispy golden breadcrumbs would work well here, but resist the urge to go too far. The freshness of the greens will make them shine pretty beautifully on their own.

Springiest lunch ever!

How are you eating all your spring greens?

21 February 2014

Mashed potato pancakes with yogurt and pickled peppers

Mashed potato pancakes with yogurt and pickled peppers

I don't know about you, but I have been SUPER BUSY lately. For the past couple days I've been working setup for Stitches West, a gigantic yarn convention, and if you think that doesn't sound like a lot of work, you've never hauled around a bunch of 100-lb boxes of yarn. The transition between brainwork and physical labor is interesting, to say the least.

So I've had to actually eat breakfast every morning. This is emphatically not normal for me; I've pretty much always felt nauseous if I ate anything within an hour of waking up. My usual breakfast is a lot of tea, but this week that was not going to fly. So it was a good thing that I had half a massive batch of mashed potatoes with spinach hanging out in the fridge, because that meant I could have simple mashed potato pancakes every single morning. They're the perfect solution: they're fast, easy, NOT SWEET (crucial for a non-sugar-crashy breakfast), and don't make me feel sick.

On top of that, mashed potato pancakes are a good vehicle for a variety of toppings. I went in the yogurt direction because I love yogurt and have a big vat of it around. Besides, we all know that sour cream works well with creamy potato--and yogurt, with its similar rich tang, does too.

Mashed potato pancakes with yogurt and pickled peppers

Super mashed potato pancake!

leftover mashed potato
butter as needed
to top: plain yogurt, herbs, mustard, pepper, etc.

Form palm-sized patties out of cold leftover mashed potatoes. Fry over medium-high heat in the pan of your choice. If you had a lot of butter and cream in the initial mash, you may need no butter whatever in the pan. I certainly didn't, although I was also using a nonstick pan.

Cook for about three to five minutes per side, or until golden brown. The timing will depend on the strength of your burner. If your patties are very thick, you may want to put the lid on the pan for a few minutes to ensure that the middles are hot through.

When your pancakes are done, slide them onto a plate. Top with the savory deliciousness of your choice and eat immediately, as hot as possible.

Mashed potato pancakes with yogurt and pickled peppers

I ate my pancakes with two different yogurt toppings. #1: thick labneh (i.e. drained yogurt) with whey-fermented brown mustard and black pepper. #2: ordinary plain yogurt with pickled peppers and black pepper. Both of these were excellent choices, although I think I prefer the latter for sheer inclusion of homemade pickles. Hot pancakes with a crispy coating and soft center, topped with creamy yogurt and crunchy, spicy pickled peppers? They were SO good.

Lots of other additions would work really well here, though. If I had fresh dill, you know I would have added some of that to my yogurt. A straight-up tzatziki, such as my tzatziki, would also be amazing.

Hooray for mashed potato pancakes! What's your favorite savory pancake?