Showing posts with label condiments. Show all posts

02 December 2014

Fennel frond, lemon zest, and black pepper cream cheese schmear

Fennel frond, lemon zest, and black pepper cream cheese schmear

Contrary to a variety of expectations, I did NOT pickle the last two heads of fennel that came our way in the CSA box. Instead, I chopped one up and mixed it with a whole lot of other vegetables to roast for Thanksgiving dinner. So good!

However, that left me with a big handful of fennel fronds. What can you do with fennel fronds?

Fennel frond, lemon zest, and black pepper cream cheese schmear

I refrained from simply cramming them all into the half-empty fennel, ginger, and lemon pickle jar, although that was kind of tempting.

Instead, I thought I'd chop them up and see how well they worked in a cream cheese schmear, along with some lemon zest and black pepper. And lo, they worked SUPER WELL.

If you are into the delicate anisey tang of fennel, you should absolutely give this one a try. The fennel and lemon make a refreshing and zingy combination -- an excellent contrast to the creamy creamy cheesy cheese (*cough* *That's a NSFW Foamy the squirrel reference*).

This makes approximately one laden bagel's worth of schmear. Of course, you can always increase any and all of the ingredients at your leisure.

Fennel frond, lemon zest, and black pepper cream cheese schmear

Fennel frond, lemon zest, and black pepper cream cheese schmear

3-4 tbsp cream cheese/tofu cream cheese
2-3 tbsp fennel fronds
zest of 1 lemon
black pepper to taste
optional milk/yogurt to thin

Finely chop your fennel fronds and lemon zest. Mix all ingredients together well, using a fork to blend thoroughly.

To serve, spread on the bagel, cracker, or other toasty bread product of your choice. I had mine on a couple of leftover whole wheat rolls from Thanksgiving. That worked exceptionally well.

Such a great addition to the schmear library. I am definitely going to make this one again, and not just because there is still yet another head of fennel hiding in the crisper.

More schmears for your bagel-topping delight:
- Spicy salsa and bloody mary schmears
- Red onion and dill schmear
- Fresh corn and basil schmear

What are you eating on your bagels lately?

26 October 2014

Fennel pickle with lemon and ginger


So remember the fennel and orange pickle I made this summer? How about a fennel, lemon, and ginger pickle too?

The only correct answer is YES.

This refrigerator pickle is crispy, crunchy, tangy, and bright. It's super easy to make and so, so good on practically any sandwich you can think of. Okay, you might not want it on a classic peanut butter and jelly, but otherwise? Yes, please.

Putting together a cheese platter? Add some fennel pickle and get ready for something amazing. Is your crisp green salad a little boring? Not with fennel pickle, it isn't. Replace the typical relish and sauerkraut on a Chicago-style hot dog with fennel pickle and a touch of spicy mustard, and I promise, you will be in heaven.

It's possibly even better than the first fennel pickle. You've been warned. Try to give the other people in your household a chance to at least try some before you eat the entire jar yourself.


Fennel pickle with lemon and ginger
based on a recipe from The Joy of Pickling

2 heads fennel plus a couple decorative fronds
1 tsp pickling salt
zest of 1 lemon, julienned
1-inch piece ginger, shredded or julienned
4 peppercorns, roughly crushed
6 tbsp champagne vinegar
juice of 1 lemon plus enough water to equal 6 tbsp
1 tbsp sugar
pint jar
canning funnel
chopstick or flexible spatula

Cut each head of fennel into thin slices. Mix the fennel with the pickling salt in a medium bowl. Set aside for about an hour to let the salt draw out some of the fennel's liquid.

When the hour is up, drain off the accumulated juices. Toss your prepared fennel with your lemon zest, ginger, and fronds. Pack this mixture into your pint jar. It may look like a tight squeeze, but with some careful packing, everything should fit.

Next, it's time to make your brine. Put your peppercorns, vinegar, lemon juice, water, and sugar into a small saucepan. Bring to a boil, lower the heat, and simmer for about five minutes, or until the sugar has dissolved.

Using your canning funnel, pour your brine into your jar. Leave 1/4 inch of headspace at the top. Use a chopstick or spatula to release any air bubbles, and top up the brine as needed. Now lid the jar, refrigerate, and let everything pickle for at least 24 hours.

Now break out your bread and cheese and lettuce and make yourself a sandwich of epic deliciousness.

How is your fall pickling going? Any new and exciting pickles on your plate?


05 August 2014

Lamb meatballs with chive tzatziki

Lamb meatballs with chive tzatziki

As most of you know, although the typical meal at our house is either vegetarian or vegan, I am actually an omnivore. Meat happens on limited occasion. This was one of them.

This time, I wanted to make a freezer stockpile of little juicy meatballs to use for emergency solo lunches. I wanted them to be full of flavor, but not so particularly spiced that I couldn't use them for a variety of applications. So I grabbed some lamb (the best of all red meats), added a handful of garlic, onion, and parsley, and went to town.

I decided to oven-bake these instead of frying them for several reasons. First, baked items cook with minimal attention. Second, you can sidestep the otherwise unavoidable barrage of hot fat particles burning you intermittently and greasifying everything in your kitchen. Third, this batch was big enough that it wouldn't all fit in my biggest frying pan at once. However, if you want to brave all these issues, you can absolutely cook these guys in the frying pan or cast-iron skillet of your choice. The latter would certainly let you achieve an excellent crust!

If you don't like lamb, you can go for pretty much any other ground meat you prefer, or use a blend of different meats. If you're planning on going for a very lean meat, such as ground turkey, you may want to mix it with some ground pork, so the fat content is still high enough to make a juicy meatball.

And, of course, you can always double or triple the recipe if you want to have meatballs in the freezer for the next few months. Either freeze the cooked meatballs in one layer on a cookie sheet and remove to a freezer bag when solid, or portion them into containers and freeze them that way. It's all good.

Lamb meatballs with chive tzatziki

Lamb meatballs
Makes 4 dozen small meatballs or 2 dozen large meatballs.

2 pieces bread to make approx 3/4 cup breadcrumbs
1/4 cup milk or another soaking liquid of your choice
1/2 small red onion
4-5 cloves garlic
1/2 red, yellow, or orange bell pepper
a mushroom or two if you have them lying around
1/4 bunch (approx 2 tbsp) chopped parsley
1 1/2 tsp salt
2 tbsp dried red New Mexico chile/your choice of red pepper flake
as much freshly ground pepper as you desire
1 lb ground lamb

Preheat your oven to 350F.

Start by making breadcrumbs. Grab a couple slices of bread and finely chop them with a chef's knife or in a food processor. Of course, if you have premade breadcrumbs around, you can definitely use those instead.

Put your breadcrumbs in a large bowl. Add your milk and let the breadcrumbs soak it up while you prep your other ingredients.

Mince your red onion, bell pepper, mushrooms, and parsley as finely as you can. It's important to chop everything super-finely so your meatballs cohere well. Again, if you have a food processor, you may want to use it.

Add all your chopped veg and herbs to the bowl, along with your salt, pepper, chile, and ground lamb. Mix well, using your hands to distribute all the different elements as evenly as possible.

Form your meatballs by pinching off a small chunk of your meat mixture and patting or rolling it together. I like small meatballs, so I made mine a bit smaller than a ping-pong ball. You can go up to the size of a golf ball or even larger if you prefer. Arrange your meatballs in rows, either on a rimmed cookie sheet or in a glass casserole dish with sides.

Bake for about 20-25 minutes, or until your meatballs are cooked through but still juicy and tender inside. If you're making much bigger meatballs, you'll probably need to extend the cooking time to 30 or 35 minutes. They will be brown on the outside and exuding several tablespoons of hot liquid fat. (This is why it's important to use rimmed cookie sheets instead of flat ones.) If you like, pour off the fat and save it for sauteing greens later. Won't that be excellent?

Test for doneness by cutting a meatball in half, checking the color, and eating it. The tray above needed just a few more minutes in the oven to be fully browned.

Now you can either eat your meatballs right away or freeze them for later. I kept a few out for immediate eating and froze the rest, portioned out into small containers. This way, I'll be able to defrost and reheat one container's worth at a time. Then they'll go into soup, into a pasta sauce, on top of a big salad, or into a sandwich. Hooray!

What did I do with my first serving of meatballs? I put them in a wrap and had the most satisfying lunch on the planet.

I made a tiny batch of tzatziki to go along with my meatballs. There was no fresh dill in the house (although there is now plenty of dried dill around!), so I decided to change it up with some chives. Super simple.

Chive tzatziki for one

2 tbsp Greek yogurt, labneh, or strained full-fat yogurt
~2 tbsp chopped chives
~2 tbsp shredded or julienned cucumber, seeds removed
salt and pepper to taste

Mix all your ingredients together. Taste and adjust seasonings. Voila!

Next, use it to make:

Lamb meatballs with chive tzatziki

A delightful lamb meatball wrap

flatbread, tortilla, pita, or naan of your choice
hot meatballs
chive tzatziki
avocado slices
lettuce leaves

Warm a piece of flatbread in the toaster oven until flexible. This should take about 2-3 minutes at 275F. You can also do this on the stovetop in a frying pan.

Fill the warm flatbread with leaf lettuce, meatballs, tzatziki, avocado slices, and any other vegetable that sounds good to you.

Roll it up, skewer it with a toothpick or encase it in foil, and eat it with gusto.

Hooray! A delicious and satisfying lunch.

What are your favorite sandwiches lately?

21 July 2014

Fennel and orange pickle

Fennel and orange pickle

Cauliflower is not the only thing I am pickling this year! Nope. In fact, the pickling vat has been going on and off for several weeks now, and all the results are nothing short of thrilling.

I made yet another batch of my favorite pickled peppers ever, from Emmycooks (come back, Emmy!), doubling the recipe and adding some green beans into the mix. The results are stunning and delicious, and I can't wait to start tossing those beans into weekend bloody marys.

But the real star of the pickling season so far has been a surprise underdog: refrigerator pickled fennel.

This was yet another CSA save. We got multiple heads of fennel two weeks in a row. I am generally not into the typical shredded fennel salad, and so was kind of at a loss for what to do with it. But no more! This is hereby my default way to deal with any fennel that shows up at our house -- at least until I start experimenting with other pickle variations. A lemon variation would certainly be on the table, as would the inclusion of some fresh ginger. Oh man. I'm super excited to try that.

Seriously, it's SO GOOD. It is amazing. I am amazed.

This is heavily based on the pickled fennel with orange recipe in The Joy of Pickling, which is an excellent book and well worth a look if you like pickles even a little. The main change I made was to switch out the white wine vinegar for champagne vinegar, which I find smooth and delightful, and which I actually had in the cupboard besides. I also bumped up the orange zest, because who doesn't love orange zest? And everything worked out beautifully. Hooray!

Though it looks small, it is mighty.

Fennel and orange pickle

Fennel and orange pickle
adapted from The Joy of Pickling

2 heads fennel plus a few fronds (more or less for decoration)
1 tsp pickling salt
zest of 1 orange
4 peppercorns
6 tbsp champagne vinegar
juice of 1 orange (approx 6 tbsp)
1 tbsp sugar
pint jar
semi-optional canning funnel
chopstick or flexible spatula

Start by trimming your fennel bulbs, halving them, and slicing them thinly. In a medium bowl, toss your sliced fennel with the pickling salt. Let this sit for about an hour, so the salt begins to drain some of the juices from the fennel.

When the hour is up, drain off any accumulated liquid. Pack your fennel slices, fronds, and orange zest into a clean pint jar. I used wide strips of orange zest, but I'd recommend that you go for thin strips, either by using an actual zester or by slicing up strips taken with a vegetable peeler. Be careful just to include the zest and no white pith.

To make your brine, crush your peppercorns roughly with a mortar & pestle or the bottom of a measuring cup. Put your pepper, vinegar, orange juice, and sugar into a small pan and bring the mixture to a boil. Simmer, swirling occasionally, until the sugar has dissolved.

Using the canning funnel, pour your brine into your jar, leaving 1/4 inch of headspace at the top. Use your chopstick or spatula to go around the edge of the jar, releasing air bubbles. Top up your brine if needed, cap your jar, and put your pickles in the refrigerator overnight.

After 24 hours, crack your jar open and taste your pickles. Try not to just eat the entire jar with a spoon.

Since this is such an unusual pickle, I bet you guys are wondering what to do with it (besides eating it with a spoon, which I heartily recommend). Well, I have found it to be excellent on toasted cheese sandwiches, usually with a milder cheese such as emmenthaler, along with plenty of cracked pepper. A super-simple snack platter of crackers with said emmenthaler, a smear of mustard, and some fennel pickle would be an excellent variation. It's definitely delicious tossed into a green salad, preferably with some orange supremes thrown in. And if you are of the sausage in a bun persuasion, how about searing one up and topping it with big handfuls of pickled fennel?

But I won't judge you if you just eat it with a spoon.

Who else is making crazy pickles this summer? Forget popsicles, right? PICKLES WIN.

(Oh, also I am suddenly going to BlogHer14 this weekend! If you are going, let me know & let's meet up!)

16 July 2014

Refrigerator giardiniera

Refrigerator giardiniera

One of the vegetables we've been getting from our CSA is cauliflower. I love cauliflower, but two heads in two weeks is a little much to work through when there are only two people in the house. So what's the solution?

PICKLES.

When I came across Laurie of Relishing It's Giardiniera, I knew a batch was in my future. All the vegetables in the land, cut into pieces, doused in spicy brine, and kept nice and crispy in the refrigerator? Yes, please!

The vegetable mixture here is super flexible. I just went through the crisper and grabbed everything that sounded like it would make a good pickle. If you want to use a different mix of vegetables, go for it! If I'd had more space, I would have added in some small green beans (tailed but otherwise whole). Laurie added radishes and celery to hers. What do you have? It will probably be delicious.

Re: brine. Most giardinieras seem to include sugar in their brine. I am not at all into sweet pickles, so I decided to leave out the sugar. This was a wise choice for a lovely, vinegary, spicy pickle. However, if you do prefer a sweeter pickle, you can always choose to add a tablespoon or so of sugar. Give it a try and see what you like.

A note on canning: this is a refrigerator pickle, which means it is not processed for long-term storage. While it may be acidic enough to water-bath can, I am not a food safety or canning authority, so I can't provide accurate info about converting this to a canned pickle. Check the Ball Blue Book or another trusted canning resource if you want to make a canned giardiniera.

Refrigerator giardiniera

Refrigerator giardiniera
Based on Relishing It's Giardiniera

Makes 2 pints or 1 quart.

vegetables:
1/4 head cauliflower
1 carrot
1/2 red or yellow pepper, or several baby peppers
1 jalapeno (or half if it's very spicy -- mine was.)
2-3 cloves garlic
1/4 red onion
1/2 tsp thyme
1 tsp oregano
1 tsp peppercorns

brine:
1 1/2 cups white vinegar
3/4 cup water
1 1/2 tsp pickling salt
1 large or 2 small bay leaves

equipment:
2 pint jars or 1 quart jar with lids
canning funnel (semi-optional)
chopstick or flexible spatula

Chop your vegetables into pieces. The size is pretty much up to you. I kept my cauliflower and peppers in larger chunks and sliced everything else, but whatever you like should be fine.

Divide your spices evenly between your clean jars. I used pint jars, so I put 1/4 tsp thyme, 1/2 tsp oregano, and 1/2 tsp peppercorns in each. To keep the spice distribution fairly equal, add half your garlic and jalapeno slices to each jar as well. If you're using a quart jar, none of this applies, of course.

Pack your mixed vegetables into your jars. I did my best to distribute everything equally, but if you feel like cramming everything in willy-nilly, that's fine too.

Next, make your brine. Add all the brine ingredients to a saucepan with a lid. Bring the brine to a boil and cook, covered, until the salt has dissolved.

Remove the bay leaves and add one to each jar. Pour your hot brine into your jars, using the canning funnel if you so desire. Leave 1/4 inch of space at the top. Use a chopstick to release any air bubbles, working your way around the side of each jar. Top up the brine if needed, lid, and refrigerate overnight.

After 12-24 hours, your giardiniera will be ready. Hooray!

Refrigerator giardiniera

I especially love how the red onion tinges everything a beautiful pink.

What can you do with giardiniera?

- If you are a pickle lover, just eat it as a snack, or as a side with a big deli sandwich.
- Scatter handfuls of it into big green mixed salads.
- Use small pieces as garnish for deviled egg halves.
- In fact, chop up a handful and add it to egg salad or potato salad in place of the typical dill pickle.
- Use it as a garnish for a hearty soup like borscht.
- Puree it with a handful of kalamata olives for a very pickley tapenade.

What pickle experiments are you conducting this summer?

23 May 2014

Cashew cheese with dill and red onion

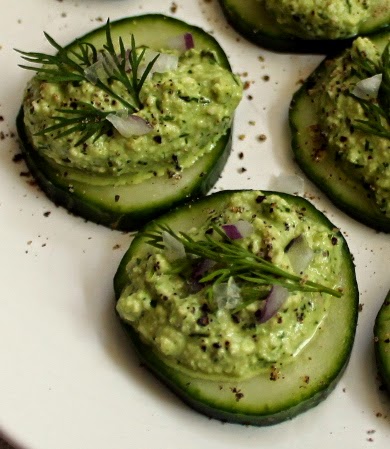
Cucumber cashew cheese bites with dill and red onion

So one thing about making egg salad is that afterward you still have 3/4 of a bunch of fresh dill to eat. This is not a huge problem for me, since I love dill, but it does get a little interesting if you're trying to figure out how to eat ALL of it in a short period of time.

I mixed some dill with cottage cheese and pepper and ate it on toast. I...uh, that's actually all I had done by this point. So when I unearthed a container of cashews from the back of the freezer, they seemed like the best idea ever. Cashew cheese with plenty of fresh spring herbs, coming up!

Cashew cheese is one of my favorite spreads ever. It's super versatile and works well with any number of flavors. This time I threw in plenty of dill and some diced red onion for a delightful fresh and herbal nut cheese. So good!

This makes a small batch of about 2/3 cup of cashew cheese, but you can easily double or triple it for a full party tray of Memorial Day tidbits. No problem!

Cucumber cashew cheese bites with dill and red onion

Cashew cheese with dill and red onion

1/2 cup raw cashews soaked in water for 1+ hours & drained
1/2 cup chopped fresh dill, loosely packed
additional chopped fresh parsley if desired
2-3 tbsp chopped red onion
1/8-1/4 cup water
salt, pepper
squeeze of lemon juice
cucumber slices and extra dill & onion to serve

Start by soaking your cashews. Simply cover them with twice their depth of water and let them sit for an hour or more. I actually let mine go for a couple days in the refrigerator, but that is not necessary at all. In fact, if you soak cashews too long, they can start to turn purple! This is evidently their previously dried juice getting rehydrated, so it's not a cause for alarm, but it can be a little disconcerting.

When you're ready to make your cashew cheese, drain your cashews. In a blender or food processor, combine your herbs, onion, 1/8 cup water, salt, pepper, lemon juice, and finally the cashews. It's a good idea to put the heaviest things (in this case the nuts) on top, for a smooth blending experience.

Blend until well combined. If you have a hard time getting everything to combine well, add a bit more water. I ended up using the full 1/4 cup in my standard blender, but if you're using a high-powered blender or food processor, you may not need to do that.

Taste and correct the seasoning, and you're done. Hooray!

Cashew cheese with dill and red onion

Once you have your batch of cheese ready, it's time to use it. I decided to have mine with cucumber.

Top each cucumber slice with a spoonful of cashew cheese. Garnish with an extra frond of dill, some finely chopped red onion, and a grind or two of pepper. Voila! Fill up a few plates, pour a few glasses of sauvignon blanc, and you're totally ready to party.

Cucumber cashew cheese bites with dill and red onion

Since I was eating my cashew cheese by myself, I did not make a gigantic party tray. Instead, I refrigerated my leftovers and later ate them with a lot of pretzel sticks. So, you know, that is a less fancy but similarly delicious alternative.

Hooray!

What delights are you whipping up for the holiday weekend?

12 May 2014

Homemade dill-dijon mayonnaise and the egg salad thereof

Homemade dill-dijon mayonnaise and the egg salad thereof

Homemade mayonnaise is supposedly difficult to make correctly. That's interesting, because this took under five minutes to make and had no issues whatever. Don't be scared--just give it a try!

The worst that can happen is that your mayo breaks. To fix a broken mayonnaise, all you have to do is get out another egg yolk and gradually whisk your broken mayo into it. No problem.

We wanted a super-flavorful mayo, so John (who was at the whisk) broke out the jar of dijon mustard, a bunch of fresh dill, and some chive blossom vinegar.

Let's go!

Egg salad on a radish slice

Mayonnaise with dill and dijon

1 egg yolk
splash of vinegar (chive blossom, white wine, or champagne)
spoonful dijon mustard
salt, pepper
1/2 cup grapeseed oil
chopped fresh dill (or other herbs of your choice)

Mix together egg yolk, vinegar, dijon, and salt and pepper to taste. Gradually whisk in the oil until your mayonnaise is completely emulsified. Fold in as much dill as you like. Taste and correct the seasonings, and you're done.

You can use this immediately or stick it in the refrigerator to use later. Fresh mayonnaise only keeps for about 3-5 days, so make plans to use it up quickly!

Now that you have some homemade mayo, what should you do with it? My vote is always and forever for egg salad.

Homemade dill-dijon mayonnaise and the egg salad thereof

Egg salad for two

5 hard-boiled eggs
3-4 radishes
a handful apiece of fresh dill and chives
3-4 tbsp homemade mayo
1 tbsp dijon mustard or more to taste
salt, pepper

Chop your eggs. I like to chop mine irregularly for a more interesting texture in the final product. Slice your radishes and cut across the slices to make little strips. Chop further if you want smaller bits. Wash and chop up a healthy whack of both chives and dill.

Deposit your eggs, radishes, herbs, mayo, and mustard into an appropriate bowl. Season with salt and pepper to taste. Mix everything together, correct seasonings, and you're done. Hooray!

Homemade dill-dijon mayonnaise and the egg salad thereof

This recipe makes enough for four open-faced egg salad sandwich halves or two very full closed sandwiches, plus some leftovers to scoop onto radish slices. You could also serve spoonfuls in nice crisp lettuce leaves or endive boats. Hooray!

Now I really want to take a batch of these on a picnic, with a bagful of apples and a cold bottle of sauvignon blanc. So perfect for summer.

Have you ever made homemade mayonnaise? How did it go?


10 January 2014

Lamb burgers with yogurt and dijon mustard sauce

Lamb burgers with yogurt and dijon mustard sauce

Well. The beginning of 2014 has turned out to be unexpectedly challenging so far. I for one am feeling pretty tired and ready for some serious comfort food. It's time for burgers.

At our house, burgers are usually Jenna of good good things' BBQ pinto bean burgers. You should absolutely give these a try, if you haven't already. SO GOOD. I made up a huge batch to freeze several months ago, and was that ever a good idea. The only problem was that we ate them all, and I haven't made up another batch yet.

So this time, exhausted and in need of immediate protein infusion, I went for a lamb burger.

Lamb is absolutely my burger meat of choice. Beef has that tallowy mouthfeel; pork is too much fat all at once; chicken is boring and easy to overcook. Lamb, in contrast, is delicious and strong, juicy and intense, and it matches super well with all the seasonings I like best (read: practically all of them). Ginger and lemongrass, soy sauce with hot chili pepper and garlic, feta and artichoke, bell pepper and onion piperade--any combination is delicious.

I grabbed a red onion and a bell pepper, ripped up a piece of bread, and went to work. Burgers!

For garnish, I decided to make up a micro-batch of a really easy, really delicious sauce. It's the easiest thing on the planet: plain yogurt with dijon mustard. This stuff is the best possible idea as long as you like both yogurt and mustard. Mixing them together creates a spicy, tangy sauce that is far more than the sum of its parts, and takes literally seconds to make. Perfect.

Lamb burger on kaiser roll

The mighty lamb burger

1/4 of a red onion
1/4 of a red bell pepper
1/2-2/3 cup breadcrumbs
1/2 lb ground lamb
salt, pepper

Start by chopping your vegetables as finely as possible. Finer bits will adhere better to the finished burgers. You can, as mentioned, add more things to your lamb burgers. Some garlic would be nice, as would a big handful of fresh parsley, but this time I kept it simple.

If you don't have any breadcrumbs around, chop up a piece of bread too. No problem! Also no trips to the store to buy something as cheap and easy to make as breadcrumbs.

Note that breadcrumbs are mandatory in a good burger. They keep it moist and tender, eliminating the "solid meat hockey puck" issue. Do not make these without breadcrumbs.

Mix everything together in a big bowl with your hands. Yeah!!

Lamb burger with red pepper and red onion

Form the meat mixture into reasonable burger-sized patties. I made three from this amount, but you could definitely make four slightly smaller patties if you wanted to. Freeze any burgers you don't want to cook immediately with a square of parchment paper in between them. Then you can just defrost and cook them in times of future burger emergency.

Fry your lamb burgers over high heat for about four minutes on the first side. Flip, reduce the heat, cover, and continue to cook on medium to medium-low for another four or so minutes. The time is going to depend on how hot your stove runs, so check for doneness and cook longer if necessary. Just imagine you're making a grilled cheese sandwich and you should be good.

Serve on a delightful toasted bun with the condiments, cheese, and vegetables of your choice. I used the aforementioned yogurt and mustard sauce plus a whole lot of crispy romaine lettuce. Fries are not mandatory, but they're certainly recommended.

Lamb burgers with yogurt and dijon mustard sauce

Yogurt and dijon mustard sauce

plain full-fat yogurt
dijon mustard (or probably any good spicy mustard)

This is the easiest sauce ever. Simply mix together roughly equal amounts of yogurt and mustard until smooth. Taste and decide whether you want to spice it up with more mustard or tang it up with more yogurt.

Serve on a lamb burger, as a dipping sauce for fries, or use to garnish cooked vegetables. I tried this with roasted carrot, and it was excellent. Steamed broccoli is on the to-try list as well.

Together, these guys made a plate of comfort food at its finest. What hearty dishes are you cooking in the depths of winter?

30 August 2013

Sauteed carrots with spicy brown mustard

Mustard-sauteed carrots

Sometimes the simplest preparations are the best.

This time, I had made up a batch of Janet of The Taste Space's amchoor chana, and I needed something vegetabley to stand up to the very beany & lemony chickpea content. There were carrots in the crisper and homemade lactofermented mustard (courtesy of Amanda at Phickle) in the refrigerator door. And thus my sauteed carrots with spicy brown mustard were born.

All you have to do is give carrots a quick & hot saute, then add a hit of seed-filled mustard. The result is super-easy, sweet and toothsome, with a kick of mustard heat. It's definitely a great way to nudge the lowly carrot out to center stage.

Mustard-sauteed carrots

Sauteed carrots with spicy brown mustard

peanut oil/sub of your choice
carrots
salt
spicy seedy mustard

Warm the oil on medium-high in a wide frying pan or saute pan of your choice. While it's heating up, scrub and slice your carrots into whatever shape you like. I did half-moons just because they're easy. And no, I generally don't peel my carrots, although you are totally free to go ahead and peel yours.

Add your carrots to the oil and toss to mix. Sprinkle a touch of salt over the pan and cook, stirring or shaking occasionally, for about five minutes, or until your carrots are almost cooked through. The timing is going to depend both on the size of your carrot pieces and the heat of your stovetop, so make sure to taste as you go. You may want to add a splash of water to the hot pan to steam your carrots a bit if you're using thick slices.

When your carrots are just a hair away from done, add a couple spoonfuls of spicy mustard to your pan. Stir to coat well and continue to cook for about another minute. then take the pan promptly off the heat, scoop your carrots onto your plate, and serve the whole shebang.

Eat!

How are you transforming ordinary veg lately?

31 July 2013

Pickles and mustard, oh my

In further keeping with the theme of the summer--that is, "Oh man, I'm definitely not cooking an actual meal today,"--I've been making a slew of random condiments, garnishes, and snacks. It's AMAZING and I love it.

First, I decided to use some of the whey I got from making labneh with plain yogurt. I always want to use the whey, but I rarely find anything I actually want to make before it's turned questionable. But not this time! This time I just so happened to be reading about Phickle's lactofermented mustard. So obviously a lactofermented mustard was meant to be.


Yes, I have been staging a lot of pictures right here. It's the shelf immediately to the left of my kitchen windows, so it gets good light.

Anyway. Lactofermented mustard turns out to be super easy and VERY MUCH worth the minimal effort.


I didn't see a whole lot of active fermentation--no bubbles or anything of that nature--but the results are still pretty stunning. My mustard is spicy and complex and just the barest bit sweet. And I have enough to last for months! HOORAY.

This certainly made for some excellent sandwiches. But you know what else makes for excellent sandwiches? Pickles. So I broke out the vinegar, veg, and spices, and put together a batch of Emmy Cooks' spicy pickled peppers and one of Marisa's pickled eggplant.

spicy pickled peppers

I've made these pickled peppers before; they're one of the best sandwich accoutrements of all time. They're also super easy: make a simple brine, pour it over a jarful of sliced peppers, season with peppercorns and dill, and put in in the fridge. Voila! Pickled peppers for your delight & edification.

You should absolutely make some of these. I mean it. We can go through a jar in a few weeks if we're eating a lot of sandwiches. They're also really good sprinkled over salads, or even a bowl of spicy chili.

The pickled eggplant, however, was new & intriguing. So I hit the farmer's market for a handful of long thin Chinese eggplant, grabbed a bottle of vinegar, and went to work.

Chinese eggplant

For the eggplant pickle, you simmer salted & drained eggplant spears in red wine vinegar and pack them into jars with basil and pepper. Then you process them in a water bath canner for ten minutes. Marisa has the full process on her post at Food in Jars.


I had to wait a week to crack one of these guys open and satisfy my curiosity.

If you like a serious red wine vinegar flavor and enjoy the soft texture of steamed eggplant, you will like these pickles. Since the flavor is so intense, it's probably a good idea to combine them with a mild or rich component. I personally have found them to be great in an open-faced sandwich with a couple slices of cheese and some crispy mild lettuce.

Pickles and mustards for all!

What garnishes and condiments have you guys made lately? Are you canning any new and interesting things?