Showing posts with label fast. Show all posts
08 September 2015
Spicy tuna salad with chard stem pickle, cabbage, and cilantro
A few days ago, I made a batch of Marisa's chard stem pickles. Now -- as usual when trying out a new kind of pickle -- the question is how to use them.
I started off with this experiment in tuna salad. After all, dill pickles or gherkins are a pretty standard ingredient in classic tuna salad. So why not give it a try with a different variation? I like to eliminate the usual mayo and go for a more oil-and-vinegar-oriented salad, which meant that these tangy, slightly sweet pickles were a perfect match.
To complement the rice wine vinegar in the pickle brine, I added hot mustard and cilantro. Together with the tuna and vegetables, this made a nicely spicy, herbal, and complex tuna salad.
Now I want to do another tuna salad experiment with my refrigerator pickled beets. Of course, in that case, everything will be BRIGHT FUCHSIA. But that's okay. Who doesn't like bright pink food?
On that note, because they're just too gorgeous, this is what the chard stems looked like just before I brined them up. So intense.
Spicy tuna salad with chard stem pickle, cabbage, and cilantro
Makes enough for 3 open-faced sandwiches or 2 substantial closed sandwiches.
1 cup shredded cabbage
1 medium carrot
1-2 scallions
2-3 tbsp chard stem pickles
1/4 cup chopped cilantro
1-2 tsps hot Chinese mustard
1 tbsp grapeseed oil or other oil of choice
1 5-oz can tuna
salt, pepper
Shred your cabbage and deposit it into a mixing bowl. Sprinkle with a few shakes of salt and mix with your hands, squeezing gently, to soften the cabbage a little.
Prep and finely chop your carrot, scallions, pickles, and cilantro. Add them to your bowl, along with the mustard, the oil, the drained contents of your can of tuna, and salt and pepper to taste. You may also wish to add in a little of the pickle brine for some extra vinegar kick.
Mix everything together well, taste and correct seasonings, and you're done. Super easy.
I had my spicy tuna salad in a couple of open-faced sandwiches on toasted sourdough, with a small green salad on the side. It was fantastic. Needless to say, this is definitely going on the list of things to make when the fridge is full of pickles (i.e. always).
Do you have a fridge full of homemade pickles? How are you eating them this month?
23 August 2015
Blistered shishito peppers
Shishito peppers are one of the highlights of late summer. While they look like a hot pepper, they are generally pretty sweet -- only about one in ten peppers will be spicy. So eating a plate of these is like a delicious, delicious game of chance, where no matter what, you always win.
When we got a pint of shishitos in our CSA share, we knew exactly what to do with them: blister them. One hot pan and five minutes later, we were ready to eat the entire pint in one fell blow.
I imagine these peppers would also be excellent grilled on the barbecue. Toss your peppers with oil, string them onto soaked skewers, and roast, turning to cook each side, until nicely blistered. Then salt and eat. I haven't tried this, though, so if you do, let me know how it goes! For science!
This method will work with shishito or padrón peppers.
Blistered shishito peppers
grapeseed oil or other cooking oil with high smoke point
shishito peppers
plenty of kosher or sea salt
Put a frying pan wide enough to hold all your peppers in a single layer over medium-high to high heat. Let the pan get hot before you start cooking. Test the temperature with a flick of water, just like you would if you were cooking pancakes; when the water sizzles away immediately, you're ready to go.
Add a generous slug of oil to the pan and let it heat up for a moment. Then add your peppers and toss or stir to coat. Let the peppers cook, stirring or flipping occasionally, until they are blistering and turning golden to dark brown in patches on all sides. This should take about five minutes.
When your peppers are done, remove them to a paper towel-lined plate or wire rack and immediately season with a generous amount of salt.
Serve hot. Eat them all. Hooray!
Blistered shishitos are great by themselves, but they also work well as part of an antipasto spread. A hard slicing chorizo or other spicy sausage and a chunk of manchego are the perfect match. Marinated olives would be pretty tasty too. Basically anything you'd get at a tapas bar is a good idea.
And of course you are going to want a glass of cold, cold beer on the side. Hot peppers and icy beer are one of the best possible combinations to eat on a hot afternoon.
What are your favorite late summer snacks?
Labels:
CSA,
easy,
fast,
recipes,
snacks,
vegan,
vegetables,
vegetarian
14 August 2015
Momofuku-style pickled torpedo beet, radish, and tokyo turnip
We've had the Momofuku cookbook for awhile, and I've never cooked anything from it until now. But I've been wanting to try these pickles for a few weeks, ever since I read a blog post that talked about how the beets in this recipe (or method, really) aren't cooked.
I've always made (and eaten) western-style beet pickles, so I've always boiled my beets. But shredded or julienned raw beets are excellent in a salad setting, or even as garnish for a hot soup or rich piece of meat, so I was officially intrigued. And we certainly had plenty of beets lying around. The CSA farm seems to have a had a bumper crop this year, and they've been coming practically every week. So many beets: golden, torpedo, and plain old red globes.
When I checked out the supply in our crisper, I found not only three beautiful red torpedo beets, but also three ordinary red radishes and a single solitary tokyo turnip. (Of course, later I found two more buried under a head of cabbage, so...yeah.) I decided to pickle them all together for a few reasons. First, beets and turnips are a usual match in Middle Eastern pickles; if you've had a falafel sandwich with pink pickled turnip, you've experienced this. Radishes are similar to turnips in texture, but also provide a pungent kick. Besides, all of these vegetables needed eating.
I considered adding some ginger to my pickles, because that's always super interesting. See: fennel pickle with lemon and ginger, which is SO GOOD and you should go make some right now. Actually, I need to go make some, because I have all the ingredients lying around, crying for me to use them. Anyway. I knew about that; I also recently read about Nami's pickled sushi ginger, which I need to try as soon as I can find some young ginger. But since I hadn't tried this particular pickle method before, I thought it might be a good idea to just go for the master brine recipe before I started fooling around quite so much. The fooling around will very likely happen later, though. Oh yes.
Momofuku-style pickled torpedo beet, radish, and tokyo turnip
Adapted from the Momofuku cookbook
brine:
1 cup hot water
1/2 cup rice vinegar
6 tbsp (3/8 cup) sugar
2 1/2 tsp kosher or pickling salt
veg:
3 torpedo beets
3 radishes
1+ tokyo turnip
or adjust vegetable proportions to fill your jars.
equipment:
2 pints or 1 quart mason jar with plastic storage lids
chopstick or spatula
optional canning funnel
For the brine, combine all the ingredients in a nonreactive pan or bowl. I used water that I boiled in the teapot and let cool down a bit, instead of the book's hot tap water. Stir until the sugar and salt are completely dissolved.
For the veg: wash, trim, and peel your beets. Wash and trim your radishes and turnips. Halve all your veg and slice into very thin half-moons.
Pack your vegetables into mason jars. Pour the brine over the veg to cover, filling up to 1/2 inch from the top of the jar. Use a chopstick or spatula to remove any bubbles. Cap your jars and put them in the refrigerator to cure overnight.
Store in the refrigerator and eat at your leisure. These guys should last at least a month, and probably quite a while longer. I usually keep refrigerator pickles for a good three months or so.
What are you pickling this summer?
Labels:
cheap,
easy,
fast,
pickles,
recipes,
vegan,
vegetables,
vegetarian
03 August 2015
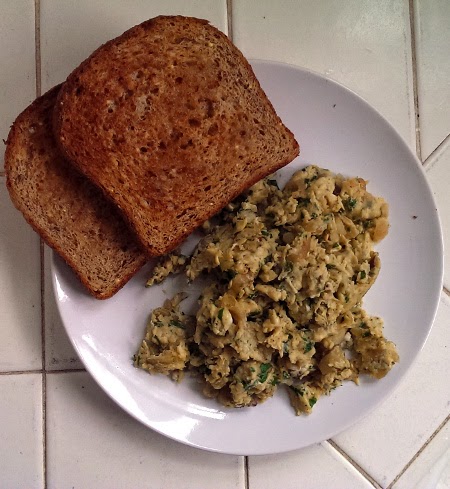
Scrambled duck eggs with green beans, red pepper, and fresh herbs
We bought an egg share with our CSA. This means that along with our weekly vegetables, we also get half a dozen mixed brown, blue, and spotted eggs. They're excellent -- obviously super-fresh, with bright orange yolks and full whites. A fried CSA egg is a thing of beauty, especially split over a piece of sourdough toast. But six eggs is just about as many as we can eat in a week, considering our overall low levels of breakfast-eating and baking. And then the CSA decided to give everyone a sample of half a dozen duck eggs.
Suddenly we had double the eggs, and the duck eggs were nearly double the size of the chicken eggs, so it was more like we had sixteen eggs than twelve. It was definitely time for a couple of hearty weekend scrambles. And why not get the full use out of the CSA by adding plenty of herbs and vegetables?
For our herbs, we used curly parsley and dill, both of which are excellent with egg. I think dill is seriously underused in general, and particularly when it comes to eggs. It's great raw in egg salad, and it's also great cooked into a scramble like this. I imagine that it's similar to the classic tarragon-and-egg combination. Try it!
Scrambled duck eggs with green beans, red pepper, and fresh herbs
serves 2
butter
2 scallions
large handful green beans (or zucchini, broccoli, etc)
1/2 red bell pepper
2-3 duck eggs (or sub 5-6 chicken eggs)
~3 tbsp each fresh dill and parsley (or basil, tarragon, chives, etc)
salt, pepper
Chop your scallion whites, setting the greens aside. Saute in butter in an appropriate egg pan over medium heat.
Wash, trim, and cut your green beans into bite-sized pieces. When your scallions have begun to soften, add the beans to the pan, along with a punch of salt. Continue to cook for another 2-3 minutes, stirring occasionally, while you dice your bell pepper. When the beans are mostly tender, add your peppers and cook for another 2-3 minutes to soften.
Crack your eggs into a bowl. Finely chop your scallion greens, parsley, and dill; add them to the eggs. Season with salt and plenty of pepper. Beat with a fork until frothy and well mixed.
When all of your vegetables are tender, add your egg mixture to the hot pan. Cook, stirring frequently, until your eggs are done to your liking.
Serve your finished eggs with a little more pepper or a few fronds of herbs scattered on top. A simple green salad is definitely welcome alongside. And if it happens to be dinnertime, or Sunday brunch, a glass of dry white wine would not go amiss.
Have you ever cooked with duck eggs?
Labels:
breakfast,
CSA,
easy,
eggs,
fast,
herbs,
recipes,
vegetables,
vegetarian
29 July 2015
First garden green beans of the year
I planted a truly massive amount of green bush beans this year. We had the garden space, and can basically never get enough beans, so why not? Besides, after the moles killed multiple jalapeño plants and a tomato plant, I figured that more plants equaled a better chance of actually getting a crop.
Now the beans are the most successful plants in the garden, with no attrition by mole at all. I'm picking huge double handfuls every other day, so as to keep up a steady supply for the whole growing season. Later I'll let one or two plants go, so the beans mature in their pods and can be used for seed next year. Hooray!
For my first foray into homegrown green bean cooking, I went super simple. What better way is there to eat beans than sauteed with butter and garlic?
Green beans with butter and garlic
Serves one. Multiply as needed.
1-2 big handfuls green beans
1-2 cloves garlic
1 pat butter/slug olive oil
salt and pepper to taste
Wash your green beans, trim them, and cut them into bite-sized pieces. Crush and mince your garlic.
Melt your butter or oil in a frying pan over medium to medium-high heat. Add your garlic and cook for about a minute before adding your beans. Season with several good pinches of salt. Cook, stirring occasionally, for about 5 minutes. If you like, you can add a splash of water to the pan and let the beans cook in the steam.
When the beans are done to your taste, season with pepper. Taste and add more salt as necessary. Eat immediately.
Of course, beans can also get a little fancier. This is especially the case if you also need to get through a CSA box of vegetables every week. In this case, I more or less just added some delightful extras to the basic green bean and garlic recipe. It's still super easy and still delicious.
Green beans with zucchini and dill
Serves one. Multiply as needed.
1 big handful green beans
2 cloves garlic
1 small or 1/2 large zucchini
1 pat butter/slug olive oil
salt and pepper to taste
2-3 tbsp chopped fresh dill (or basil, tarragon, parsley, etc)
wedge of lemon
Wash your green beans, trim them, and cut them into bite-sized pieces. Crush and mince your garlic. Chop your zucchini into thin rounds or half-moons.
Melt your butter or oil in a frying pan over medium to medium-high heat. Add your garlic and cook for about a minute before adding your beans. Season with several good pinches of salt. Cook, stirring occasionally, for about 3 minutes. Add water to steam your beans if you like.
Add the zucchini and continue cooking for another 2-3 minutes, or until all the vegetables are done to your taste. Season with pepper and correct salt.
Serve topped with plenty of fresh dill and a squeeze of lemon juice. If you're having your beans alongside a seared piece of fish, put any extra dill and lemon on the fish.
Beans! They are the best.
Who's gardening this year? What are you harvesting now?
Labels:
CSA,
easy,
fast,
herbs,
potentially vegan,
recipes,
vegetables,
vegetarian
27 July 2015
Summer garden tuna salad
The CSA box demands that we eat as many vegetables as humanly possible all summer long. This is simultaneously great and a problem.
Salads are the obvious solution, but an all-veg salad is usually not a sufficient lunch. Unless you want to make another entire dish, some sort of protein is necessary. I chose eggs -- we still have abundant CSA eggs -- and tuna, and decided to wake up the flavors with sriracha sauce, garlic, and fresh basil, scallion, and parsley. For some extra textural interest, I used a mix of cooked and raw vegetables. Altogether, this worked out super well.
If you aren't a tuna person, you can always leave it out and up the hard-boiled eggs to two, or sub in the cooked and drained beans of your choice. I'd probably go for white beans first, but any kind you like that maintains reasonable structural integrity should be fine. If you want to use other fish, maybe try fork-mashed sardines or a smoked fish of your choice. And of course, you can make this completely vegan by switching out both tuna and egg for beans. It's all good.
Some lime or lemon zest wouldn't be unwelcome, either.
Summer garden tuna salad
makes 2 meal-sized servings
1 egg
1 cup broccoli florets in bite-size pieces
1 cup green beans in bite-size pieces
3/4 cup shredded/julienned cucumber
3/4 cup shredded/julienned zucchini (I used gold bar squash)
1 clove garlic, minced and pulverized thoroughly
1-2 scallions or a large handful of their greens, finely chopped
large handful basil leaves, finely chopped
large handful parsley, finely chopped
1 5-oz can tuna, drained
1+ tbsp olive oil
several good squirts sriracha or other hot pepper sauce to taste
salt, pepper
any other veg you think sounds good in this circumstance
salad greens to serve
Put your raw egg in a small pot of water and set it on to boil. Cook for 9 minutes at a simmer. Scoop the egg out of the water and put it in an ice bath.
While your water is still hot, add your broccoli and green beans. Bring the pot back to a boil and cook for 3 minutes, or until the vegetables are done to your liking. Drain, shock briefly in cold water, and drain again.
While you're waiting for the egg and cooked veg to cool enough to use, cut up your cucumber, zucchini, garlic, scallions, basil, and parsley. Add them to a mixing bowl along with your tuna, olive oil, sriracha, salt, and pepper.
When the egg is cool, peel and dice it. Add your egg, broccoli, and beans to the bowl. Mix thoroughly. Taste and adjust seasonings.
Serve on a bed of salad greens of your choice, with an extra drizzle of olive oil and a little more salt and pepper.
A spoonful or two of leftover salad, combined with mozzarella cheese and another dash of sriracha, makes a good quick quesadilla filling. The cucumber makes it a little drippy, but it's still delicious.
How are you eating your fresh summer vegetables?
Labels:
cheap,
easy,
fast,
fish,
potentially vegan,
recipes,
salads,
vegetables
15 July 2015
Radish and dill compound butter
Radishes, butter, and salt are one of the most classic food combinations out there.
Usually I've seen instructions to swipe whole radishes through cold butter and dip them into sea salt. This is all well and good if you want a huge mouthful of radish, but it can get a little spicy for me. So instead I thought I'd make a quick compound butter and spread the resulting tasty mess on slices of sourdough baguette. Then I added some fresh dill, because we had a big bunch and it's delicious with crispy radish. Perfect!
This is one of those recipes you can adjust to suit your tastes. Do you like lots of crunch and spice? Add more radish. Do you want all the dill? Add more dill. You're going to be spreading this on bread anyway -- a fairly neutral palette -- so I recommend going for large amounts and strong flavors.
If you want to chill your butter before using -- maybe so you can let a slice of it melt on top of a piece of poached salmon later -- you can shape it into a cylinder by wrapping it in plastic wrap, rolling it to an even thickness with the palm of your hand, and twisting the plastic together at each end. Then just stick the packet in your refrigerator for future application.
And if you want to make this into a schmear instead of a compound butter, you can switch out the butter for cream cheese. This is definitely on my short list of things to make before the dill is all gone.
Radish and dill compound butter
2-3 radishes (3 tbsp grated)
1 1/2 tbsp fresh dill
4 tbsp softened butter
salt and pepper to taste
Shred your radishes on a box grater or microplane. Finely chop your dill.
Mix the shredded radish, dill, and butter together thoroughly. Season with salt and pepper, taste, and adjust.
Spread on the bread of your choice and eat. Otherwise, wrap in plastic wrap and chill for future use.
John and I may have polished off our entire batch, as well as an entire baguette, and called it lunch. Cold rosé is optional.
What are you spreading on bread lately?
Labels:
cheap,
dairy,
easy,
fast,
herbs,
recipes,
sandwiches,
snacks,
vegetables,
vegetarian
13 July 2015
Super simple strawberry cake
We've been getting 2 pints of strawberries per week from our CSA. This, of course, is pretty fantastic. Strawberries with dinner! Strawberries with breakfast! Strawberries at the slightest provocation!
But there's always that point at which the yet uneaten berries start to wilt a bit. Maybe one pint is gone, and the other is completely untouched (strange, but it does occasionally happen). And then it's Tuesday night and you know that Thursday will bring another two pints.
At this point you have a couple options. You can freeze your berries for smoothies, which is always a good plan. You can mash your berries into the world's smallest batch of jam, to be eaten immediately on toast spread with ricotta or cream cheese and topped with basil and black pepper (which I have not done, but which definitely needs to happen ASAP). Or you can bake with them.
Since the weather was cool enough for us to turn on the oven, we went with option 3. I found a minimal cake recipe that would let the berries take center stage, and I went to work.
This cake is not only really easy and quick to make, but also deceptive, hiding chunks of strawberry beneath its surface. The berries start out on top of the batter and sink down over the course of baking, becoming delightful surprises. So good.
Super simple strawberry cake
adapted from Always With Butter.
6 tbsp softened butter
3/4 cup sugar
2 eggs
2 tbsp milk
1 1/2 tsp baking powder
1/4 tsp salt
1 tsp cinnamon
1 1/2 cups flour
1 pint strawberries
I bake pretty much everything by the 1-bowl method, and this was no different.
In a large mixing bowl, cream your butter and sugar until light and fluffy. Add eggs and milk and mix to combine well. Add the baking powder, salt, and cinnamon, and mix to combine again. Add the flour in three half-cup increments, mixing thoroughly after each addition.
Pour the batter into a well-buttered and floured 8-inch cake pan.
Wash and slice your strawberries. Push the berries far down into the surface of the batter, making a pattern or not as you prefer. As you can see, I prefer not to. They'll mostly be covered in the end anyway.
Bake at 350F for 35-40 minutes, or until a cake tester comes out clean. Try not to put your tester directly into a molten berry.
Serve plain, with whipped cream, or with a sprinkling of powdered sugar. Very lovely for breakfast or with a cup of afternoon tea. Or, you know, whenever.
And if you are a fan of peanut butter, this is excellent with a big spoonful spread on top. Peanut butter and jelly cake for all!
What fruit-filled concoctions are you baking this summer?
09 July 2015
Refrigerator zucchini pickles
Yay! It's summer squash season! Yes, that magical time of year in which suddenly everyone you know is trying to foist bagfuls of zucchini, pattypans, and yellow squash onto their friends and neighbors at the slightest provocation. If you're growing your own, the situation is even worse. Suddenly, YOU are the one wandering into the backyard to find that an apparently bare plant has somehow sprouted six fully grown squash -- and you have four more plants to check -- and there were already several zucchini in your crisper.
Now is the time to use up that squash any way you can. I like to slice up a few squash for a simple saute with garlic and olive oil, or to cube them and scramble them with eggs and a big handful of herbs. But when those strategies fail, it's time to go a step further and think about preserves.
The classic method of summer squash preservation is a simple shred and freeze. This works out very well if you are the kind of person who will eat zucchini bread for months on end. But I decided it was time to try something different, and that thing was pickled zucchini.
This is a very simple and delightful refrigerator pickle. There is a surprising hint of mustard taste in the finished product, which means that these go very well on sandwiches of all kinds. A jar of these is definitely a great way to get through some of a massive summer zucchini harvest -- or, in my case, the seven or eight zucchini at a time that have been arriving at frequent intervals via CSA box.
Refrigerator zucchini pickles
1 pint mason jar, washed and dried
4 medium zucchini or summer squash (~2 cups sliced)
1 halved garlic clove
1/2 tsp dried dill
3/4 cup white vinegar
3/4 cup water
1/4 tsp peppercorns
1 tbsp pickling salt or kosher salt
optional canning funnel
Wash your zucchini and slice them into rounds or spears. I chose rounds for easy sandwich application. Leave them raw.
Put your garlic clove and dill into your jar. Add your zucchini. You may have to shift the pieces around a bit to fit them all in there.
In a small saucepan, heat your vinegar, water, peppercorns, and salt. Put on the lid and simmer for about five minutes, or until the salt has completely dissolved.
Pour your hot brine into your jar, leaving 1/4 inch of headspace at the top. Use a chopstick or spatula to release any air bubbles, and top up with more brine as needed. Make sure you get all the peppercorns into the jar, even if you have extra liquid left over.
Lid your jar and put it into the refrigerator. Let your pickles cure for at least 24 hours before eating them.
Now it's time for voluminous sandwiches of all kinds. Pickles for every lunch! Hooray!
How do you use up the yearly summertime zucchini glut?
Labels:
easy,
fast,
pickles,
preserves,
recipes,
vegan,
vegetables,
vegetarian
06 July 2015
Fresh apricot sauce with honey and black pepper
OKAY. We have just finished hosting John's mom and our niece for a full week of running around the SF bay area and points beyond. Much fun was had by all. The only problem is that I now have roughly 500 posts in my foodblog feed to get through as quickly as possible. Yay?
We didn't do that much cooking in the past week, considering the holiday etc., but one standout was this delightful apricot sauce. It was totally appropriate for multiple occasions. First, we seared some pork chops and served them with the apricot sauce, plus brown rice and garlic chard. This was lovely. But the sauce was even better on our last night, when we made a big batch of waffles for celebratory breakfast for dinner. Apricot sauce, waffles, and butter: yes please.
Of course, at this point I also must point out that our niece's favorite way to eat her waffles -- with peanut butter and maple syrup -- was excellent too. But you don't need me to teach you how to put peanut butter and maple syrup on waffles!
This sauce is very easy to make. Just a quick poach plus a little blending is all it takes to make your own delightful apricot concoction. This also creates what is possibly the most vibrantly orange sauce ever.
If you're planning to use this sauce with meat or other savory devices, I'd recommend adding a touch of something herbal. Rosemary would be ideal. You could either put a branch in the poaching liquid to let the flavor infuse into the fruit, or gently cook the pureed sauce with your rosemary for overall sauce infusion. Either way, you'd end up with something just a touch more complex and applicable to savory dishes.
This makes approximately 1.5 cups of apricot sauce, depending on the size of your apricots.
Fresh apricot sauce with honey and black pepper
6-7 apricots
water to poach
2-3 tbsp honey (adjust to taste, depending on the apricots' sweetness)
10-12 grinds black pepper
stick blender or other appropriate blending device
Put a medium pot of water on to simmer. Halve and pit your apricots. When the water comes up to temperature, add your apricot halves and poach gently for about two to three minutes, or until the apricots float to the surface. They should be lovely and tender.
In a bowl or other container, combine your apricots, honey, and pepper. Puree thoroughly using the stick blender. If your sauce is too thick, you can thin it with a spoonful or two of poaching liquid.
Serve your finished apricot sauce with the delights of your choice. I choose waffles.
How are you eating your fresh summer stone fruit?
Labels:
breakfast,
easy,
fast,
fruit,
potentially vegan,
recipes,
vegetarian
02 June 2015
Samosa soup
We've been eating a lot of pinto beans lately. This is a thing that happens when you buy a 5-lb bag of said pinto beans and cook huge batches of them in your pressure cooker on a regular basis, both of which I absolutely do.
Refried beans are already on the table two or three times a week at our house, whether they're made from pintos or black beans. I also recently made a double batch of Good Good Things' bbq pinto bean burgers (along with a vegetarianized batch of Joy of Cooking bbq sauce to put in them). We now have a lovely stock of 11 burgers stashed away in the freezer for future consumption. But I still had quite a few beans in their broth hanging around waiting to be eaten afterward.
We'd more or less exhausted the classics, so I wanted to make something different. Soup is always good. Why not mix up a basic bean soup with the spices usually used in making samosas?
I looked up a couple of samosa recipes and went to town.
This soup is lovely and warming, with a hint of heat that can be increased as much as you like. The garam masala makes it a bit sweet, especially when eaten plain. Add a handful of crackers (or naan, if you're feeling semi-industrious) and a few salad greens, and you have a complete and very satisfying meal. The leftovers freeze very well.
Serves 4.
Samosa soup
oil of choice
1 large yellow onion
2 carrots
1-2 stalks celery
1-2 boiling potatoes
1 jalapeno or serrano
2 cups cooked pinto beans (in 2 cups of their broth if homemade, drained if not)
2 cups veg broth (+2 more cups if using canned beans)
1 tsp salt
1 tsp ground coriander seed
1 tsp cumin
1 tsp amchoor powder (or sub lemon juice)
1/2 tsp cayenne pepper or to taste
1 tsp garam masala
immersion blender or other pureeing device
plain yogurt/sub of your choice and cilantro to garnish
Warm a couple slugs of oil over medium heat in a large soup pot while you chop up your onion, carrots, and celery. When the oil is hot, add the chopped vegetables to the pan along with a shake of salt. Cook, stirring occasionally, for about five minutes, or until the onion is beginning to turn translucent.
While you're waiting, chop up your potatoes and chile. Then add them to the pot, stir, and continue to cook for another five minutes.
Next, add your pinto beans and broth to the pot. Add all the spices except garam masala (and lemon juice, if you're using it). Bring the pot to a boil, cover, reduce heat, and simmer for about ten to fifteen minutes, or until your potatoes are entirely cooked through. This may take a bit longer if your potato pieces are on the large side.
Take your pot off the heat and puree your soup using an immersion blender. Taste and correct the seasonings. Then return the soup to the heat and cook it down until it reaches your desired texture.
When you're happy with your soup, turn off the heat and stir in your garam masala (and lemon juice). Serve plain, with chopped cilantro, or top with plain yogurt. Voila!
If you want more vegetables, you can saute some peas in olive oil with a little salt and put a big scoop of them over the top of your bowl of finished soup. Or put a handful of spinach or mesclun leaves in the bottom of each bowl before serving. Or have an actual salad on the side! It's all good.
What's your favorite thing to cook with pinto beans?
29 May 2015
Chickpea, heart of palm, & roasted red pepper salad
One thing you do when you're going out of town -- especially if an abundant CSA box is on the way -- is to eat down as much of the food in your kitchen as you can.
Salad was definitely on the list, because we had romaine already, and we're going to get an influx of even more greens before we leave. So I went through the cabinets and pulled out everything I thought would make a great full-meal salad. That meant chickpeas, hearts of palm, and jarred roasted red pepper. Together, they make an excellent, highly flavored, and multitextural salad. Over plenty of crispy greens, this mix made a very satisfying lunch.
This salad is very reminiscent of one of my favorite restaurant salads ever: the heart of palm salad at Osteria in Palo Alto, CA. I'm super excited to have made something similar at home. And if any of you want good Italian food -- especially salads -- in Palo Alto, this is where you should go, hands down. Even their basic green salad is astoundingly good.
This recipe will make three meal-sized servings or 4-6 smaller servings. It's therefore pretty great to make on Sunday and bring to work for several days during the week, as long as you keep the salad greens separate from the marinated veg mixture.
Chickpea, heart of palm, & roasted red pepper salad
1 15-oz can or 2 cups cooked chickpeas
1 14-15-oz can hearts of palm
3-4 roasted red bell peppers
several big handfuls of chopped parsley
1 tbsp champagne vinegar
1 clove crushed garlic
4+ tbsp olive oil
salt and pepper
up to 1 head romaine or other salad greens
If you need to roast your peppers, do that first. You can either roast them directly over the gas flame or halve them and stick them under the broiler. In either case, you want to blacken and blister the peppers on all sides. Then put them in a bag or sealable container for about ten minutes; this will trap the steam inside and loosen the skins. Then you can just brush the skin away with your fingers. Voila! Roasted red peppers!
Drain and rinse your chickpeas and deposit them in a large mixing bowl. Drain and rinse your hearts of palm, cut them into bite-sized pieces, and add them to the bowl. My hearts of palm were supposedly salad-cut, but they were still pretty large, so I cut them down a bit more. Chop your roasted and skinned peppers into similar bite-sized pieces and add them to the bowl. Add a couple big handfuls of chopped parsley, and the base of your salad is ready.
To make the dressing, mix together a tablespoon of champagne vinegar and a clove of crushed garlic, along with some salt and pepper. Whisk in about 4 tablespoons of good olive oil. Taste and adjust the seasonings to your liking. Then pour your dressing over your salad and stir well to coat and mix. You can sub about 5 tbsp of the vinaigrette of your choice if you prefer.
It's a good idea to let this salad rest in the refrigerator for at least an hour before serving, so the flavors have a chance to mix together nicely. I absolutely did not do this, however.
When you're ready to serve, wash, dry, and chop your salad greens into appropriate pieces. Spread a few handfuls of leaves over each plate. Top with a generous amount of your chickpea mixture. Sprinkle a little more pepper on top and go to town.
What are some of your favorite salads?
Labels:
cheap,
easy,
fast,
recipes,
salads,
vegan,
vegetables,
vegetarian
25 May 2015
Scrambled eggs with tarragon, parsley, potato, and onion
Wait, it's the holiday weekend? It's practically summer! What happened?
A lot of things happened. My ankle is still sprained, which means I've been hobbling around instead of standing up in the kitchen. I've been taking programming and computer history classes, which require a lot of brain and leave me wanting to sit around reading trashy novels in my spare time. And we're semi-suddenly going to London at the end of this week, due to someone having a required work trip. This gives us an excellent opportunity to kill two birds with one stone and take some vacation time. I intend to drink lots of coffee, eat British Indian food, and go to all the museums.
SO. That's my life right now. Anyway. Let's talk about food.
The other day I had some leftover potatoes and onions to use up, along with a bunch of fresh tarragon, so I made these delightful eggs.
Nigel Slater says that eggs and tarragon work well together, and I am happy to report that this is indeed the case. I'm especially happy because I don't really know what else to do with a package of tarragon. I think some further experimentation may be in order. But in the meantime, eggs work.
Scrambled eggs with tarragon, parsley, potato, and onion
butter
1/2 small onion
1 small cooked potato
2 eggs
leaves of 2 sprigs fresh tarragon
leaves of 2-3 sprigs fresh parsley
salt & pepper
toast to serve
Melt a pat of butter in an appropriate egg pan. Dice your onion, add it to the pan, and cook over medium heat for about 5 minutes, or until it starts to soften. (If you're using leftover cooked onion, you can just heat it up with the potato.)
Dice your potato and add that to the pan. Stir and continue to cook for another 2-3 minutes, or until hot through.
Crack your eggs into a small bowl. Chop your herbs and add them to the eggs, along with a good sprinkling of salt and pepper. Mix well with a fork.
If you want toast, now is the time to put it on.
Turn the heat down under your pan and add your egg mixture. Cook, stirring frequently with a spatula, until scrambled to your liking. I like to scramble on low heat; the residual heat in the pan will still keep things going fairly quickly.
Serve your finished eggs with nicely buttered toast. Have some coffee. Yay!
What do you make with tarragon? Seriously, I need some suggestions.
Also, did I mention that our first CSA box of the season is coming right before we fly across the world? There may be some hasty cooking and freezing happening.
14 May 2015
Strawberry banana chia smoothie
Strawberry banana: perhaps not the most creative smoothie combination of all time. But hey! It's still tasty and easy, and it's certainly strawberry season right now. Why not?
Besides, the chia seeds make up for it.
I've been experimenting with chia seeds for a few months. They're excellent as a simple oatmeal topping or made into a pudding such as Gena's basic chia pudding. But I think my favorite way to eat chia seeds is to soak them and use them to thicken smoothies.
It's easy to adjust the amounts of seeds and liquid to make a thicker or thinner smoothie. This time, since I was using the classic smoothie thickener, banana, I kept the amount of chia seeds fairly low -- 1 tbsp of seeds for 1/2 cup total of milk and yogurt. It would definitely be possible to double the amount of seeds, eliminate the banana, and add in a bunch of different fruits and vegetables, though. Experiment and see what you like!
I strongly prefer smoothies made with fresh banana to those made with frozen. However! If you happen to have a freezer full of smoothie-destined bananas, you could absolutely use them here. You may need to add some extra liquid or switch out the yogurt for milk to adjust for your desired texture, but otherwise, you should be good to go.
If you make this in a regular-mouth mason jar, you can screw it onto a standard blender base and blend in the jar itself. Fewer dishes = yes please. This also means you can always put a lid on your jar and save the leftovers for later. Super easy.
Strawberry banana chia smoothie
1/4 cup milk or non-dairy milk of choice
1 tbsp chia seeds
1/4 cup plain yogurt or non-dairy sub of choice (or more milk)
4-5 strawberries, chunked
1 fresh banana, sliced
1 tsp flaxseed meal, optional
At least two hours before you want your smoothie, mix your milk and chia seeds together in your jar of choice. Refrigerate. Stir to mix twice at rough 10-minute intervals. This will keep your seeds from sticking together in one big lump at the bottom of your jar. Then just leave the jar in the fridge for 2 hours or more. I leave mine overnight.
In the morning, your chia seeds will be ready to go. Add your yogurt, strawberries, banana, and flaxseed meal to the jar (or put everything in a standard blender). Blend until fully pureed.
Drink it! Breakfast!
Do you eat chia seeds? What's your favorite thing to make with them?
PS: I have a sprained ankle. WHY. (It's because the moles dug a hole right in front of the back door. Jerks.)
Besides, the chia seeds make up for it.
I've been experimenting with chia seeds for a few months. They're excellent as a simple oatmeal topping or made into a pudding such as Gena's basic chia pudding. But I think my favorite way to eat chia seeds is to soak them and use them to thicken smoothies.
It's easy to adjust the amounts of seeds and liquid to make a thicker or thinner smoothie. This time, since I was using the classic smoothie thickener, banana, I kept the amount of chia seeds fairly low -- 1 tbsp of seeds for 1/2 cup total of milk and yogurt. It would definitely be possible to double the amount of seeds, eliminate the banana, and add in a bunch of different fruits and vegetables, though. Experiment and see what you like!
I strongly prefer smoothies made with fresh banana to those made with frozen. However! If you happen to have a freezer full of smoothie-destined bananas, you could absolutely use them here. You may need to add some extra liquid or switch out the yogurt for milk to adjust for your desired texture, but otherwise, you should be good to go.
If you make this in a regular-mouth mason jar, you can screw it onto a standard blender base and blend in the jar itself. Fewer dishes = yes please. This also means you can always put a lid on your jar and save the leftovers for later. Super easy.
Strawberry banana chia smoothie
1/4 cup milk or non-dairy milk of choice
1 tbsp chia seeds
1/4 cup plain yogurt or non-dairy sub of choice (or more milk)
4-5 strawberries, chunked
1 fresh banana, sliced
1 tsp flaxseed meal, optional
At least two hours before you want your smoothie, mix your milk and chia seeds together in your jar of choice. Refrigerate. Stir to mix twice at rough 10-minute intervals. This will keep your seeds from sticking together in one big lump at the bottom of your jar. Then just leave the jar in the fridge for 2 hours or more. I leave mine overnight.
In the morning, your chia seeds will be ready to go. Add your yogurt, strawberries, banana, and flaxseed meal to the jar (or put everything in a standard blender). Blend until fully pureed.
Drink it! Breakfast!
Do you eat chia seeds? What's your favorite thing to make with them?
PS: I have a sprained ankle. WHY. (It's because the moles dug a hole right in front of the back door. Jerks.)
09 April 2015
Spring salad pita with sugar snap peas, avocado, and mushrooms
I have been putting raw sugar snap peas into pretty much everything I make lately. So good! So springy! So sweet and crunchy!
If it's still too early for peas where you are, I think some grated raw beet or carrot would be a good substitute. Those are pretty sweet and crunchy too.
This pita is just about the easiest lunch ever. Just chop up a salad's worth of vegetables, stuff them inside some warm pita bread, and go to town. It's such a good way to get plenty of fresh spring vegetables, snap peas or not.
Spring salad pita with sugar snap peas, avocado, and mushrooms
For 2 sandwiches:
2 loaves pita bread
3-4 large romaine lettuce leaves
1 medium avocado
~15 sugar snap peas
2 scallions
4-5 button mushrooms
~2 tbsp fresh parsley
salt & pepper to taste
olive oil or vinaigrette to dress
~4 tbsp hummus
Gently warm your pita in a 250F toaster oven (or just an ordinary oven) while you make the salad.
Wash your lettuce leaves and chop them into bite-sized pieces. Halve and dice your avocado. Finely slice your sugar snap peas, scallions, and mushrooms. Mince your parsley. Add all of these to a mixing bowl, season with salt and pepper, drizzle with olive oil or vinaigrette, and toss gently to combine.
When your pita breads are toasty warm and beginning to crisp up a bit on the outside, remove them from the toaster oven and cut them in half. Spread the inside of each half with hummus. Fill with your salad mixture, and you are ready to eat.
What sandwiches are you eating this spring?
Labels:
easy,
fast,
recipes,
salads,
sandwiches,
vegan,
vegetarian
02 April 2015
Sugar snap pea and chive schmear
There were sugar snap peas at the farmer's market! Yay!
I had to make the most of them by eating a few raw. They were very nice that way, either by themselves or dipped into hummus. But it was clear that they would be even nicer mixed into some cream cheese and spread on pieces of hot toast.
I left my peas raw, because SPRING, but this would also work with steamed or blanched peas. Do what works for you.
Also, if you happen to be into the classic pea and fresh mint combination, you might want to give that a try instead of the chives. Double trouble!
Sugar snap pea and chive schmear
~10 raw sugar snap peas
~8 chives
3-4 tbsp cream cheese/tofu cream cheese
salt & pepper to taste
a spoonful of optional milk/yogurt to thin
Break the stem of each pea and pull down to strip off the string that goes down the side of the pod. Discard the waste. Chop your peas and chives into fine slices.
Add all the ingredients to a medium bowl and mix thoroughly with a fork. This will take a bit of effort, since cream cheese can be pretty thick and unmashable. A splash of milk or plain yogurt will help thin it down if necessary.
Spread on the toasted bagel or other bread product of your choice. I used wheat bread, because there were no bagels currently in the house, and it was good.
How are you eating your fresh spring peas?
Labels:
breakfast,
cheap,
dairy,
easy,
fast,
potentially vegan,
recipes,
vegetables,
vegetarian
23 March 2015
Rösti with sweet potato
We've talked about rösti a few times before. This Swiss concoction is essentially a big pan-fried shredded potato cake, not unlike hash browns. We like to eat it for big weekend brunches, with plenty of coffee and possibly an egg or two. It's easy, impressive, delicious, and cheap. What's not to love?
This weekend I decided to switch it up and try adding sweet potato to rösti. Since sweet potatoes are significantly harder and less fluffy than the standard white boiling potato -- not to mention sweeter -- I decided against a 1:1 switch. Instead, I used about 1/3 sweet potatoes and 2/3 mixed yukon gold and red. This turned out to be a good ratio: we got some nice sweet potato flavor and color, but preserved the general texture of a classic rösti.
Now, of course, we are thinking about more things to shred and add to rösti. Carrot? Zucchini? Beets could be really excellent if you wanted to top your rösti with a classic sour cream and smoked salmon combination. Fennel might be interesting there as well. And a mixed-veg rösti would certainly be a good way to use up broccoli stems and the odd heads of kohlrabi that come in our CSA box. I'm definitely going to keep this in mind for next fall.
Rösti with sweet potato
6-8 medium boiling potatoes
1 sweet potato
4-6 green onions
salt, pepper
oil or butter to cook (not olive oil -- the smoke point is too low.)
Start out by peeling your potatoes and sweet potato. Shred them with a box grater or food processor, using the largest size shred.
Squeeze the liquid out of your potatoes. We just take big handfuls and squeeze them out over the sink before depositing them into a mixing bowl. You can also use a dish towel or paper towel if you prefer. This step is critical to ensure that your rösti cooks well, so don't skip it!
Slice up your green onions and add them to the bowl. Add a generous seasoning of salt and pepper. Mix everything together.
Heat a 10-inch frying pan or skillet of your choice over medium-high to high heat. I think a well-seasoned cast iron pan is your best bet here, followed by nonstick. When your pan is hot, add a generous tablespoon of oil, butter, or a mix of the two. Swirl the pan to coat well.
Add your potato mixture to the pan, pressing with a spatula to get it reasonably even. Cook for 8-10 minutes, or until lovely and golden brown on the first side, adjusting the heat down a bit if necessary. You'll be able to see the color coming up around the edges. The potatoes should also come free of the pan in one big solid cake when shaken back and forth a few times.
Next, flip your rösti. To do this, you'll need some intact oven mitts and a wooden (or otherwise unmeltable) cutting board big enough to cover your pan. Wearing the oven mitts, put the cutting board on top of the pan. Grab the pan and board at opposite sides and flip the entire contraption over onto your counter. Remove the pan to the stove, add a bit more oil if needed, and slide the flipped rösti back into the pan, uncooked side down. You did it!
Cook another 8-10 minutes, or until the second side is just as beautiful as the first. Slide the finished rösti onto your cutting board, cut it into wedges, and serve.
Just about anything that sounds good with potato should be good with rösti. I had mine with plain yogurt and pickled peppers. John had his with ketchup. If you are a proponent of fried eggs with runny yolks, this is an excellent place to apply them.
How do you like to eat your brunch-hour potatoes?
Labels:
breakfast,
cheap,
easy,
fast,
potato,
potentially vegan,
recipes,
vegetarian
08 March 2015
Oatmeal with flax, yogurt, jam, and chia seed
Okay! Things have clearly been busy at our house. Everything we eat lately seems to be something I've written about before. Pasta fagioli, salads with nice homemade dressing, enchiladas, quesadillas: yes, yes, yes and yes. (Although now I am noticing just how old these posts are and thinking about writing them up again anyway.)
These are our house standards, and we love them. It's really nice to have a variety of autopilot dishes under your belt, so during those weeks when you have to commute an hour and twenty minutes (one way) to a conference that starts at 8 am, you can still eat actual food.
I got home Friday night post-conference at roughly 7:45, and John seared me a piece of fish with lemon and parsley, chopped up some romaine for salad, and poured me a glass of wine. It was an excellent plan. Later I fell asleep with my glasses on and laptop open.
This morning I had oatmeal. Want to see some oatmeal?
Oatmeal with flax, yogurt, jam, and chia seed
rolled oats
flaxseed meal
water
salt
yogurt, jam, and chia seed to top
Put as many oats as you want to eat into a small pot, along with a teaspoon or two of flaxseed meal and a generous several shakes of salt. Cover with water to about one finger's width above the oats. Cook over medium-high to high heat for five minutes, or until the oats are done to your preferred consistency, stirring occasionally. A longer boil will mean thicker oatmeal.
Put your finished oatmeal in a bowl and top with yogurt, jam (mine was apricot), and chia seed, or switch it up and add whatever you like.
What are some of your favorite things to eat over and over, frequently when you're too busy to think of new things to make?
Labels:
breakfast,
cheap,
easy,
fast,
fruit,
grains,
potentially vegan,
recipes,
vegetarian
26 February 2015
Simple ravioli soup with handfuls of herbs
Because you can't just make one thing with a big bunch of dill.
And since egg salad is not exactly the optimal thing to eat in winter (not to say that stopped us), I went on the lookout for more ways to use up my bountiful dill. The answer? Well, besides some very dilly schmears and a few simple salads, a soup seemed like a really good idea.
This soup takes very little time to make and produces a seriously warming and delicious meal. It's an excellent reason to keep ravioli (or any fresh filled pasta you like) in the freezer.
I happened to have a ravioli filled with havarti and dill on hand, so fresh dill was a perfect addition. However, it would be hard to go wrong using any filled pasta you like. Ravioli or tortellini with ricotta, spinach, chicken, beef, or even a delicate shrimp could all be delicious. So could pierogi or pelmeny filled with hearty potato, cottage cheese, or cabbage.
All you'd need to do is adjust the type of herb and the broth for optimal flavor combinations. Shrimp ravioli? Use chives and tarragon, plus fish stock. Beef? Use parsley and beef stock, with a splash of tomato juice for good measure. Tomato would be a great addition for nearly any pierogi as well -- and I'd wilt in some shredded cabbage right before turning off the heat. And a little dry vermouth or white wine would be an excellent addition to nearly any of these.
Simple ravioli soup with handfuls of herbs
Serves 2.
olive oil/butter
3-4 scallions
1-2 carrots
3+ cups vegetable or chicken broth
2 servings frozen ravioli or other filled pasta of your choice
salt, pepper
plenty of dill, parsley, or another fresh leafy herb
Start by heating your oil or butter in a 3-quart saucepan over medium-high heat. Trim and chop a handful of scallions, separating the whites from the greens. Add the whites to the pan and cook, stirring occasionally, for a few minutes. Set the greens aside.
Scrub or peel one big carrot or a couple of smaller ones. Slice into the bite-sized pieces of your choice. I made thin quarter-moons. Add your carrots to the pan, season with a little salt, and cook for another few minutes to soften. If you want to add any more chopped vegetables, like celery or mushrooms, now is the time to do so.
Add a good three cups of broth to your pan. You can make up the difference with water if you don't have quite enough broth. Season with salt and pepper and bring the pan to a boil.
Add your ravioli, stir, and bring the pan to a boil again. Reduce the heat to simmer; a full rolling boil will tend to split your ravioli.
Simmer for five to eight minutes, or until your ravioli are completely cooked through. They will float to the surface of the pan when they're ready. Your timing will depend on the size of your pasta.
While you're waiting, chop up a large handful or two of the herbs of your choice. I used dill, because we had lots of it and my ravioli were filled with havarti and dill anyway, but parsley, chervil, chives, tarragon, or a mix of whatever leafy green herbs you like can all work well. Think about your ravioli filling and decide accordingly.
When your ravioli are done, correct the seasonings and turn off the heat. Stir your chopped herbs and green onion greens into your finished soup. Serve with a few extra sprigs of herbs for garnish.
Eat and feel better.
Which hot and hearty soups are you cooking this winter?
09 February 2015
Soft pumpkin cookies
It's still winter, and there are still plenty of winter squash from the last few CSA boxes hanging around on our kitchen counter. So last weekend I roasted a pie pumpkin and a butternut squash, mashed up the flesh, and made a big batch of cookies. What better way to eat as much squash as possible?
These cookies are super soft and fluffy, to the point that they almost seem like little bite-sized pieces of pumpkin bread. Of course, they don't bake as long as a pumpkin bread, and they don't need to be cut like a pumpkin bread, and they're generally more cookielike as a rule, but otherwise, the taste and texture is pretty spot-on. So: pumpkin bread in cookie form.
Note that it is 100% possible to make these cookies with no mixer. I just used a big bowl and a wooden spoon, and everything worked out perfectly.
Soft pumpkin cookies
based on Pumpkin chocolate chip cookies
1 1/2 cups sugar
1 3/4 cup pumpkin or winter squash puree
1/2 cup butter, melted
1/2 tsp vanilla
1 egg
1 tbsp cinnamon
3/4 tsp nutmeg
3/4 tsp ginger
3/8 tsp cloves
1 tbsp baking powder
3/4 tsp baking soda
1/2 tsp salt
2 1/2 cups flour
Preheat your oven to 375F. Melt your butter, either in the microwave or in an oven-safe dish in the actual oven.
In a large mixing bowl, combine your sugar, pumpkin, butter, and vanilla. Add the eggs and beat well.
Mix together your spices, baking powder, baking soda, and salt. Add to the wet mixture and stir to combine.
Add the flour gradually, in 1-cup increments, stirring well after each addition. If you would like to add chunks of delightful things to your cookies, you can fold in 1 cup chocolate chips, dried cranberries, or chopped nuts. We prefer totally plain cookies, however.
Use two spoons to drop 1-tbsp pieces of dough 2 inches apart on a cookie sheet lined with parchment or a silicone mat.
Bake for 12-15 minutes, or until set on top (14 min for me). Let cool on cookie sheet for a few minutes before removing to a wire rack to cool completely.
Makes approximately 30 cookies.
Since they're so soft and moist, these guys are a bit more perishable than standard cookies. I recommend eating them within about three or four days. Fortunately they're delicious enough that this won't really pose much of a problem.
If you happen to be in the cream cheese frosting camp -- or even just the spreads-cream-cheese-on-things camp -- these are an excellent candidate. But they're also really good by themselves, with a cup of coffee or tea.
How are you eating your winter squash post-holidays?
Subscribe to:
Posts (Atom)