30 August 2013
Sauteed carrots with spicy brown mustard
Sometimes the simplest preparations are the best.
This time, I had made up a batch of Janet of The Taste Space's amchoor chana, and I needed something vegetabley to stand up to the very beany & lemony chickpea content. There were carrots in the crisper and homemade lactofermented mustard (courtesy of Amanda at Phickle) in the refrigerator door. And thus my sauteed carrots with spicy brown mustard were born.
All you have to do is give carrots a quick & hot saute, then add a hit of seed-filled mustard. The result is super-easy, sweet and toothsome, with a kick of mustard heat. It's definitely a great way to nudge the lowly carrot out to center stage.
Sauteed carrots with spicy brown mustard
peanut oil/sub of your choice
carrots
salt
spicy seedy mustard
Warm the oil on medium-high in a wide frying pan or saute pan of your choice. While it's heating up, scrub and slice your carrots into whatever shape you like. I did half-moons just because they're easy. And no, I generally don't peel my carrots, although you are totally free to go ahead and peel yours.
Add your carrots to the oil and toss to mix. Sprinkle a touch of salt over the pan and cook, stirring or shaking occasionally, for about five minutes, or until your carrots are almost cooked through. The timing is going to depend both on the size of your carrot pieces and the heat of your stovetop, so make sure to taste as you go. You may want to add a splash of water to the hot pan to steam your carrots a bit if you're using thick slices.
When your carrots are just a hair away from done, add a couple spoonfuls of spicy mustard to your pan. Stir to coat well and continue to cook for about another minute. then take the pan promptly off the heat, scoop your carrots onto your plate, and serve the whole shebang.
Eat!
How are you transforming ordinary veg lately?
Labels:
cheap,
condiments,
easy,
fast,
recipes,
vegan,
vegetables,
vegetarian
28 August 2013
Toaster oven pita pizza with eggplant pickle and heirloom tomato
The other day I wanted pizza for lunch, but didn't want to expend any time or effort making a crust. So I decided to break out some pita bread and use it as the crust for a tiny & nearly-instant pizza.
As I poked around the refrigerator, trying to decide what I could use for sauce, my eyes fell on the jar of pickled eggplant with red wine vinegar, made from Marisa's recipe. I've been struggling a bit to find good ways to eat this, simply because it is so strong. But on pizza? Perfect!
I finely chopped a few eggplant pickle spears and spread them on the pita as my line of first defense. Was it a good idea? YES. The tang is reduced a bit though cooking, but it still provides a delicious and slightly mysterious base for everything else. That pickle, topped with an arrangement of chopped salami, big slices of backyard tomato, chunks of mushroom, little bits of hot pepper, and several slabs of mozzarella, made one of the best lunches I've had in quite a while.
A good pizza definitely needs a huge blast of heat to crisp up nicely. Generally this requires an oven. But not this time! Instead, I turned to the toaster oven: my favorite small appliance ever.
The toaster oven not only warms small items, but actually cooks them. You never get the gross spongy quality of microwaved food--because it's an actual tiny oven. Toast gets crisp and nice, and yet you can also cook things bigger than a slice of bread. Open-faced sandwiches topped with cheese go into our toaster oven regularly, as do giant bagels, servings of last night's rice and curry (with a bit of water to re-steam the rice), frozen homemade belgian waffles too big to ever fit in a toaster, and even occasional bowls of soup. Oven-safe dishes are a must, and you should certainly employ oven mitts as needed, but those are the only real caveats to consider.
In this particular case, since my crust was already baked, I only had to worry about searing all the toppings adequately. This meant I could sit down to eat my finished pizza a bare ten minutes or so after dreaming it up. It was perfect: fast, crispy, and delicious.
You can absolutely use any combination of ingredients you like on a pita pizza like this. Just go through your refrigerator and pick out whatever looks good to you. That's really all I did to come up with mine.
Pita pizza with eggplant pickle and heirloom tomato (among other things)
pita bread
optional olive oil
eggplant pickle
heirloom tomato
salami
hot pepper
mushrooms
mozzarella
oregano, basil, hot pepper flake
If you like, you can prepare your pita by brushing it with a thin layer of olive oil. If not, that's fine too. I didn't use oil because I was using salami, which has plenty of its own oil happening already.
Chop a few spears of eggplant pickle as finely as you can. Spread them thinly over your pita. They will be your sauce layer.
Slice up all the vegetables, meat, or cheese you want on your pizza. Layer them over the pita, finishing with the cheese layer. Sprinkle some oregano, basil, and hot pepper flake over the top, and you'll be ready to go.
It's best to be a little sparing with the toppings, so everything cooks evenly and your crust doesn't get soggy. If you want more toppings, make two pita pizzas.
Bake in a 450F toaster oven (or an actual oven--it's all good) until your ingredients are seared nicely, your cheese is golden brown, and your crust is beginning to turn brown and crispy around the edges.
This particular combination of ingredients was wet enough to generate some of its own liquid, mostly due to the very juicy tomatoes. To avoid drippage issues, it's a good idea to bake your pizza on a pan instead of just the toaster oven grate (which is what I normally do). You could also line the bottom of the oven with aluminum foil to catch drips, but a pan is safer, especially if you have an exposed heating element. Then, if there's any liquid accumulation, you can simply tilt the entire pan to the side and let it evaporate against the hot metal.
Cut your finished pizza into four pieces. SERVE.
This pizza was excellent all by itself, but I also find that tossing a couple handfuls of raw spinach or arugula on top is more than worth the two seconds of effort.
Items: 1. toaster ovens vs. other small appliances 2. best uses for eggplant pickles 3. favorite pizza toppings. Discuss!

27 August 2013
Fresh corn and egg breakfast tacos with homemade carrot pickles
The breakfast taco is one of the finest things in life. This one is full of fresh summer corn, which I for one am cramming into my mouth as quickly and copiously as possible. Who doesn't want a cob's worth of corn piled into a taco and slathered with hot sauce? I certainly do.
I also took full advantage of my mixed carrot pickle stash for extra garnish action. Taqueria-style garnish in the comfort of your own home is so great, you guys.
Speaking of taqueria pickles, this weekend, while we were at Lake Tahoe for a family wedding, John and I ate at a little taqueria (Tacos Jalisco in Kings Beach) with huge vats of the most excellent pickles! There was a carrot pickle with HUGE chunks of carrot, and a cucumber and white onion pickle with chopped medium-hot pepper, and they were so good. I think a taqueria-style cucumber pickle experiment is in order sometime soon.
Fresh corn and egg breakfast tacos with homemade carrot pickles
butter
half an onion
several cloves of garlic
hot peppers to taste
2 ears corn
4 eggs
cumin, oregano, salt, pepper
lots of corn tortillas
mixed carrot pickles
greens or shredded cabbage to garnish
hot sauce of your choice
Saute chopped onion in butter to soften. Add smashed & minced garlic and as much hot pepper as you desire. I used a jalapeno out of our garden, for double trouble. (Speaking of jalapenos, our crop may be making a pickle or hot sauce appearance sometime soon...maybe in a batch of Sue's green tabasco?)
Continue to cook while you husk an ear or two of corn and slice the kernels off the cobs. As I've mentioned before, I find it easiest to just lay the ear down horizontally and cut down the side, then rotate and repeat. I should probably get some pictures of that one of these days.
Add your corn to your pan of veg. Cook, stirring occasionally, for a few minutes. While you're waiting for the corn to cook, crack your eggs into a bowl, season them with cumin, oregano, salt, and pepper, and mix well with a fork.
Add your eggs to the pan and scramble everything together. Cook until the eggs are done to your liking.
Shovel your finished eggs into a bunch of corn tortillas charred briefly on both sides over the gas flame. If you don't have a gas stove, it's fine to warm them in a pan. Top your tacos with carrot pickles, greens, and hot sauce. If you want any other add-ons, like avocado or cilantro, go for it.
Fold your tacos up and eat them with alacrity. Cafe con leche is the best accompaniment.
What are your favorite fillings for breakfast tacos?
Labels:
cheap,
dairy,
easy,
eggs,
fast,
recipes,
vegetables,
vegetarian
19 August 2013
Yukon gold oven fries
Are you ready to turn on the oven yet? I am. Of course, this may have something to do with living in Northern California, where it was actually grey all morning a few days ago. Grey skies!! They're so rare I can't help but get excited. Today we're back to standard super-blue skies and glaring sun, but in the interim, I turned on the oven and baked up some of the best snacks on the planet: Yukon gold oven fries.
Deep frying is not a normal practice at our house, so baking has been my french fry method of choice for quite awhile. The results are a bit more like roasted potatoes in convenient baton form than crusty coated fries, but I'm okay with that. It's a super easy and tasty method, and that's all I need.
Yukon gold oven fries
Yukon gold potatoes
olive oil or your choice of sub
red pepper flake
mustard powder
salt, pepper
Preheat your oven to 425F.
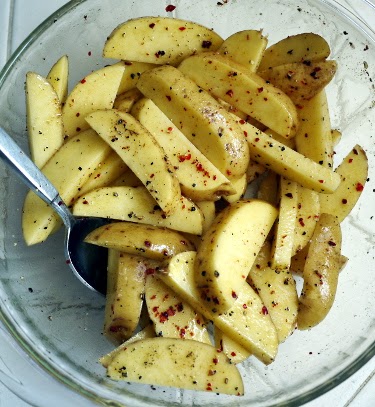
Scrub your potatoes well, removing any eyes. Cut then into appropriate steak fry batons. I don't peel my potatoes for fries, but you can feel free to do so. Personally, I think the skins give the fries a bit more structure, and they're certainly delicious. Besides, you can't beat the laziness factor.
Put your potatoes in a mixing bowl and toss them with a few teaspoons of oil and seasoning to taste. I like to use lots of black pepper, several good shakes of salt and red pepper flakes, and just a little ground mustard, but feel free to go as spicy as you like.
Arrange your fries in one layer on a baking sheet of your choice. These guys can stick, so if you have parchment paper or a silpat, you may want to break them out for this. I used tinfoil because we were out of parchment, but it's an inferior substitute.
Bake for about 20 minutes, or until your fries are golden brown on the bottom and move easily when you shake the pan. Then flip them over and continue baking until cooked through. The timing is going to depend on the thickness of your fries. I believe mine took about 35 minutes total.
Eat immediately with ketchup and the burger or sandwich of your choice. You definitely want a dill pickle spear on the side too.
John and I had our fries with a couple of good good things' bbq pinto bean burgers, which we made in a huge batch and froze for instant dinner application a couple weeks ago. That was a Very Good Idea, let's just say. Note Emmycooks' amazing pickled peppers and giant slice of homegrown tomato as well. Together, it was one of the best late summer dinners I could possibly ask for.
Are you guys ready to turn on the oven, or are you still happily submerged in a pile of raw veg and fruit?
Labels:
cheap,
easy,
potato,
recipes,
snacks,
vegan,
vegetables,
vegetarian
15 August 2013
Chickpea carrot salad with fresh parsley
It's August! Let's have a salad!
This guy is super simple, delicious, and fast. It's the perfect thing to eat when you can't stand the thought of turning on any appliance in your kitchen. (Okay, refrigerator excepted.)
The key to making a bean or legume-heavy salad appetizing is to add lots of vivid vegetable and herb flavors. Carrot is a perfect contrast to chickpeas: bright, sweet, and crunchy.
I used parsley for my main herb component, and boosted it even more with a super-herby dressing. Chopping a bunch of mixed green herbs and adding them to either the salad itself or a standard vinaigrette would work really well too. Or you can choose to go for a different herb entirely. Dill and carrot are excellent friends; basil would work well too.
The best part? You can make this salad the night before, and the flavors will be even better the next day. Instant lunch for the win!
Chickpea carrot parsley salad
1 can/2 cups cooked chickpeas
3 carrots
1-2 cloves garlic or half a shallot
handful of parsley
lemon juice to taste
salt, pepper
herb vinaigrette or other vinaigrette of your choice
Drain and rinse your chickpeas. Shred your carrots with a box grater. Mince your garlic or shallot and finely chop your parsley leaves.
Add all your ingredients to a large bowl, season with a squeeze of lemon juice and some salt and pepper, and dress with vinaigrette. Toss everything together and taste for seasoning.
If possible, let your salad rest in the refrigerator for several hours before eating.
This salad can go into a split pita with some chopped lettuce for a quick lunch. If you're not a sandwich person, you can transform it into a full meal salad by adding a big scoop to a plate of greens and your choice of chopped veg. It's a simple side for your choice of grilled or barbecued main dishes--juicy lamb would be an especially great combination with chickpea and carrot--and it will travel well to a potluck across town. Perfect!
Which salads are helping you avoid the oven this August?
Labels:
beans,
cheap,
easy,
fast,
pulses,
recipes,
salads,
vegan,
vegetables,
vegetarian
Subscribe to:
Posts (Atom)